Spacelift Intent»
Migrating from /intent/mcp
The previous /intent/mcp endpoint has been unified into a single /mcp endpoint that also exposes the full Spacelift GraphQL API. /intent/mcp remains available until August 1, 2026, after which it will be removed. Update your MCP client to use https://<account-name>.app.spacelift.io/mcp before then.
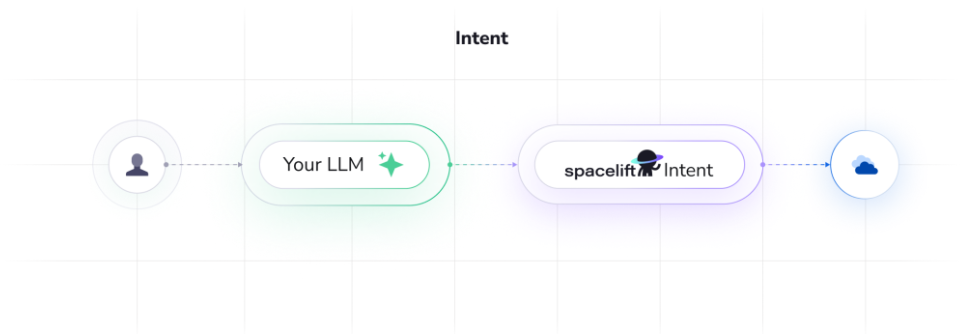
Spacelift Intent lets you provision and manage infrastructure by describing what you need in natural language. Instead of writing Terraform/OpenTofu code, your MCP client (e.g. Claude Code) calls Spacelift Intent, which directly interacts with provider schemas under Spacelift’s guardrails (policies, audit trail, state, permissions).
Key concepts»
- Natural language: Describe your infrastructure needs in natural language; Intent translates it directly into the infrastructure you want.
- Policies: Spacelift enforces governance (OPA/Rego policies) before execution to deny unsafe operations and allow compliant ones.
- State & audit built-in: Centralize state management and view the complete operation history without manual backend configuration.
- Separate policy writing & resource changes: With spaces and our access control features, you can assign precise roles and permissions so authors and operators stay clearly separated.
High-level architecture»
Spacelift Intent connects your AI client to your cloud infrastructure through a secure, policy-governed pipeline:
- MCP Client (Claude Code, ChatGPT, VS Code, etc.): You describe infrastructure in natural language.
- Spacelift MCP Server (the
/mcpendpoint): Translates requests into provider operations, discovers Terraform providers from OpenTofu registry, learns resource schemas. The same endpoint also exposes the full Spacelift GraphQL API for general-purpose automation. - Spacelift Control Plane: Enforces policies (OPA/Rego), manages state, records audit history, handles cloud authentication, provides resource visibility.
- Cloud Providers (AWS, etc.): Executes approved operations via cloud integrations with scoped permissions.
Key flow»
- You send a natural language prompt describing infrastructure changes.
- Intent interprets the request, discovers relevant Terraform providers from the OpenTofu registry, and learns their schemas to plan operations.
- Attached policies then evaluate the plan against governance rules, allowing or denying based on resource types, operations, or attributes.
- If approved, Intent executes changes via cloud integrations with scoped credentials.
- State updates automatically and full operation history is recorded for audit and rollback.
Supported clients & endpoint»
- MCP server URL:
https://<account-name>.app.spacelift.io/mcp - Tested clients: Claude Code, Claude Desktop (custom connectors), Gemini, Codex, VS Code, Cursor
Prerequisites»
- Claude Code or similar client.
- Spacelift account with access to Intent
- for Early Access, we require
rootspace admin access
- for Early Access, we require
- (Optional for AWS tests) An AWS account
- AWS integration configured in Spacelift if you plan to create AWS resources
Set up Spacelift Intent»
📽️ Quick demo of Spacelift Intent with Claude Code below.

Step 1. Add Intent MCP server to MCP Client»
You can add the MCP server via command-line interface (CLI) or by editing your config file.
CLI:
1 | |
Config file (.mcp.json at repo root):
1 2 3 4 5 6 7 8 | |
You can add the MCP server via command-line interface (CLI) or by editing your config file.
CLI:
1 | |
Config file (.gemini/settings.json at repo root):
1 2 3 4 5 6 7 | |
You can add the MCP server by editing your config file.
Config file (~/.codex/config.toml):
1 2 3 4 5 6 7 8 | |
Once configured run codex mcp login spacelift to authenticate.
You can add the MCP server by editing the workspace config file.
Config file (.vscode/mcp.json at repo root):
1 2 3 4 5 6 7 8 | |
Alternatively, open VS Code Command Palette and run MCP: Add Server to add the server to your user profile for global access.
You can add the MCP server by editing the config file.
Config file (~/.cursor/mcp.json for global, or .cursor/mcp.json at project root):
1 2 3 4 5 6 7 | |
Alternatively, go to Cursor Settings > MCP to add the server.
Step 2. Authenticate via MCP»
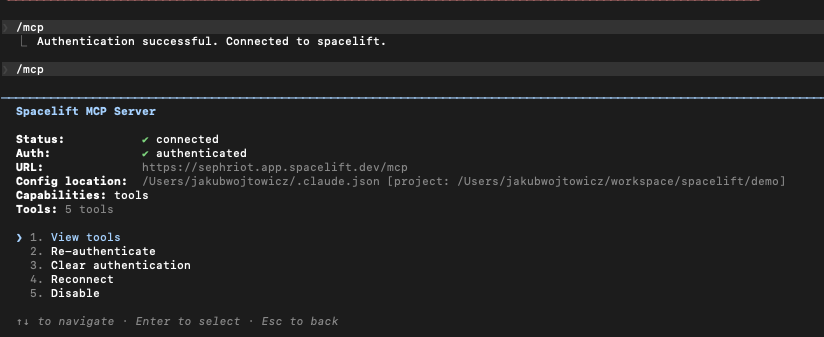
- Start your MCP client, e.g. Claude Code.
- Run the
/mcpcommand and open the Spacelift MCP Server entry — status shows needs authentication.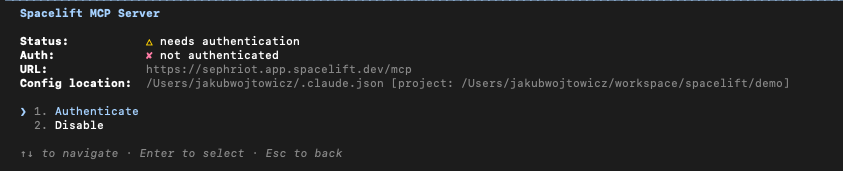
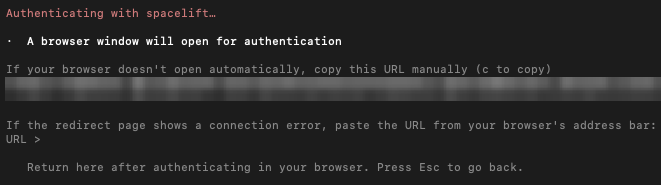
- Select Authenticate. Claude Code prints the OAuth URL and opens it in your browser.
- In the browser, approve the authorization request. Both the
mcp:readandmcp:writescopes are pre-selected — leave both checked for a full-access session, or uncheckmcp:writeto get a read-only session that cannot mutate Spacelift or your cloud.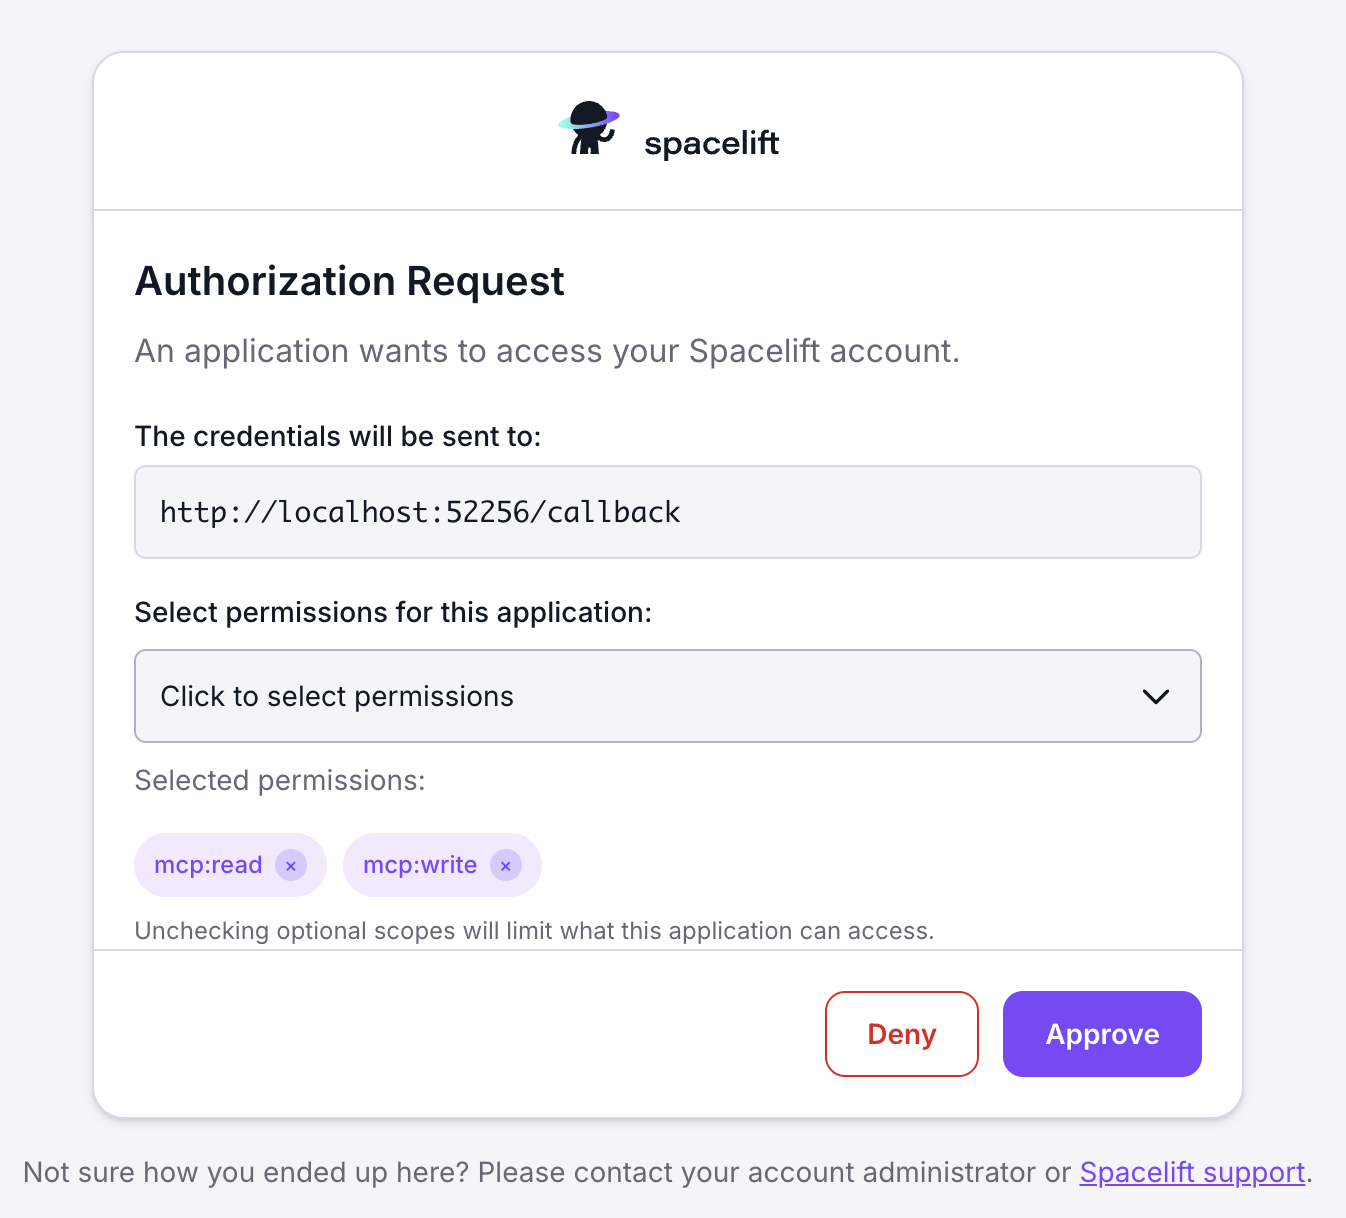
-
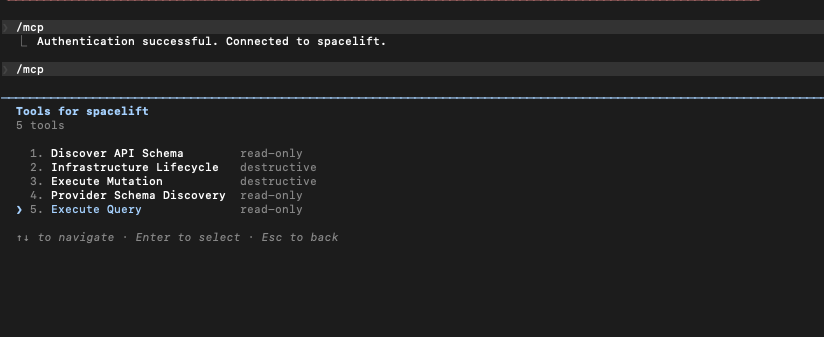
Back in Claude Code, the server now shows connected and exposes up to 5 tools, depending on the scopes you granted:
- With
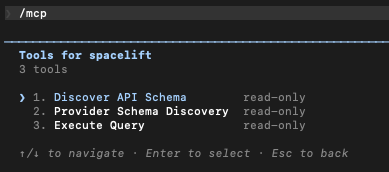
mcp:read+mcp:write(default): 5 tools —discover,query,mutate,provider,intent. - With
mcp:readonly: 3 tools —discover,query,provider(read-only).
- With
Step 3. Create & use an Intent project»
Projects scope your work and policy. You can create and lock a project entirely through natural language.
Create a project via chat prompt»
1 | |
Claude Code will call project-create for you.
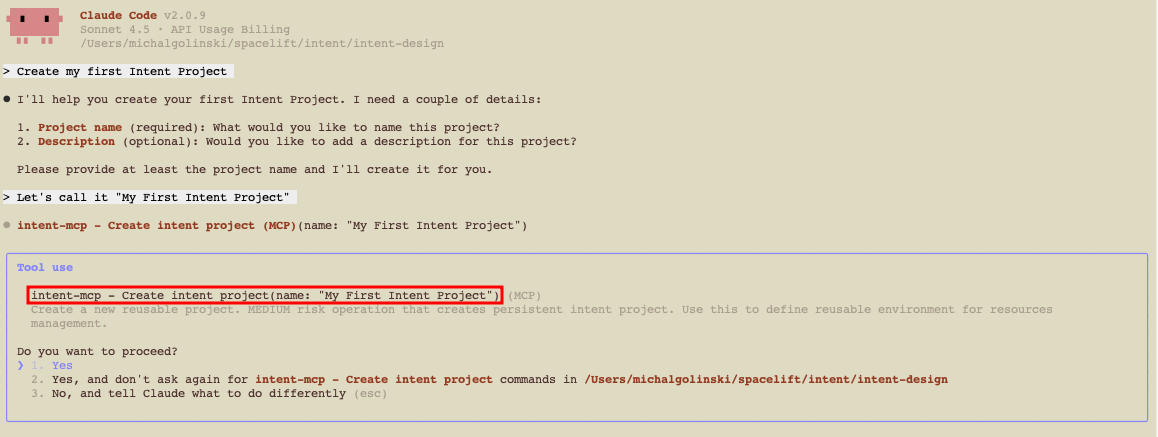
Creating a project via MCP currently places it in the root space. To create it in a different space, use the Spacelift UI.
Use (lock) the project»
Then lock the project for exclusive access:
1 | |
This calls project-use and locks the project to your user.

Locks expire after a short period of inactivity. You can also unlock via UI or API.
Step 4. Create resources (random provider)»
Try something safe first using the random provider:
1 | |
Intent will:
- Discover the provider schema.
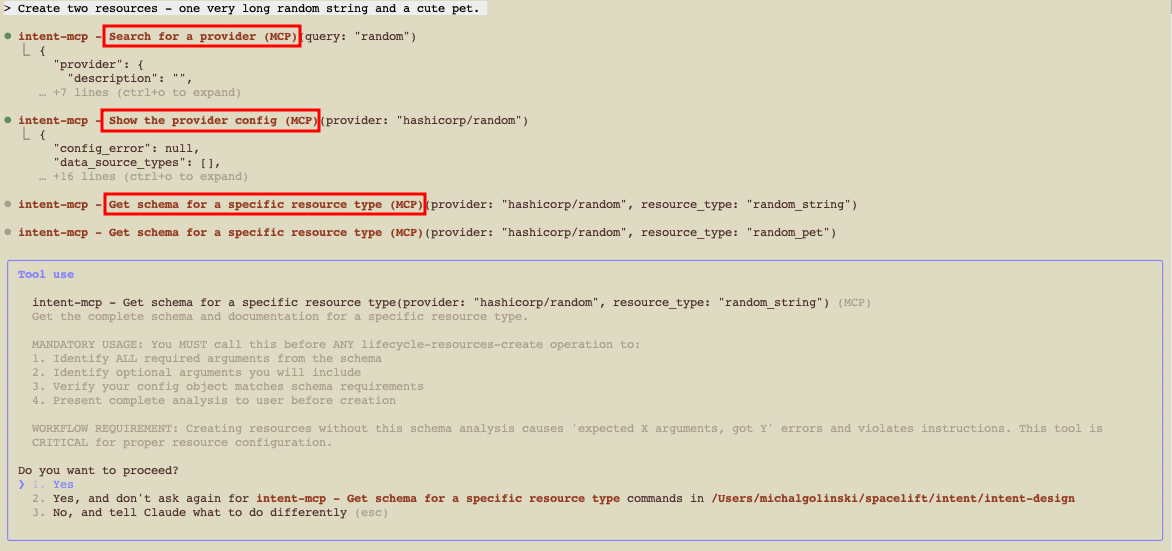
- Propose the operations.
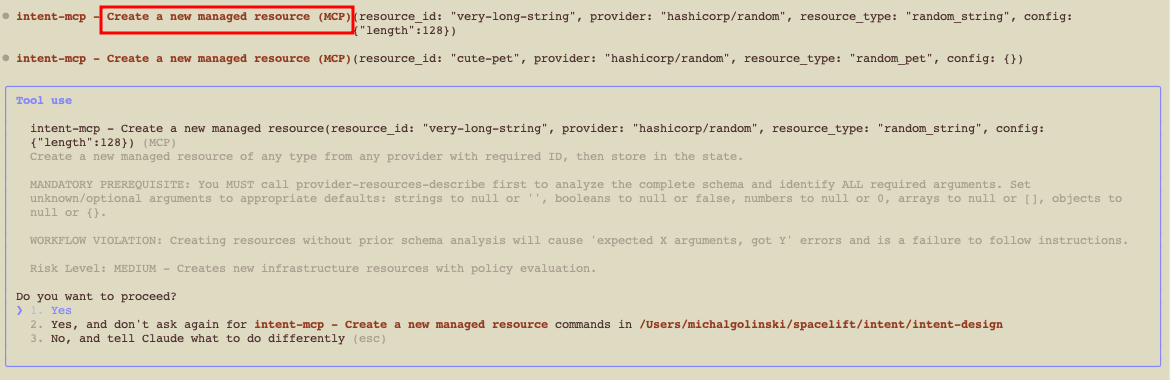
- Apply them under policy.
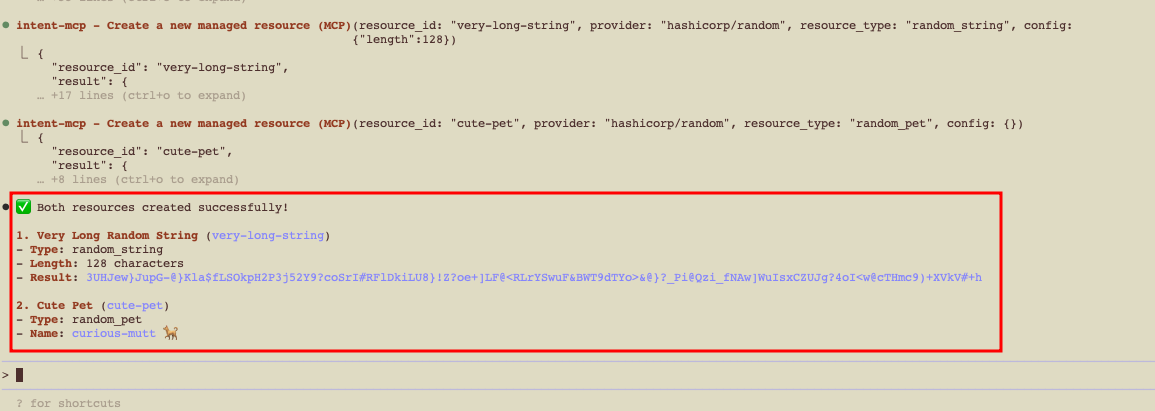
You’ll get a short summary in chat once the resources are created.
Use Spacelift Intent»
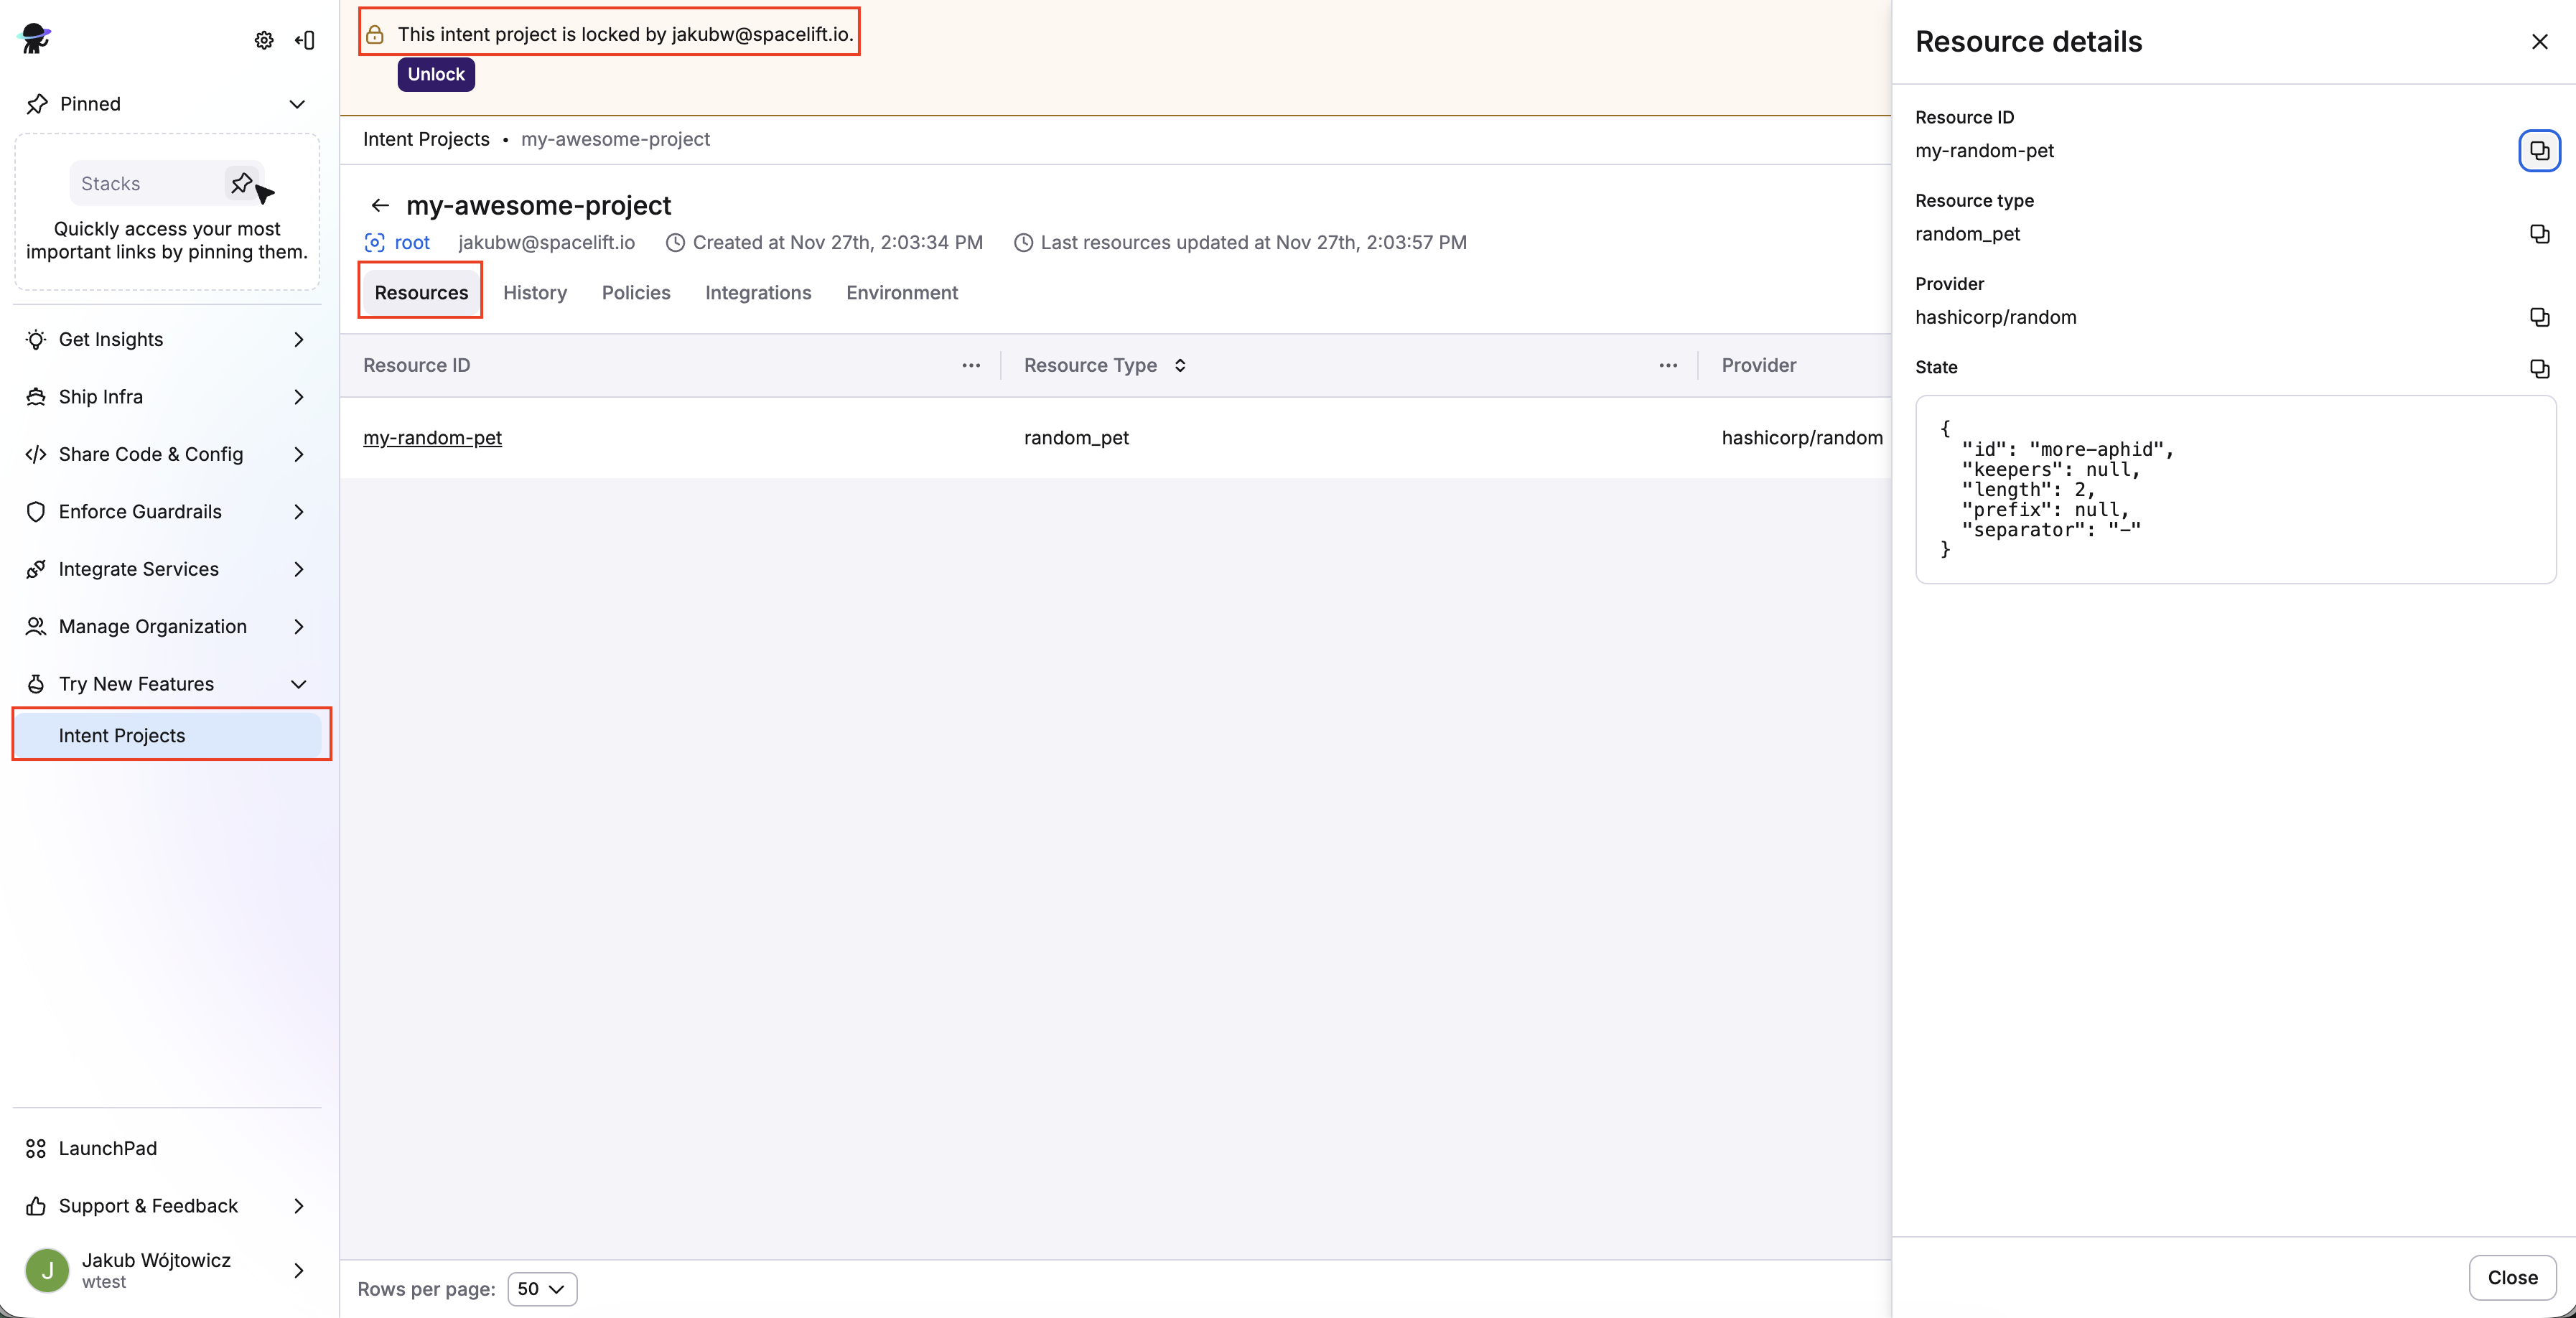
1. Explore the Spacelift Intent UI»
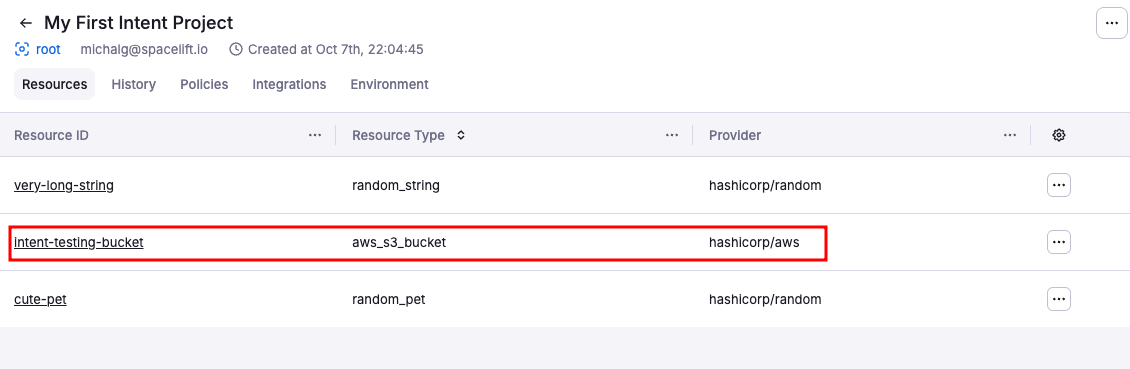
In the Spacelift UI, navigate to Try New Features > Intent Projects. When you click on a project (e.g. my-project), you'll see:
- Resources: Current resources in project.
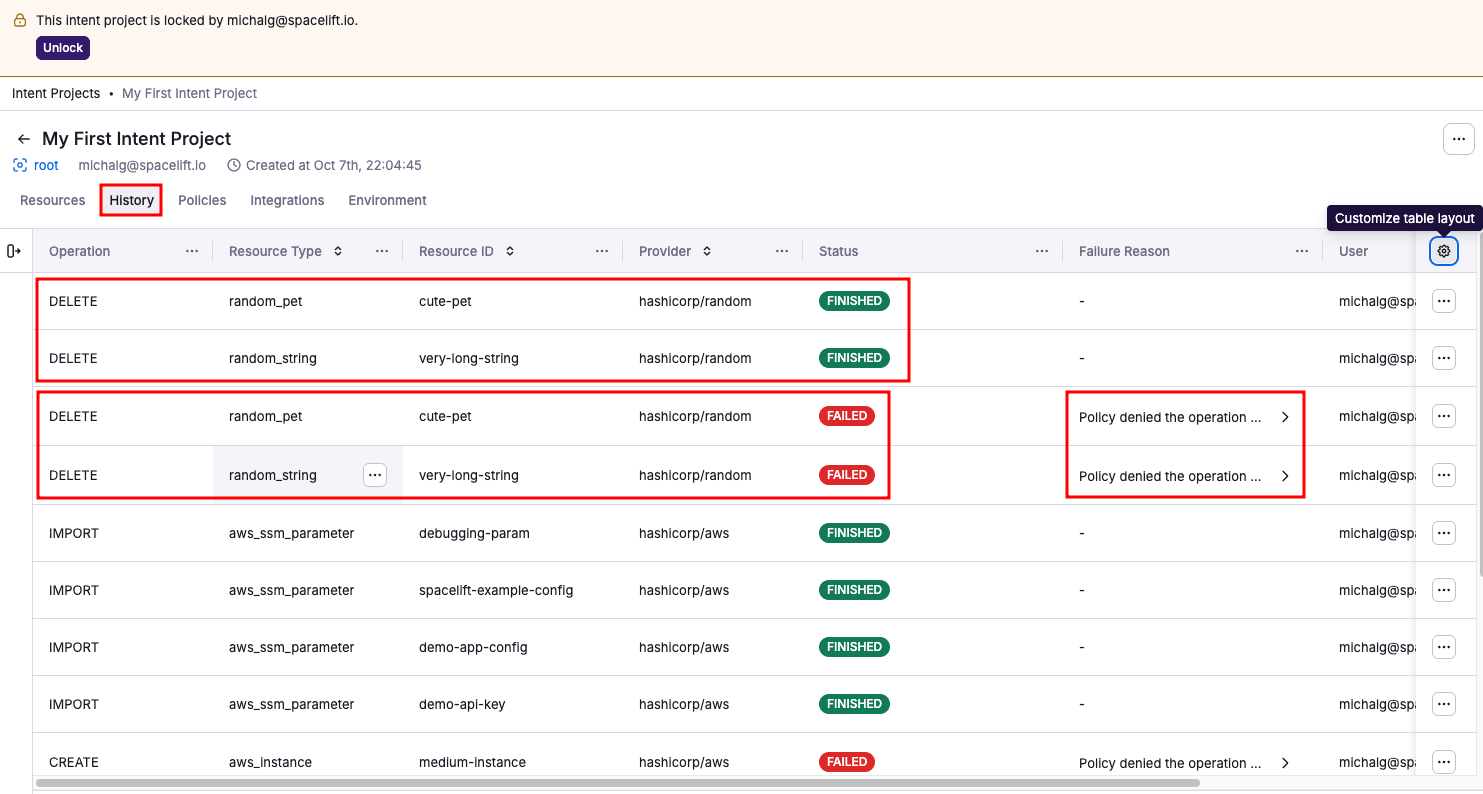
- History: Timeline of operations (create, update, delete, import).
- Policies: Attach Intent policies to govern operations.
- Integrations: Attach cloud accounts (AWS supported today).
- Environments: Environment variables for the project.
You will also see if the project is locked and who locked it.
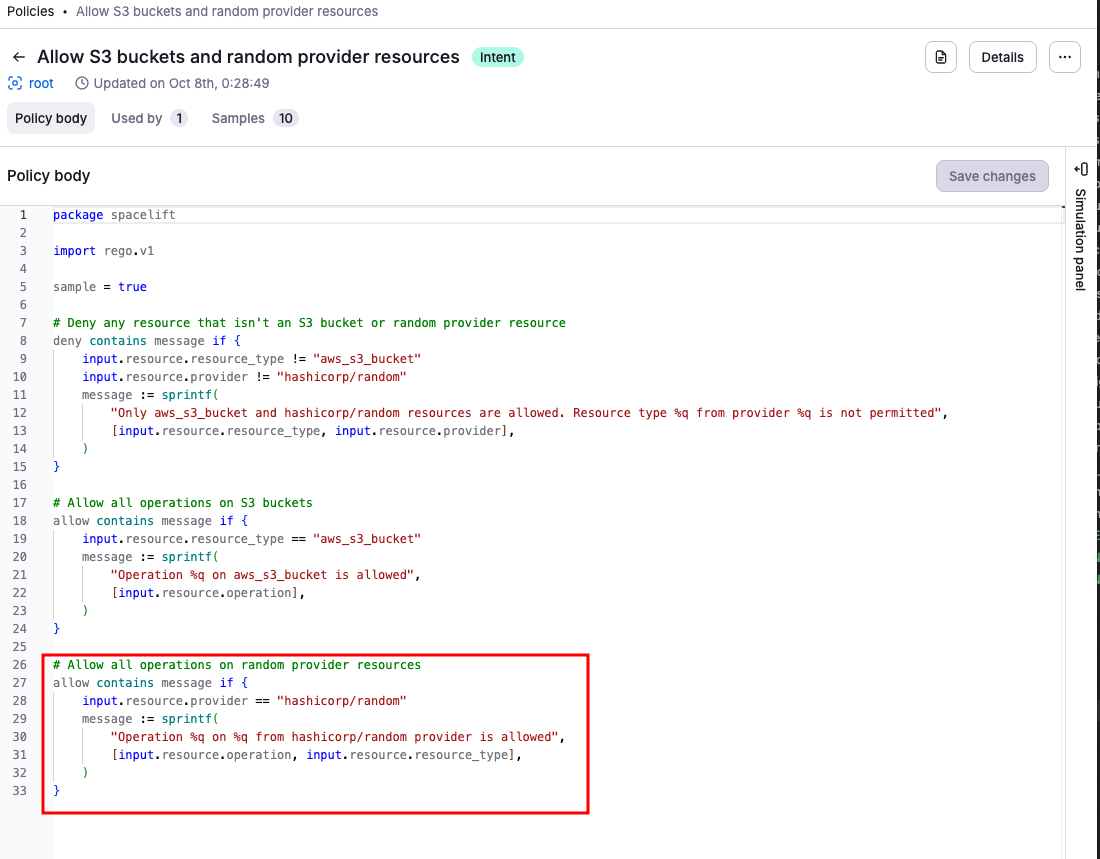
2. Create & attach Intent policy»
Policies are your guardrails.
Create policy»
Create a policy, selecting Intent policy as the policy type, and attach it to your project.
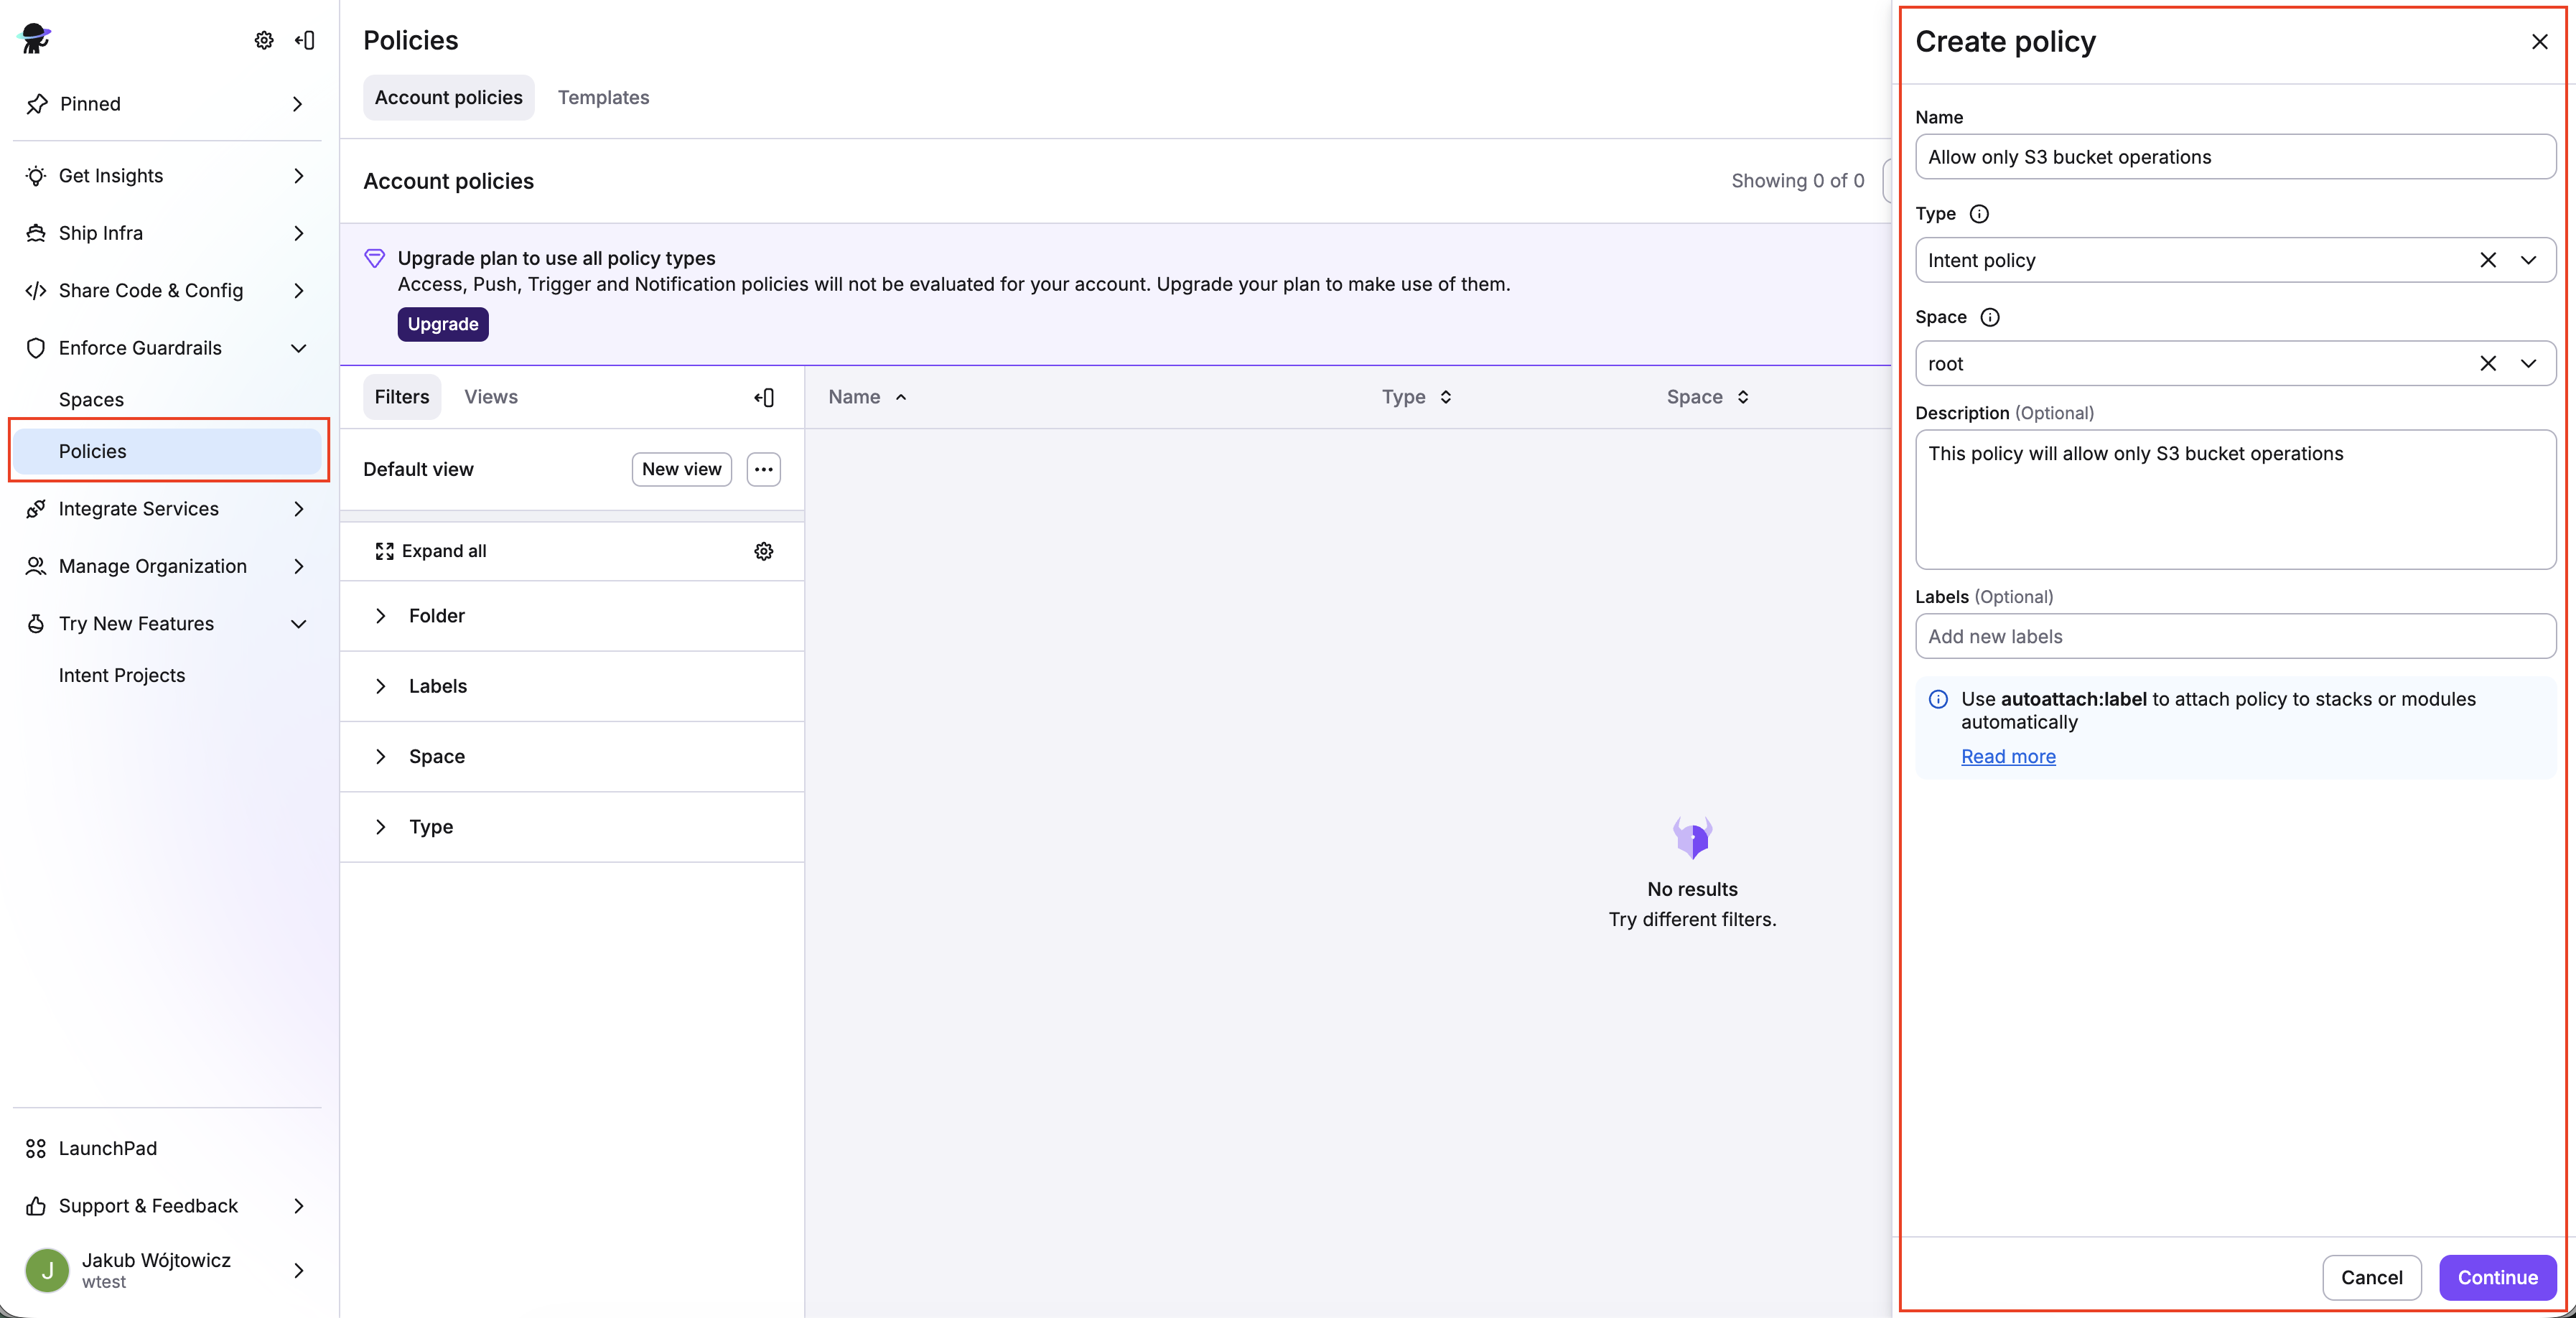
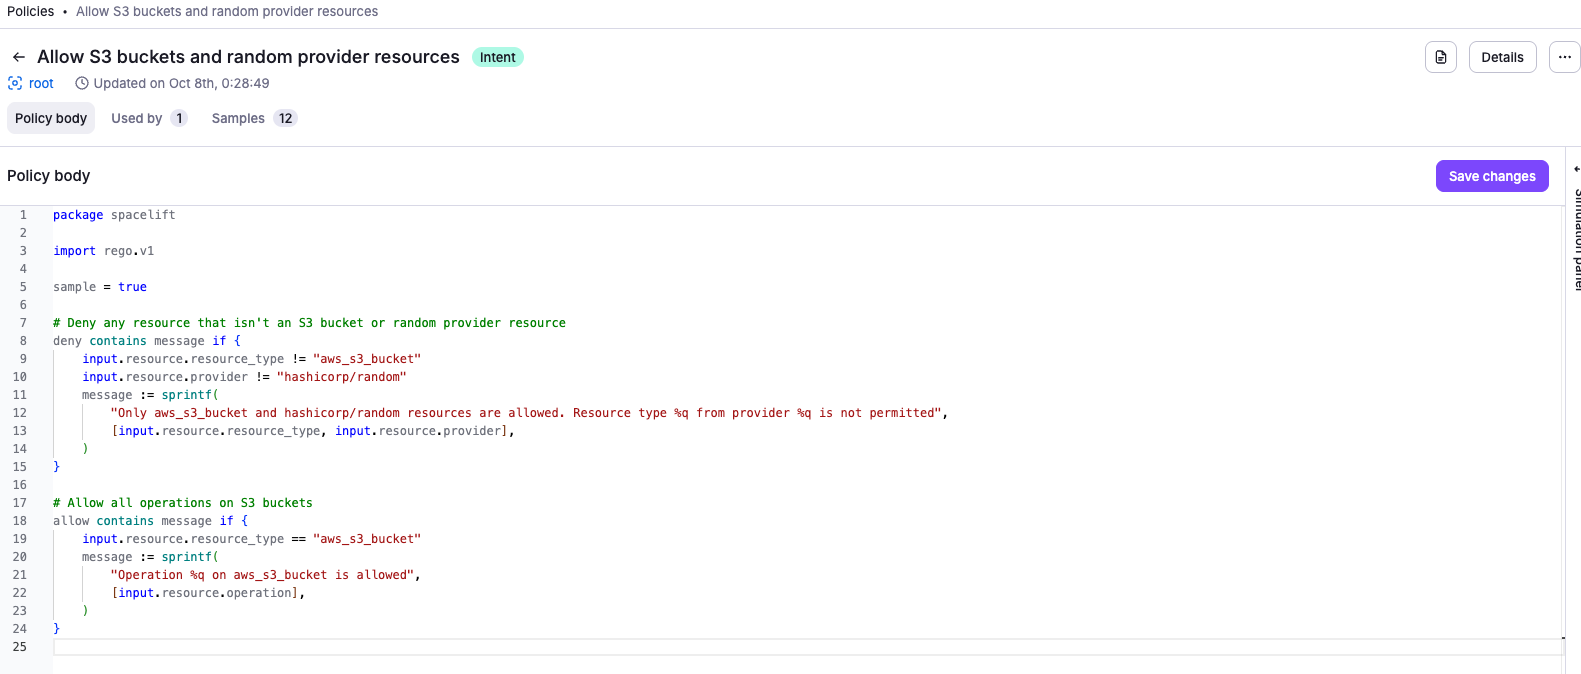
For example, this policy denies any resource that isn't an S3 bucket:
1 2 3 4 5 6 7 8 9 10 11 12 13 14 15 16 17 18 19 20 21 | |
1 2 3 4 5 6 7 8 9 10 11 12 13 14 15 16 17 18 19 20 21 22 23 | |
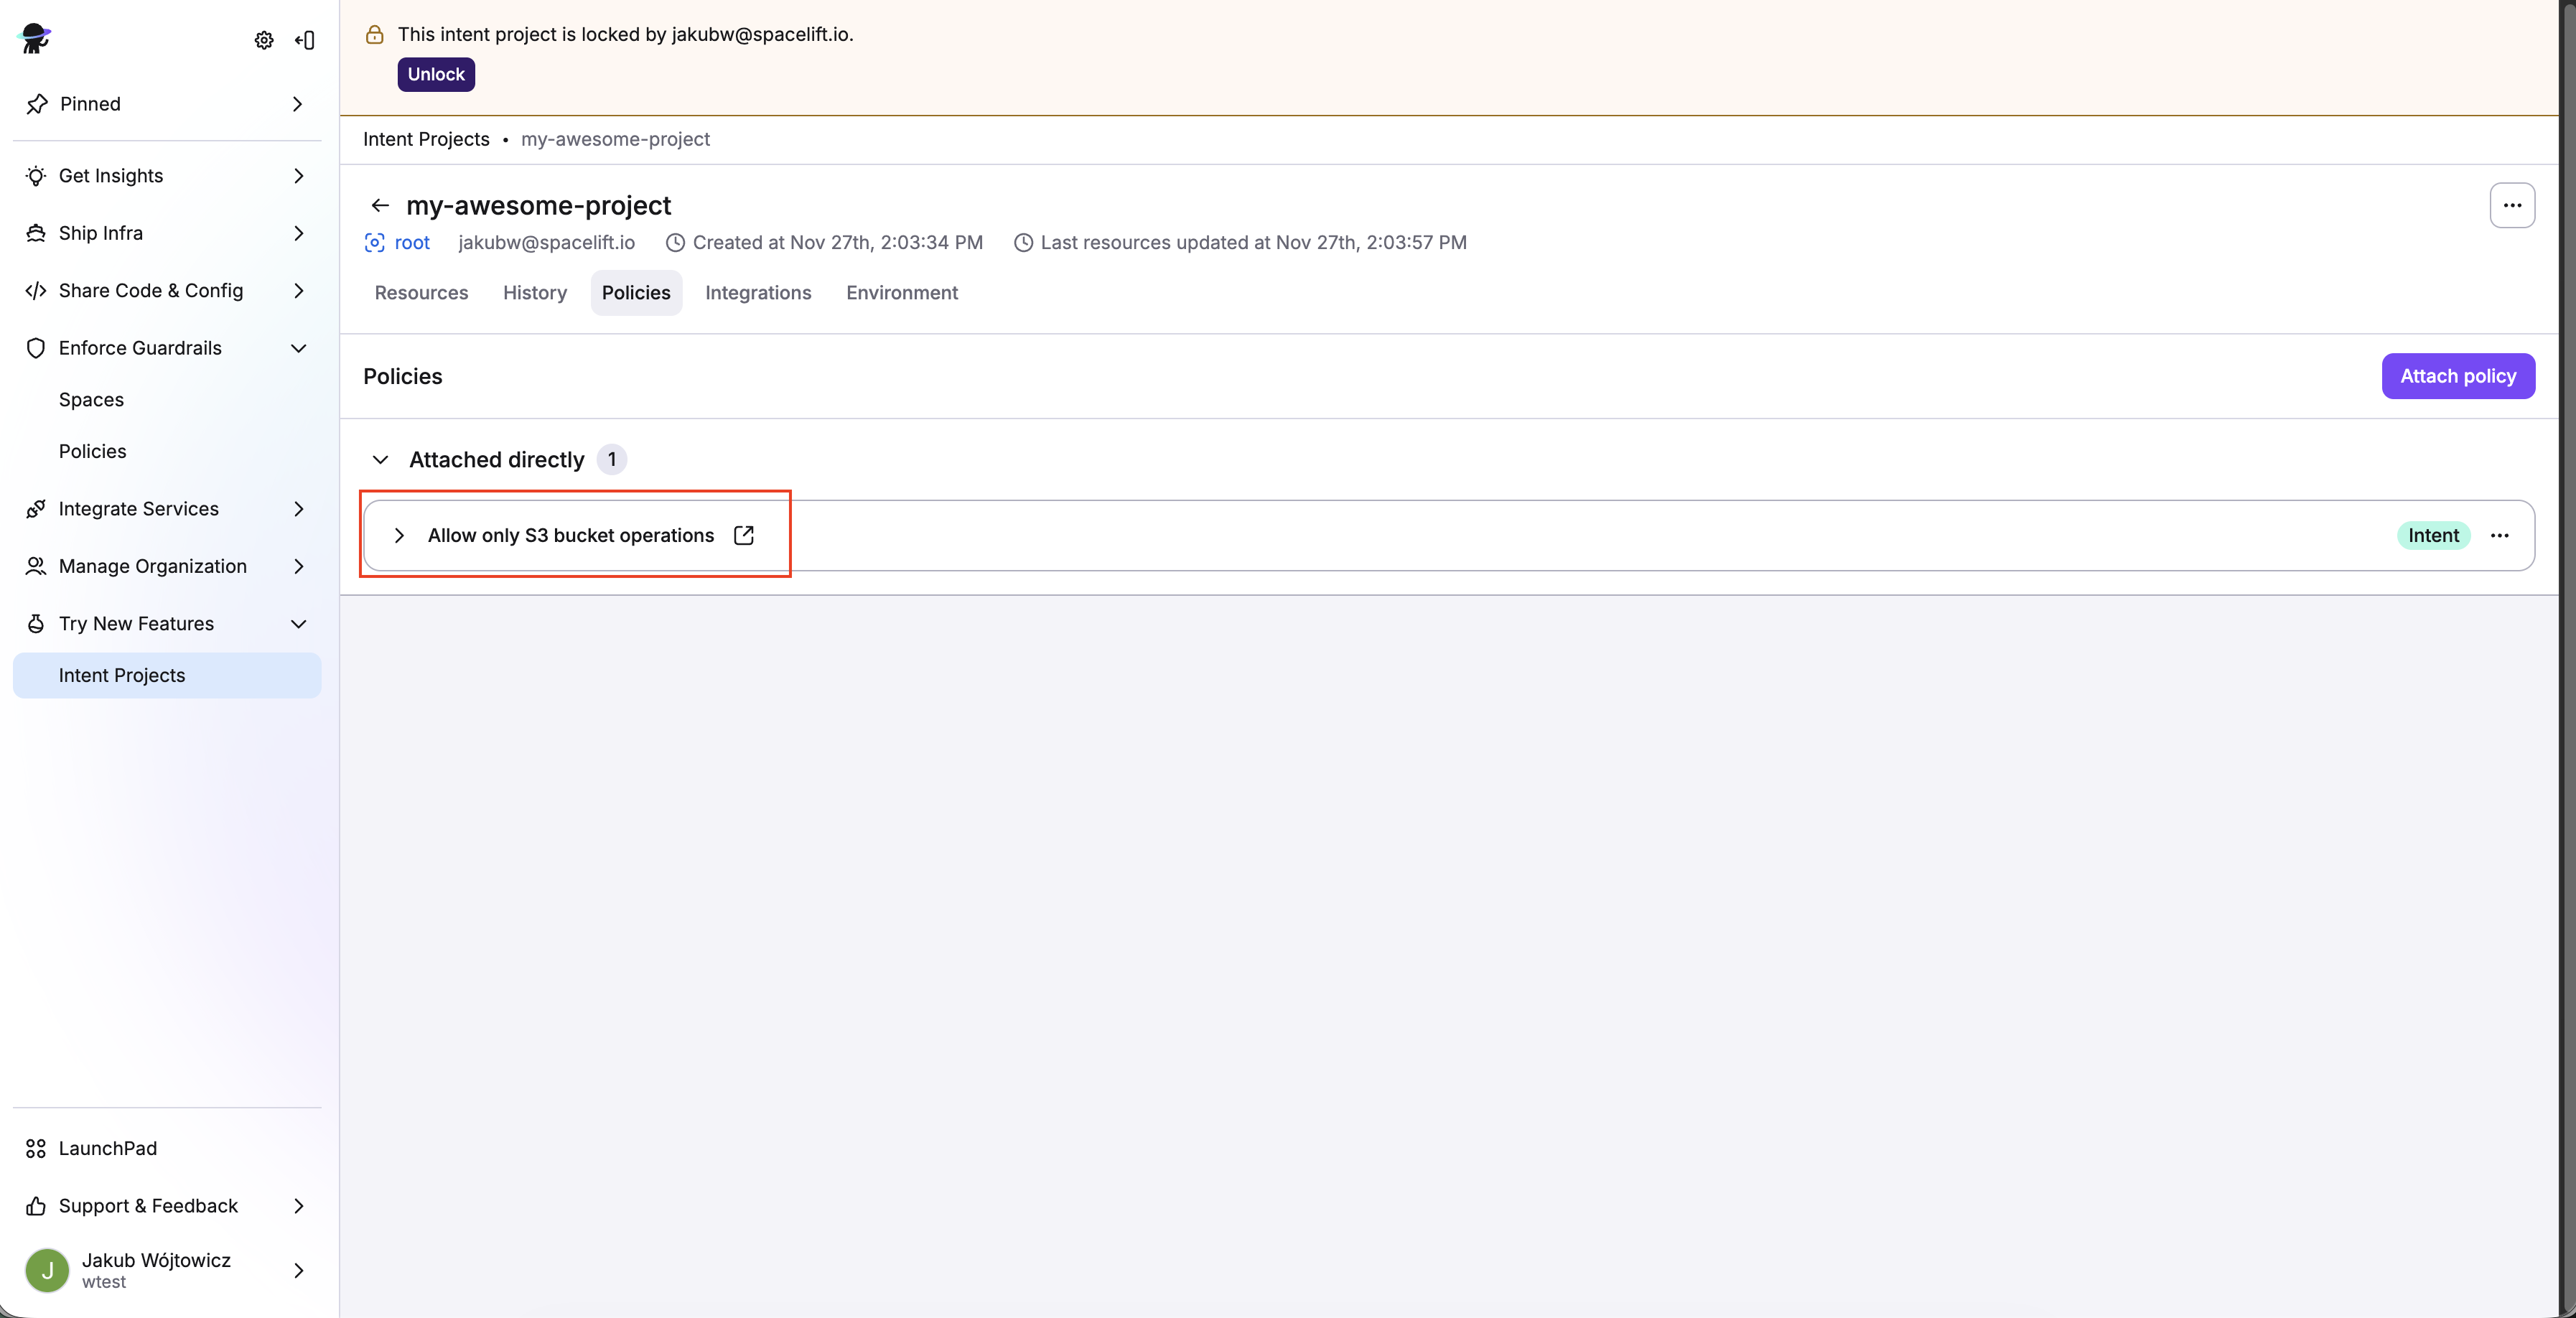
Attach policy»
Once the Intent policy is created, attach it to your project.
- In the Spacelift UI, navigate to Try New Features > Intent Projects and click on your project (e.g.
my-project). - Click the Policies tab, then click Attach policy.
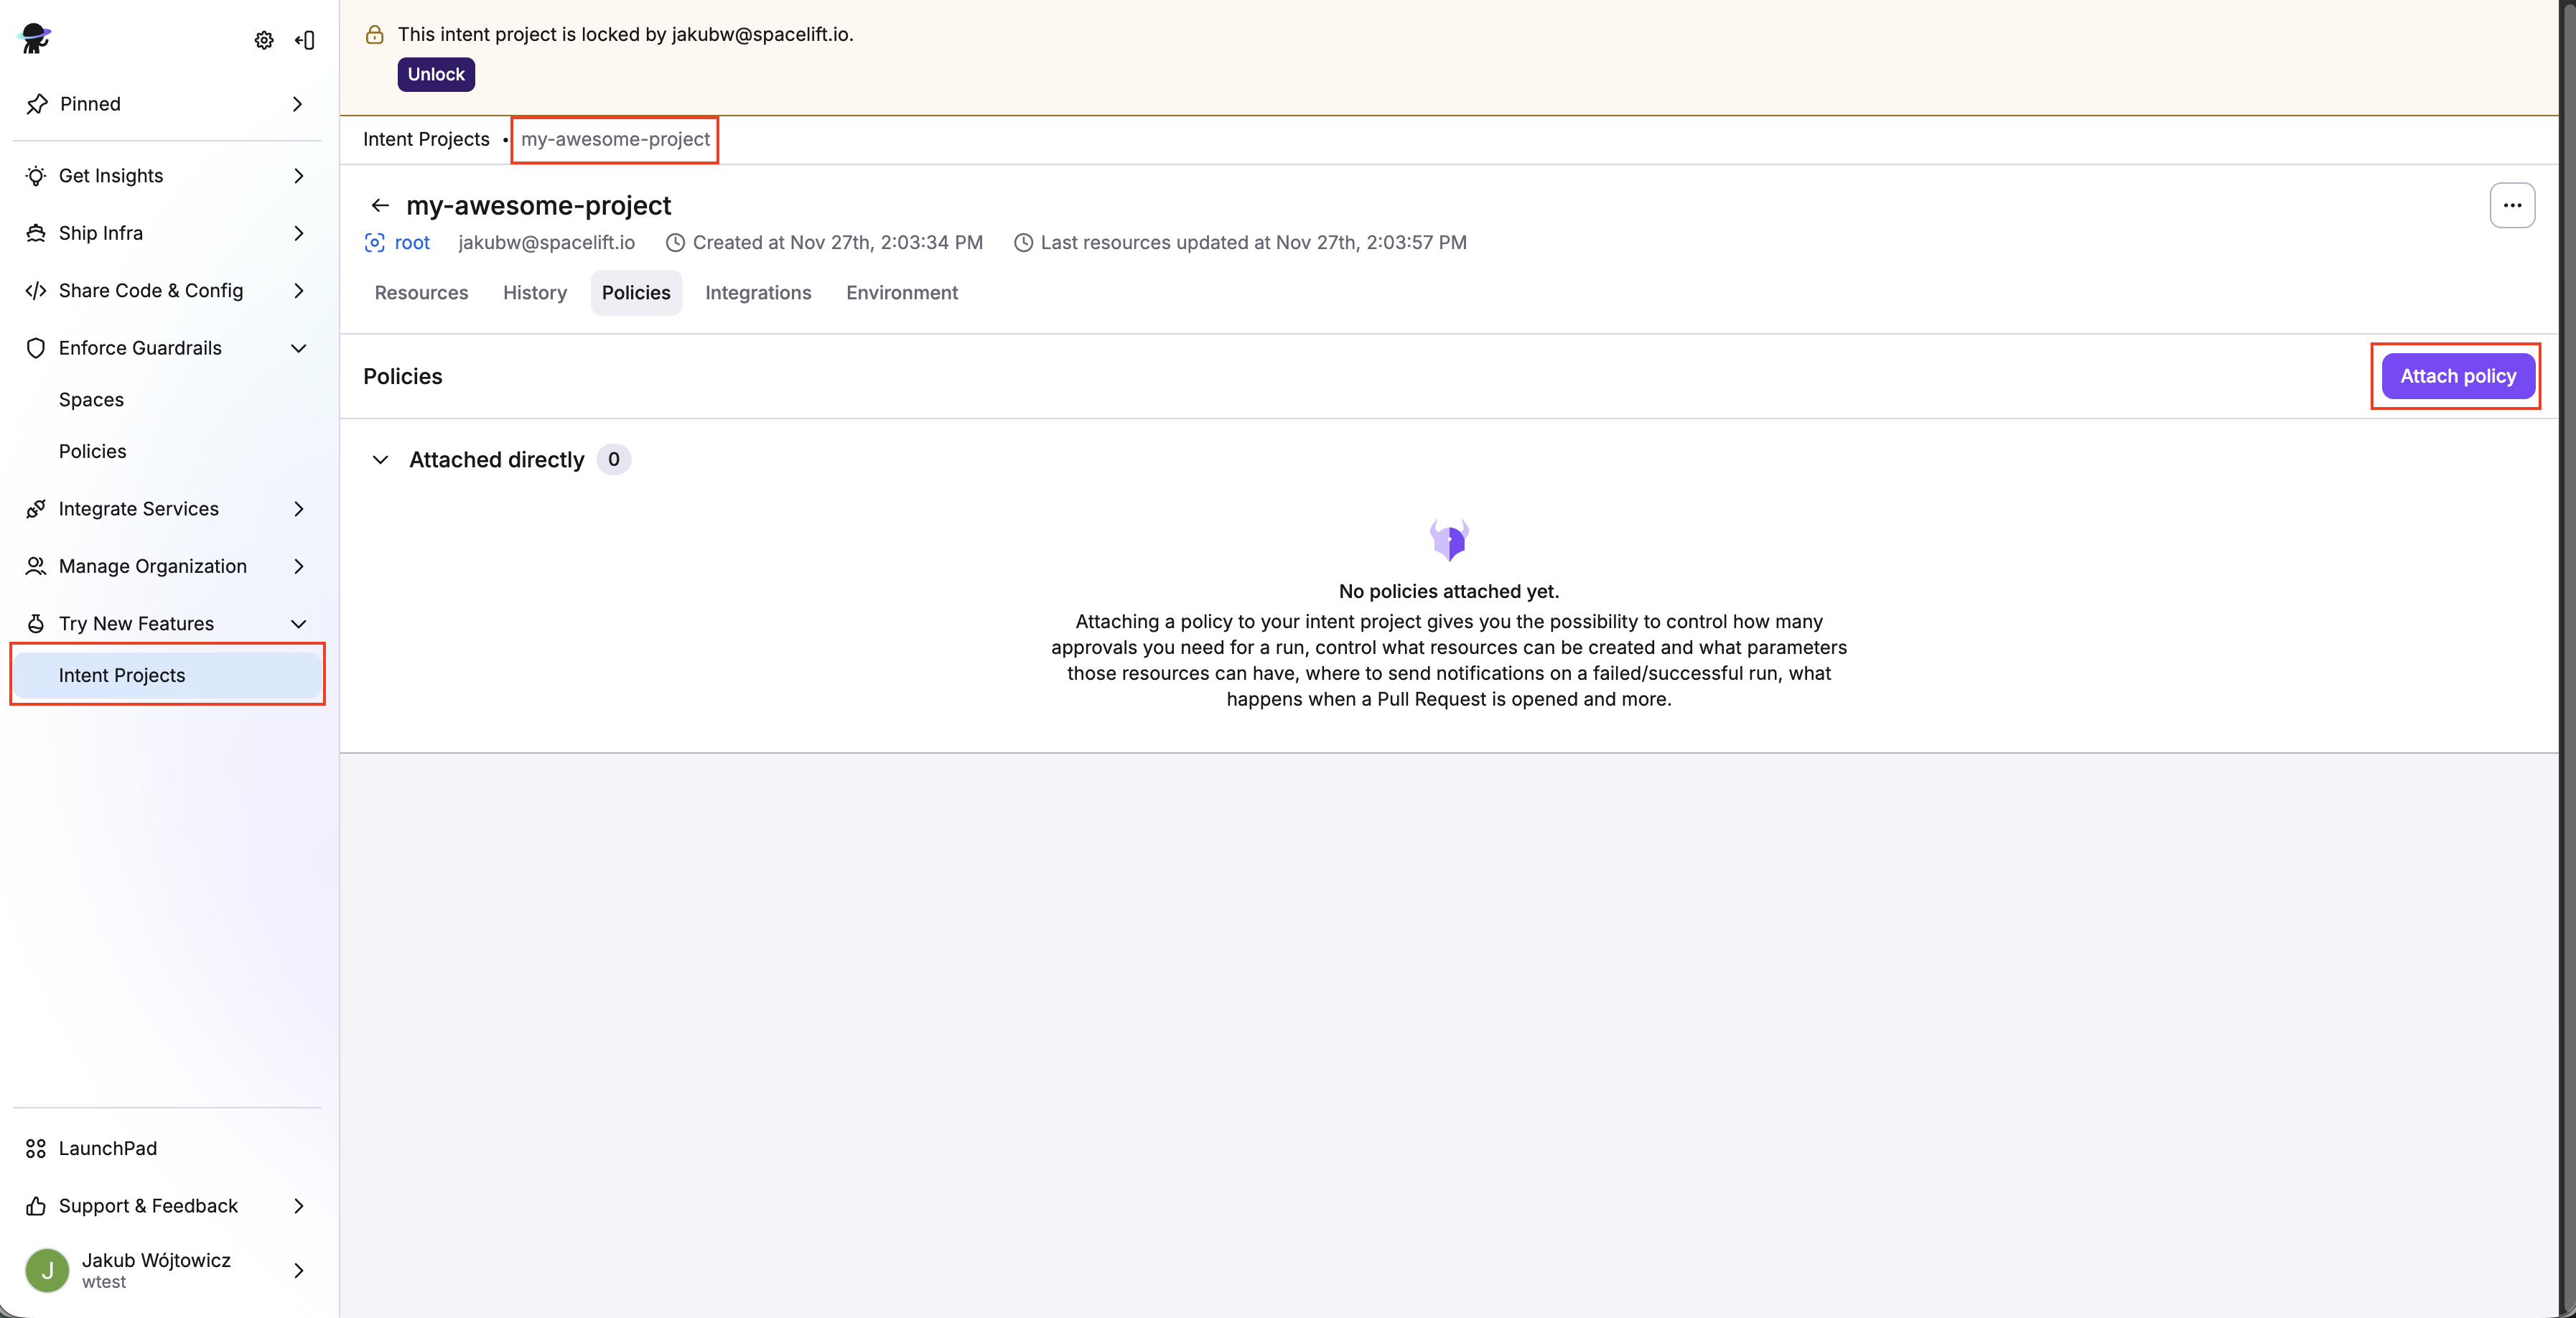
- Select the Intent policy you just created, then click Attach.
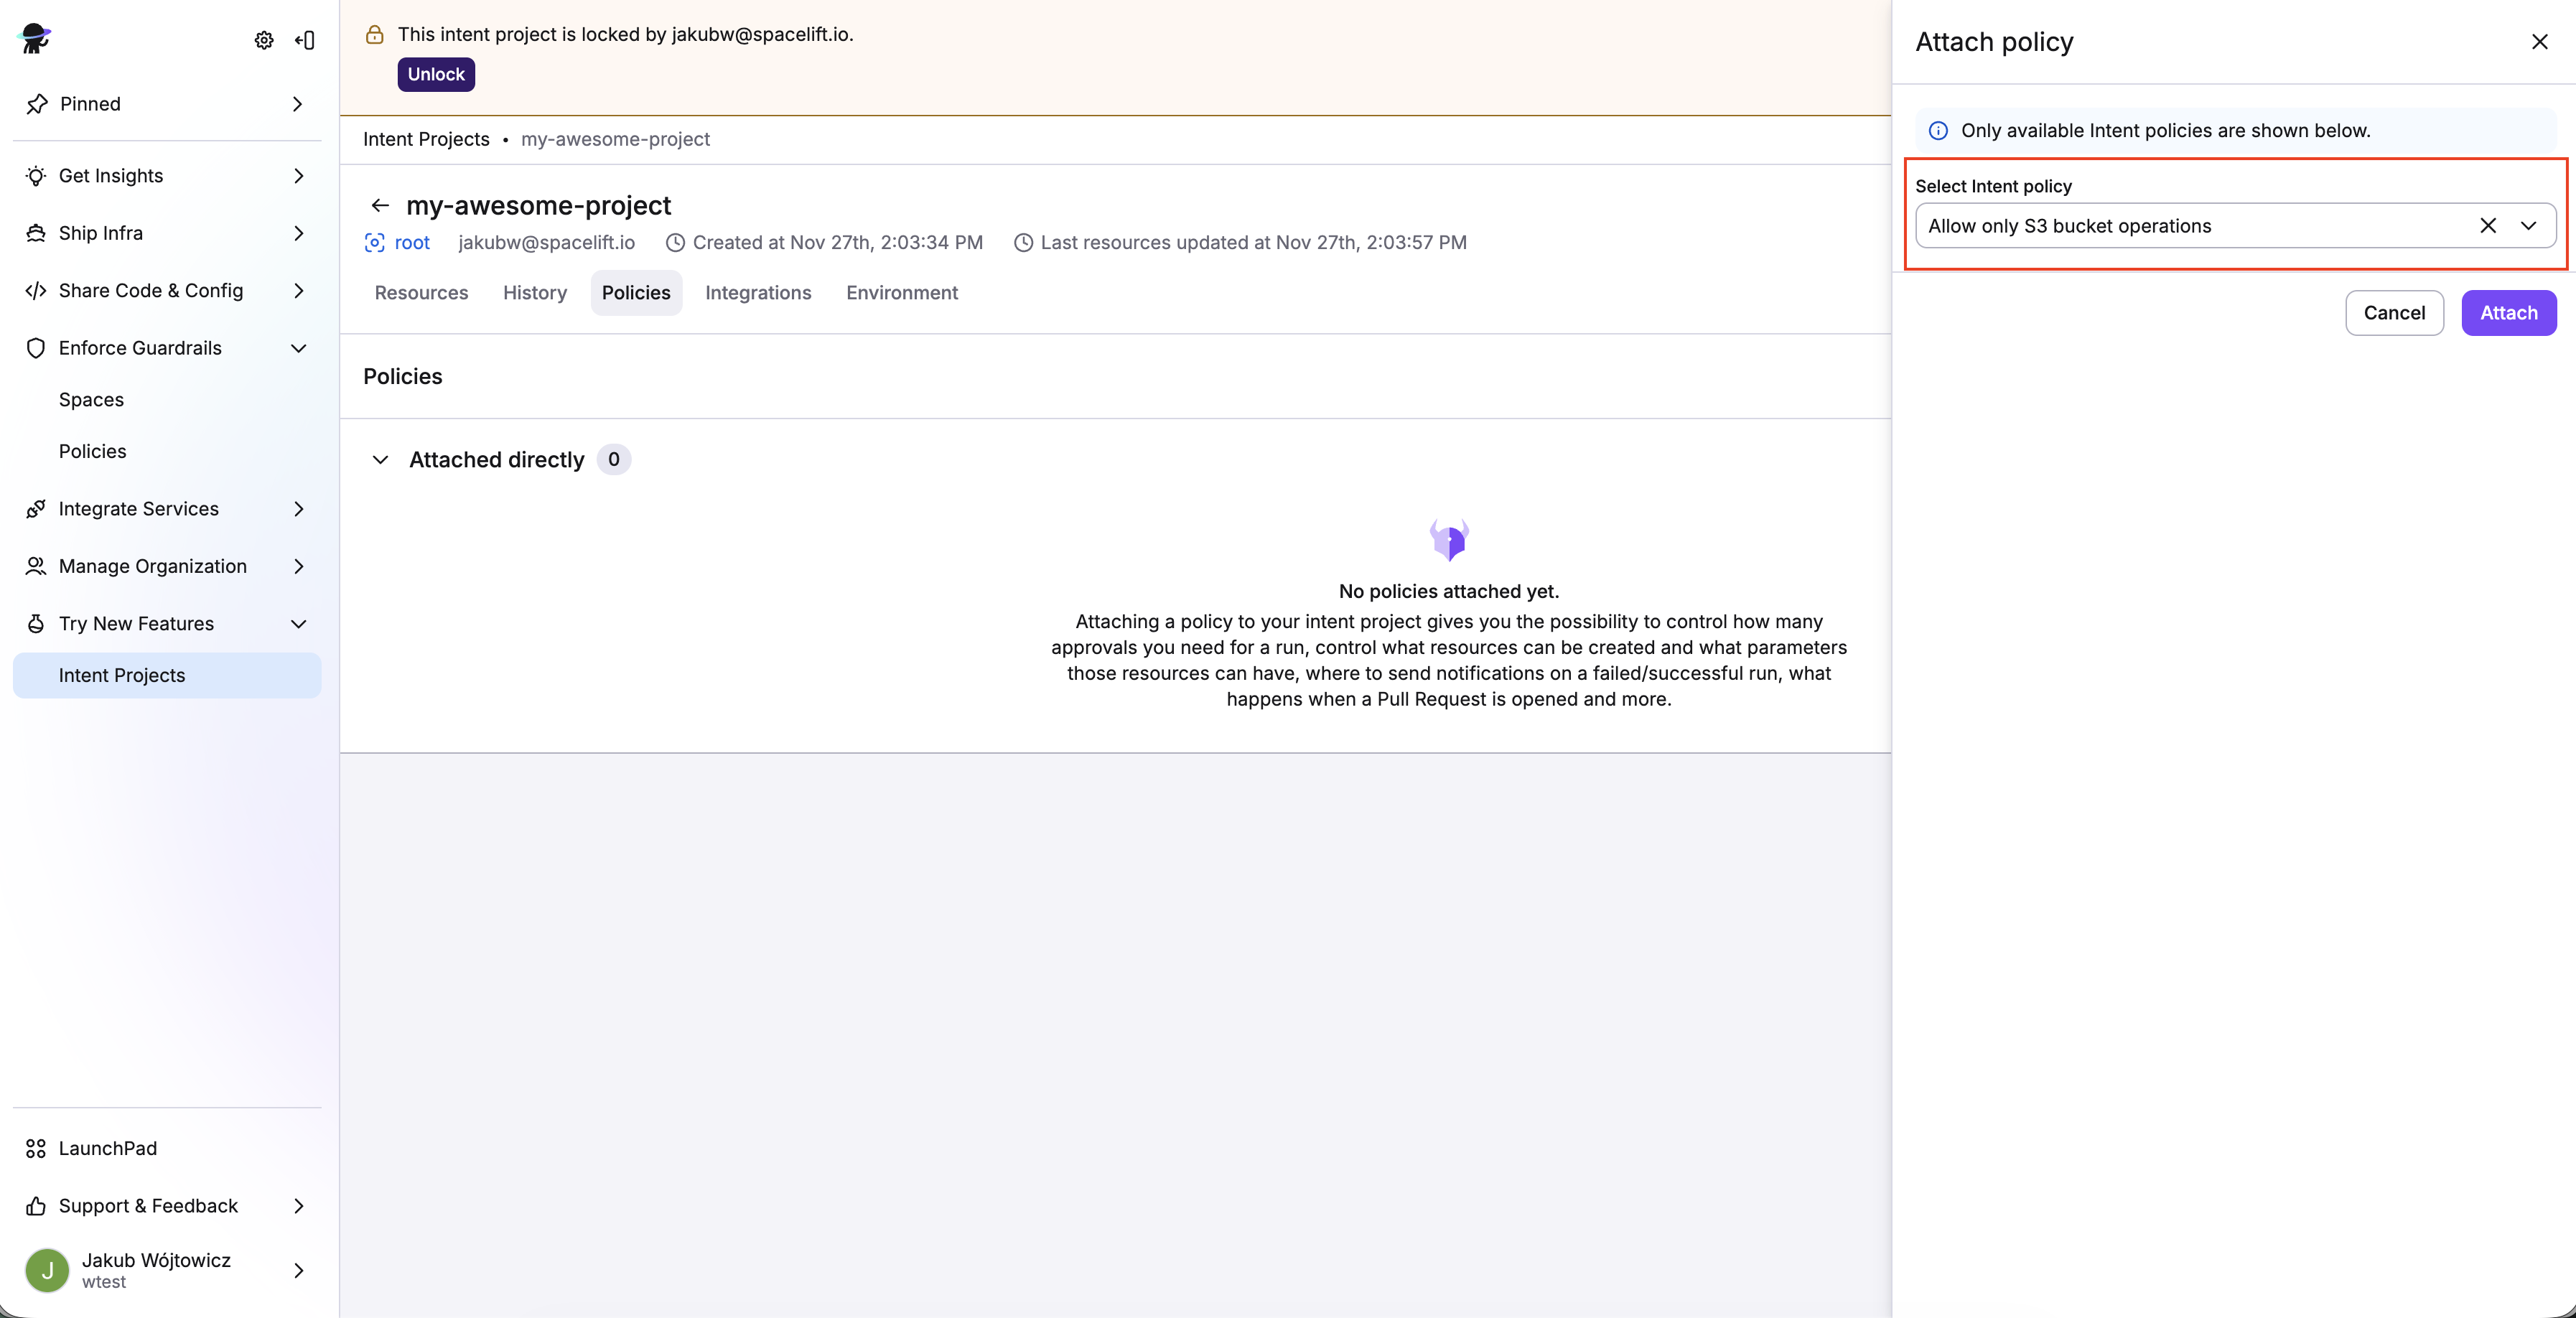
You can view attached policies in your project view on the Policies tab.
3. Attach AWS integration»
Set up your AWS integration, then attach it to your Intent project.
- Click the Integrations tab in your Intent project view.
- Click Attach AWS integration.
- Select an AWS region to use.
- Enable both Read and Write permissions using the sliders, then click Attach.
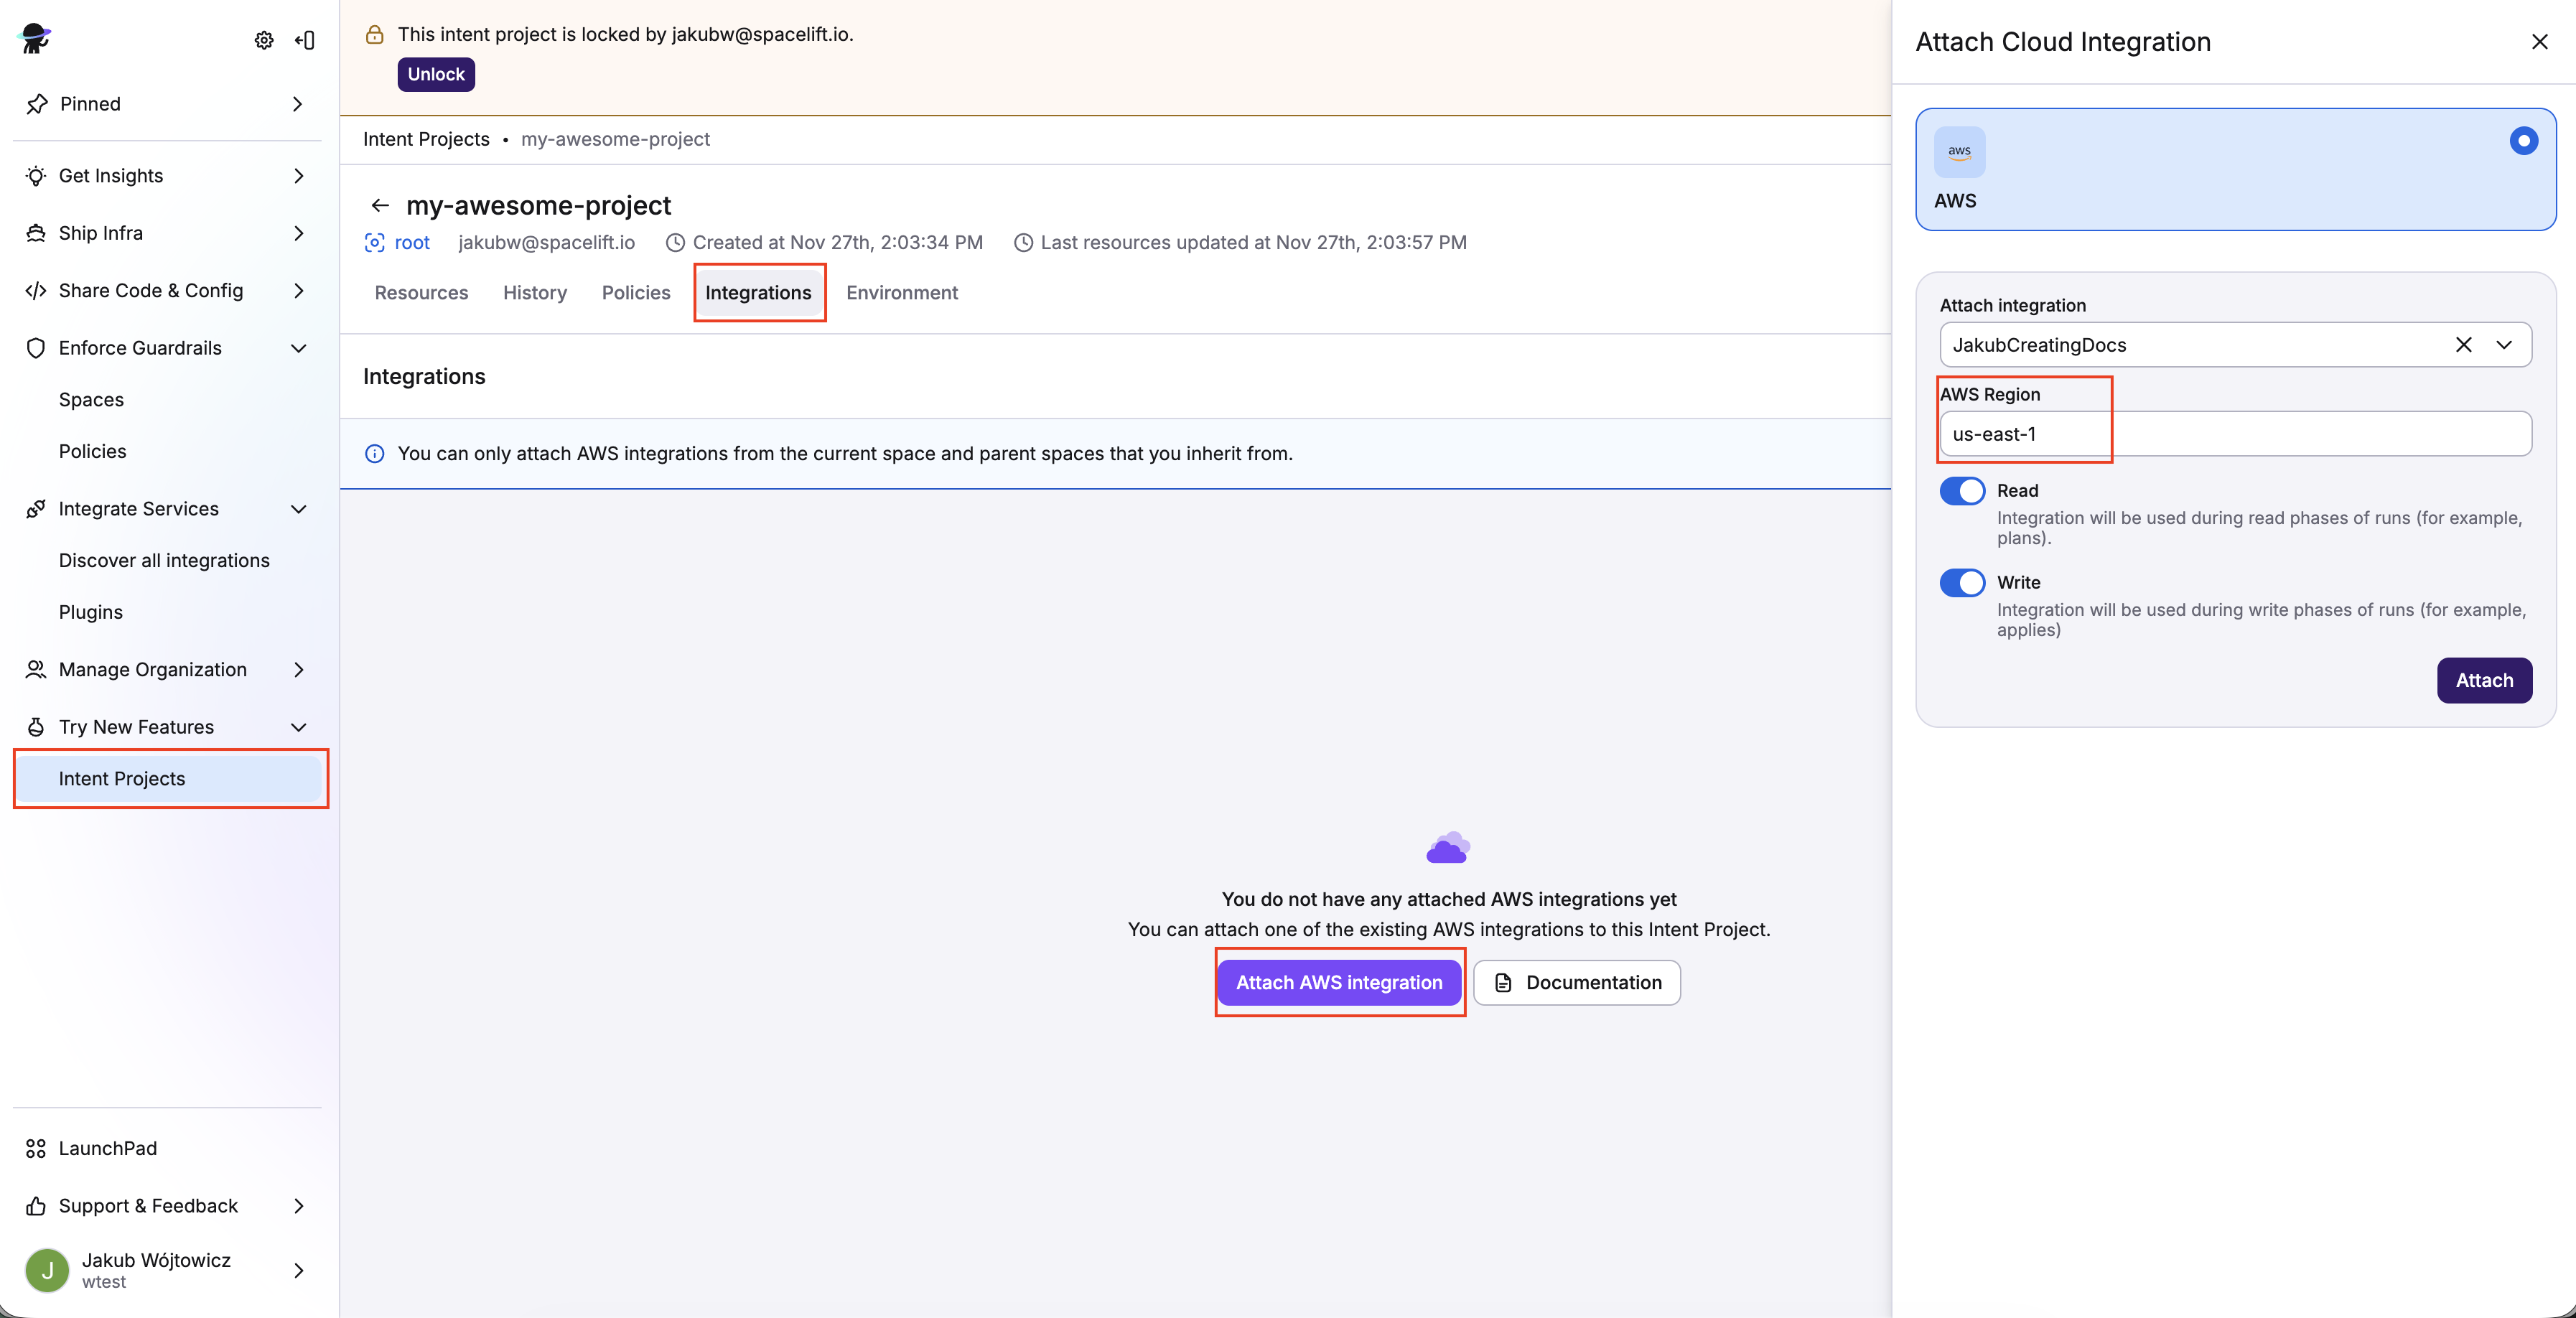
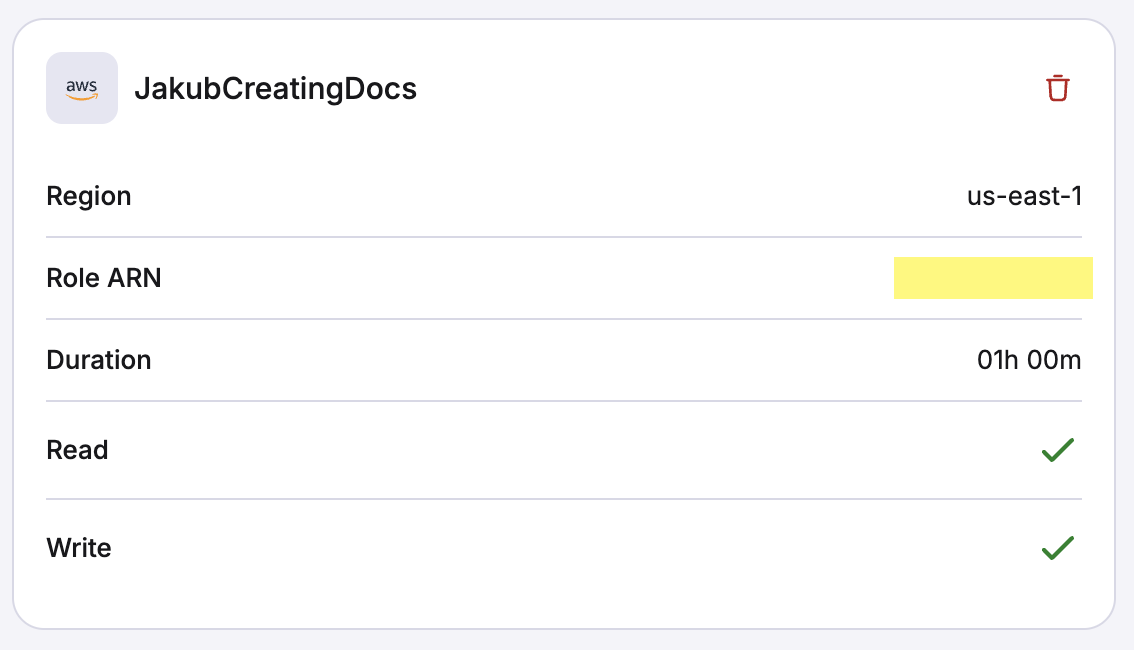
You can view the attached integration details in your project view on the Integrations tab.
4. Provision AWS resources (S3, EC2)»
With the policy above:
- Creating an S3 bucket should succeed.
- Creating an EC2 instance should fail with a policy denial.
Create an S3 bucket (via chat)»
1 | |

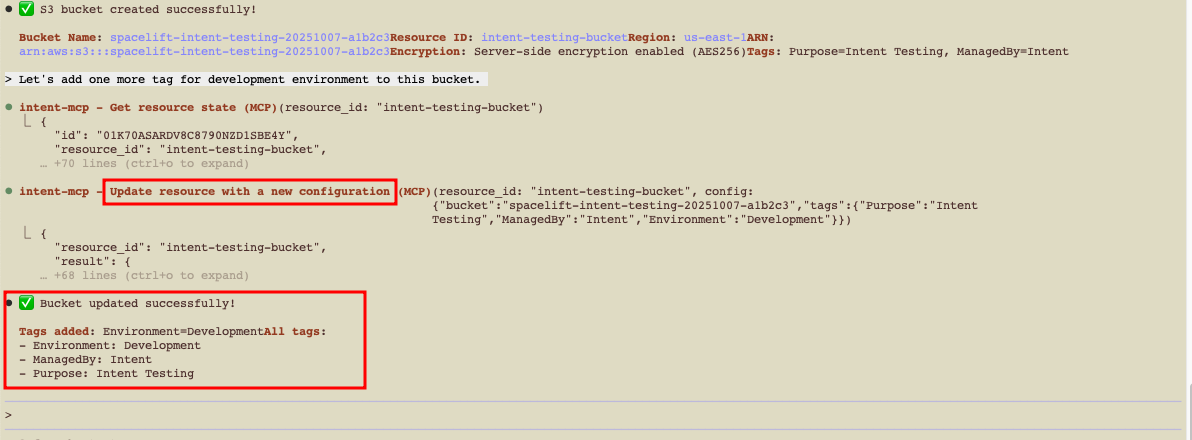
Update the S3 bucket»
You can continue the conversation to modify existing resources:
1 | |
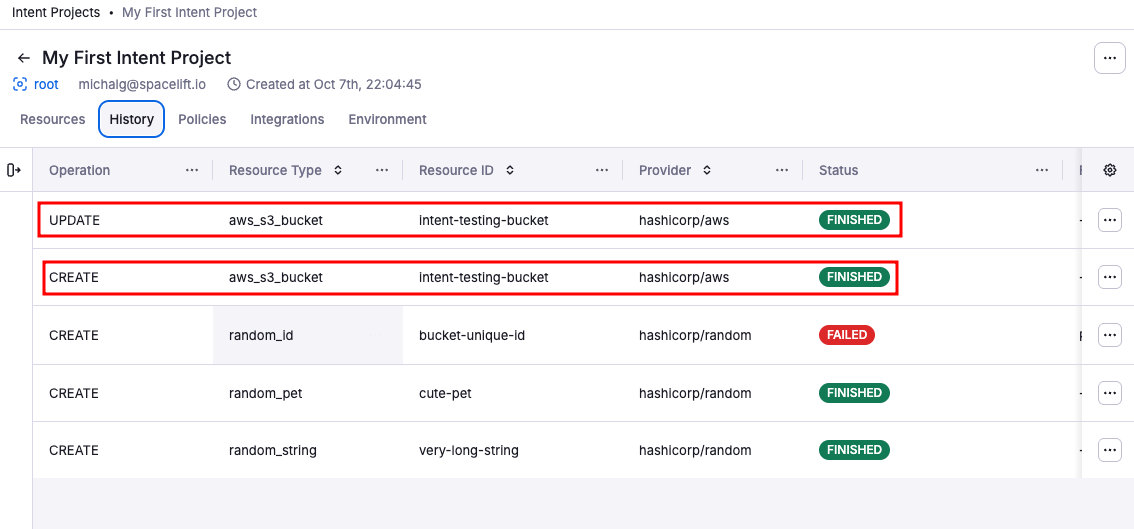
Intent updates the resource configuration and applies the changes. You’ll see the updated values in both your AWS account and the Spacelift UI. In Spacelift, the Resources tab shows the current configuration, and the History tab records the update operation.
Verify in Spacelift UI & AWS»
Confirm the resource lifecycle in both systems.
-
In the Spacelift UI, navigate to your Intent project.
-
Resources tab: Shows the S3 bucket with current configuration including the tags you just added.
-
History tab: Lists all operations (create, update) with timestamps, operation details, and who/what triggered them.
-
-
In the AWS Console, go to S3:
- Find your bucket (e.g.,
dev-attachments-123). - Verify it exists with the correct configuration.
- Check the Tags section to confirm
Environment=devandOwner=platform-teamare present.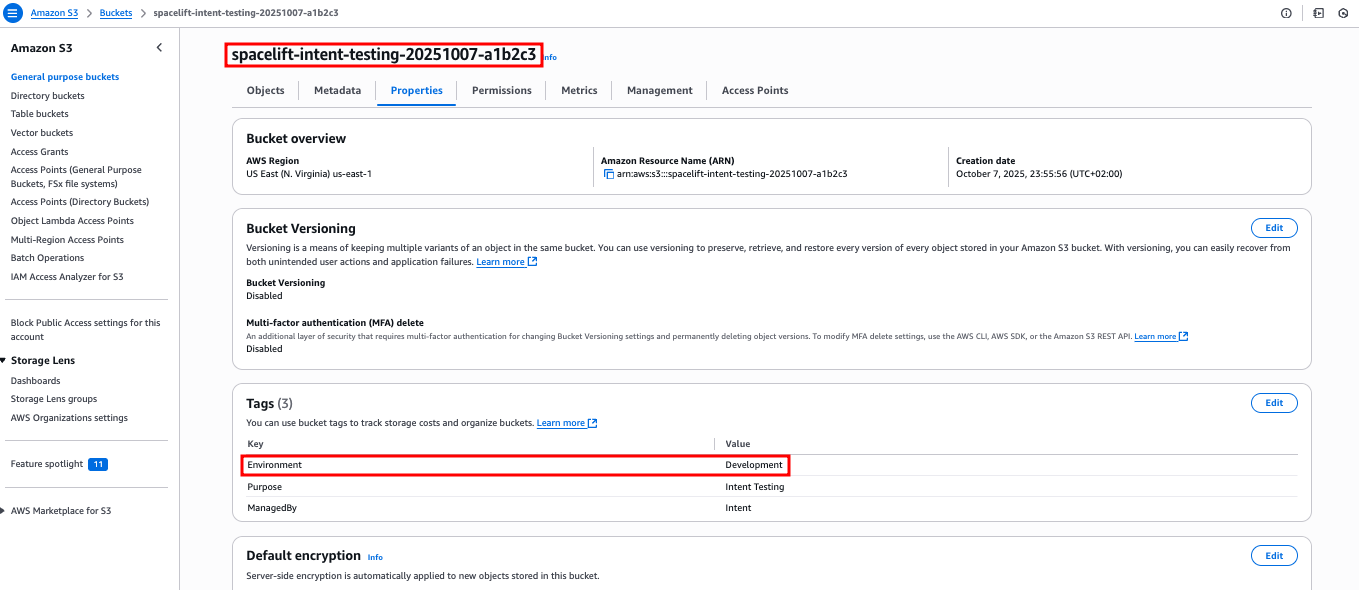
- Find your bucket (e.g.,
As we've seen, Intent creates resources directly in your cloud, while Spacelift provides access control, policy governance, state management, and full auditability.
Test policy denial»
Create an EC2 instance to see how Spacelift Intent's policy denial works.
1 | |
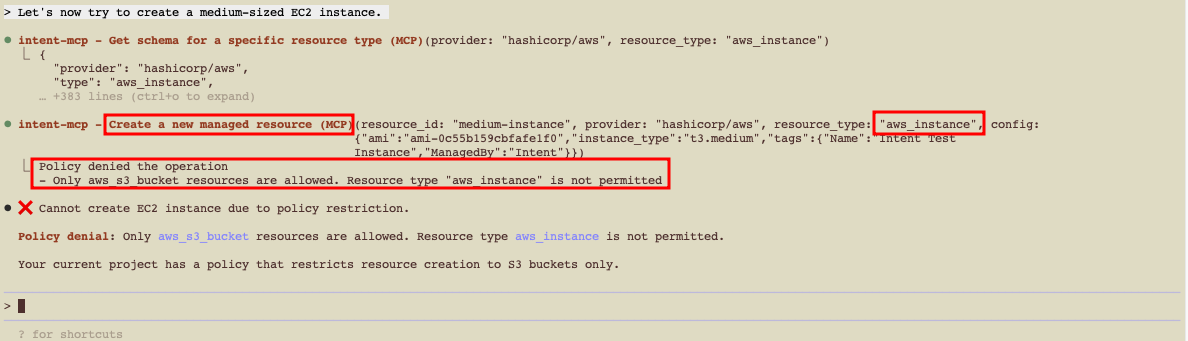
Iterate on the policy to allow additional resource types when you're ready (e.g., allow aws_instance for non-prod).
5. Import existing resources»
You can discover and import pre-existing resources into the Intent state, then manage them.
Example (SSM Parameters)»
1 | |
- Review the discovery result.
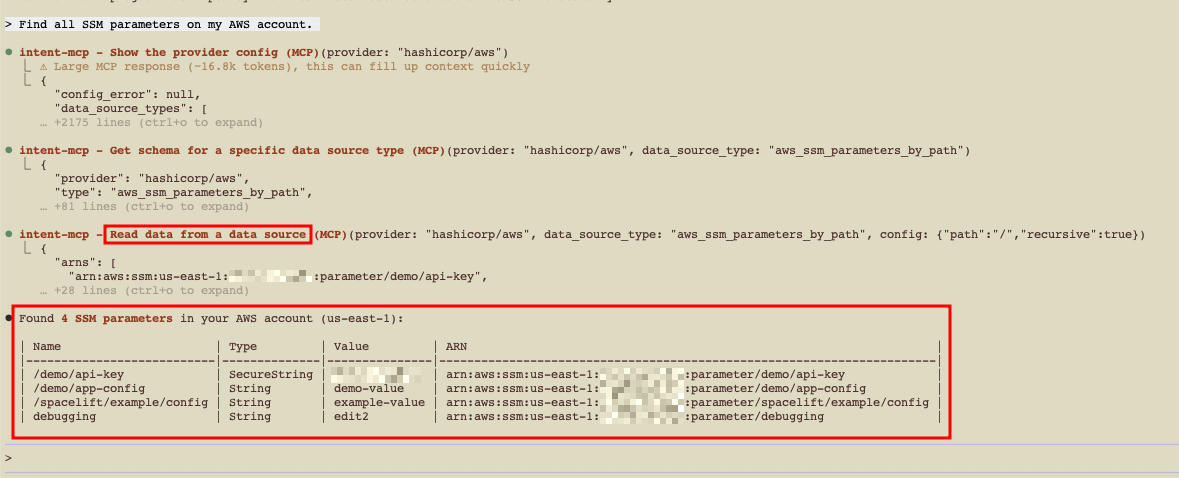
- Select items to import into Intent state.
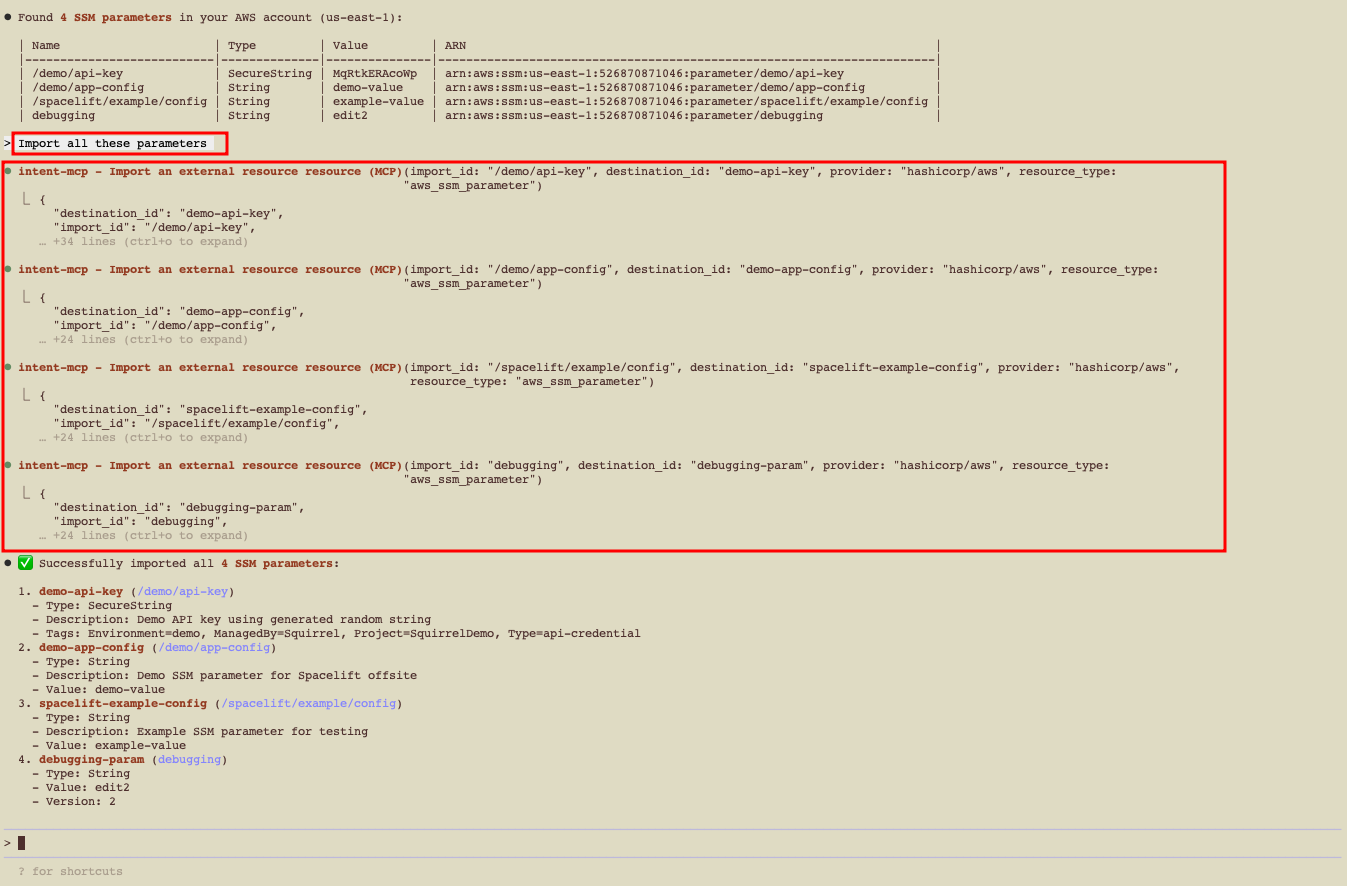
- Manage them via natural language and policy from now on.
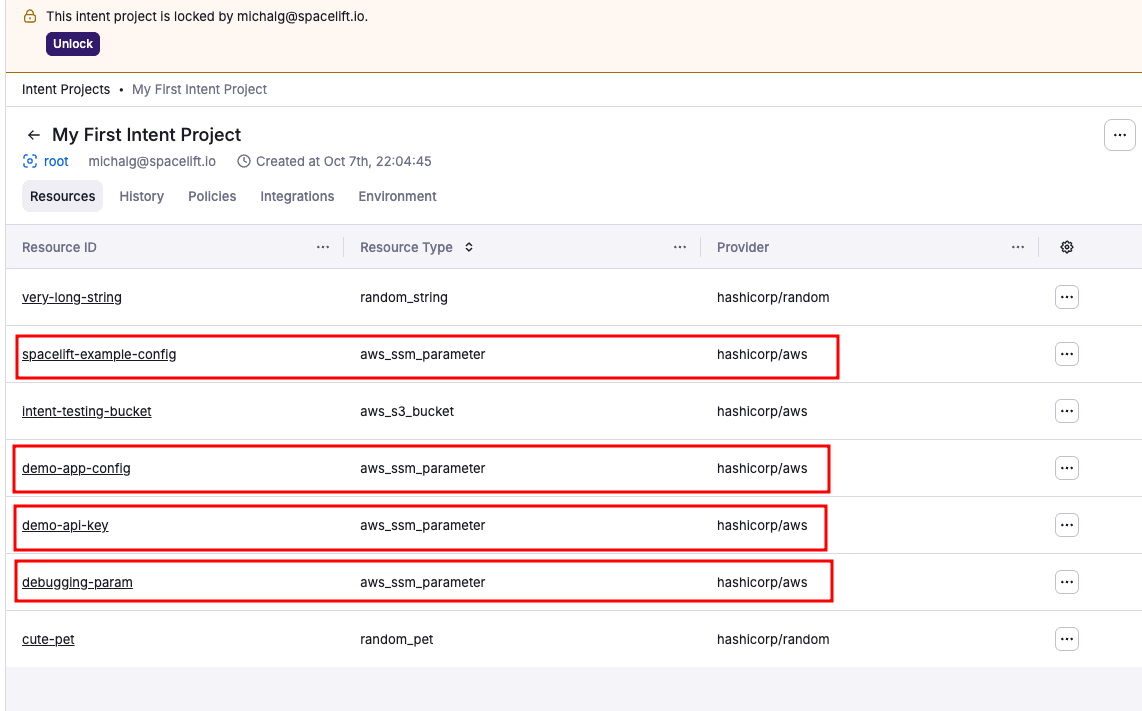
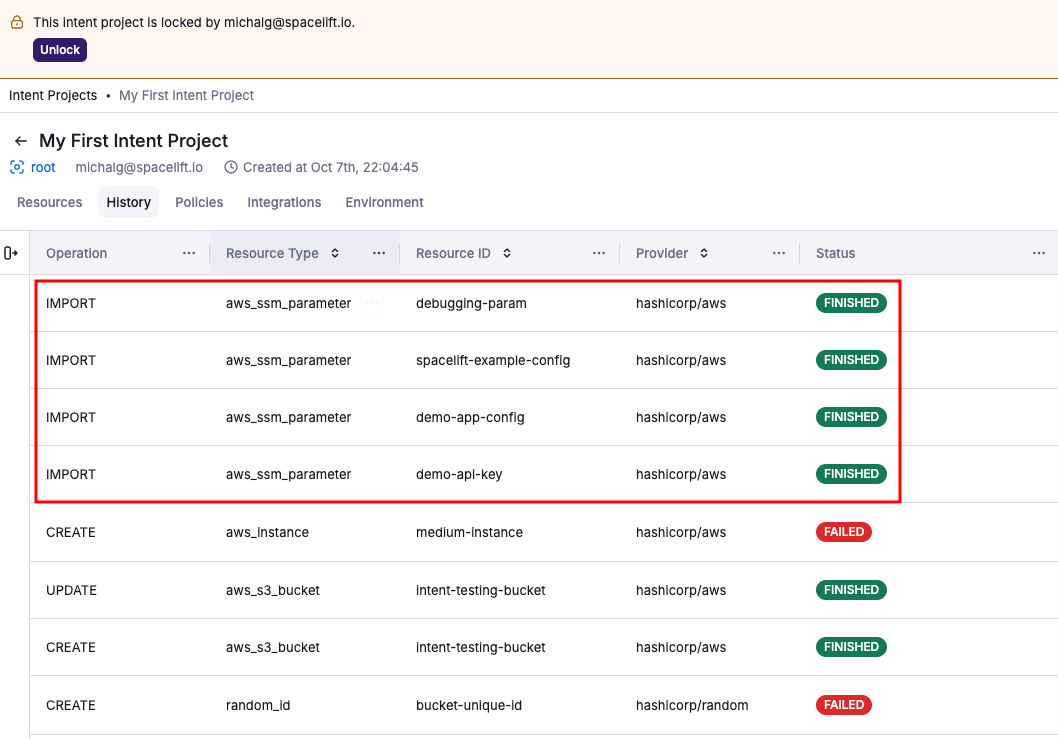
Check Spacelift UI after import»
Once resources are imported, verify them in the Spacelift UI.
- Resources tab: Shows newly imported SSM parameters alongside your existing S3 bucket.
- History tab: Records the import operation with full details of what was imported and when.
6. Delete resources safely»
When deleting, Intent evaluates dependencies, requests confirmation, and enforces policy.
1 | |
Typical flow:
- Tool computes dependency order.
- Client asks for explicit confirmation (by default).
- Apply proceeds or is blocked by policy.

If policy prevents deletion, update the policy to allow the random resources. You can do this with Spacelift Intent, but review Session Locks & Safety first.
Updating a policy via MCP»
- Update the policy via Intent to allow
randomresources, which should enable deletion in this example.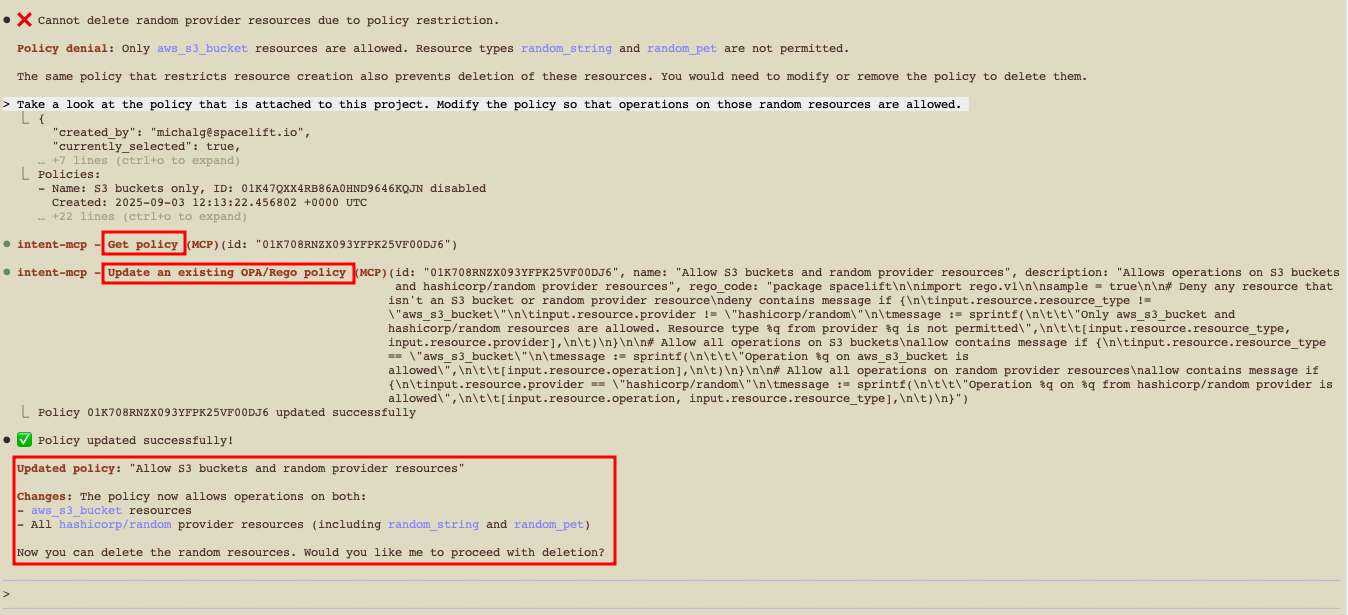
- Verify policy updates in the Spacelift UI.
- Attempt the delete prompt again and verify the updated policy works as intended.
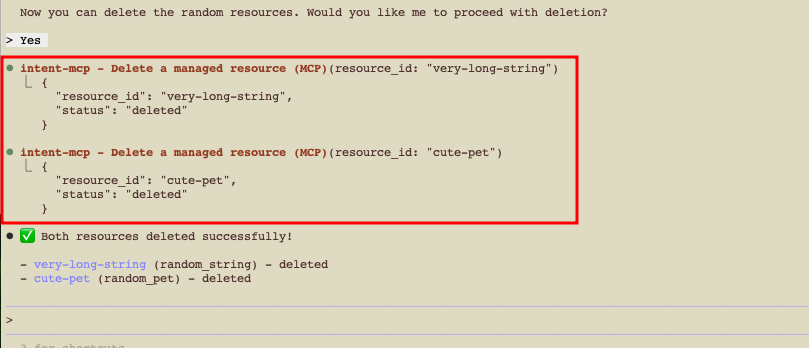
For auditability, the History tab shows attempted and successful deletions, with full receipts.
7. Session locks & safety»
- Project lock: Only one active session can operate on a project at a time (prevents conflicting changes). Locks auto-expire after a period of inactivity.
- OAuth scope: Sessions authorized with only
mcp:readcannot callmutateorintent, so they can inspect Spacelift and cloud resources but cannot change them. Pick the narrower scope when you want a "look-only" assistant. - Read-only projects: Projects switched to
READ_ONLY(for example via Intent to IaC state import) reject every write operation — create, update, delete, refresh, import, and resume — until they are re-enabled via theintentProjectEnablemutation or the Spacelift UI. - Client controls: You can configure your MCP client to always ask before invoking tools.
8. Access control»
Intent projects use Spacelift's Role-Based Access Control (RBAC) system to manage permissions. This allows you to control who can create, modify, and delete Intent projects, as well as who can operate on resources within them.
Managing Intent projects»
By default, Space Admins have full access to manage Intent projects within their spaces. However, you can create more granular permissions using custom roles with specific Intent project actions. Intent specific actions can be found under the Intent category in the role creation page.
9. Worker pool and runner image»
By default, Intent operations execute on the Spacelift public worker pool using the system default Intent worker image. For stricter network isolation or custom tooling you can override both per project.
Custom worker pool»
Attach a private worker pool to an Intent project so all subsequent operations run on workers you control. Visible worker pools follow the project's space inheritance.
You can manage worker pool assignment through MCP, the Spacelift GraphQL API (intentProjectAttachWorkerPool, intentProjectDetachWorkerPool, or the workerPool argument on intentProjectCreate / intentProjectUpdate), or the Spacelift UI on the Intent project page.
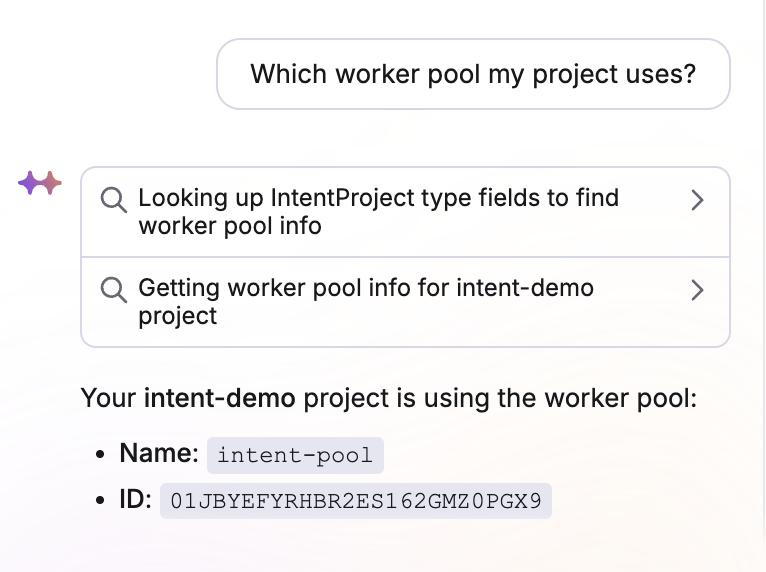
Through your MCP client you can drive it via natural language, for example:
1 2 | |
Per-project runner image»
You can also point a project at a custom Intent worker image — useful when you need extra binaries or vetted base images. Set the runnerImage field on intentProjectCreate or intentProjectUpdate (leave it empty to fall back to the system default). The launcher picks up the image for every subsequent execution on that project.
Troubleshooting»
I don't see spacelift in /mcp»
- Re-run the add command; confirm the URL and account name.
- Verify
.mcp.jsonpath and JSON validity.
OAuth window didn't open.»
Check pop-up blockers. Try re-auth via /mcp → select server again.
project-use fails / lock busy»
Another session may hold the lock. Wait for timeout, or unlock via UI/API.
Policy denies everything»
- Start with allow-list for one resource type and expand.
- Use a separate test project/space while iterating.
- Enable policy sampling by adding
sample = trueto your policy to capture evaluation events and debug in the Policy Workbench (UI → Policies → select policy → Show simulation panel).
AWS creation fails»
Verify integration is attached to the project, region matches prompts, and access is Read+Write.
FAQ»
-
Can I use a client other than Claude Code?
Yes—Claude Desktop (custom connector), VS Code, Cursor. Any MCP-capable client should work with the same URL.
-
Where are the Terraform files?
Intent works at a higher abstraction—your agent calls provider operations under Spacelift governance. No IaC files are required for day‑1 usage.
-
Can I export to Terraform/OpenTofu later?
Yes — use Intent to IaC to generate HCL code from your project and optionally create a Spacelift stack with imported state.
-
How do I keep things safe in production?
For this early access beta, we do not recommend to run things in production.