Docker-based workers»
Spacelift Docker-based workers consist of two main components: the launcher binary, and the worker binary. The launcher is responsible for:
- Downloading the correct version of the worker binary to be able to execute Spacelift runs.
- Starting new Docker containers in response to those runs being scheduled.
In a Self-Hosted install, the version of the provided launcher binary comes with the correct worker binary for your version of Self-Hosted embedded. This means that it doesn't need to download the worker binary separately when executing runs.
We suggest using our Terraform module or CloudFormation template to deploy your workers, but you can also follow our instructions on manual setup if you need to deploy workers to an environment not supported by either approach.
Terraform module»
The terraform-aws-spacelift-workerpool-on-ec2 module can be used to deploy an EC2-based worker pool on AWS. The module is originally for our SaaS offering, but it's compatible with self-hosted when providing the selfhosted_configuration variable. For example:
1 2 3 4 5 6 7 8 9 10 11 12 13 14 15 16 17 18 19 20 21 | |
CloudFormation template»
Another way to deploy workers for self-hosting is to deploy the CloudFormation template found in cloudformation/workerpool.yaml.
PseudoRandomSuffix»
The CloudFormation stack uses a parameter called PseudoRandomSuffix to ensure that certain resources are unique within an AWS account. The value of this parameter does not matter as long as it is unique per worker pool stack you deploy. You should choose a value that is 6 characters long and made up of letters and numbers, for example ab12cd.
Create a secret»
First, create a new secret in Secrets Manager, and add your token and the base64-encoded value of your private key. Use the key SPACELIFT_TOKEN for your token and SPACELIFT_POOL_PRIVATE_KEY for the private key. It should look something like this:
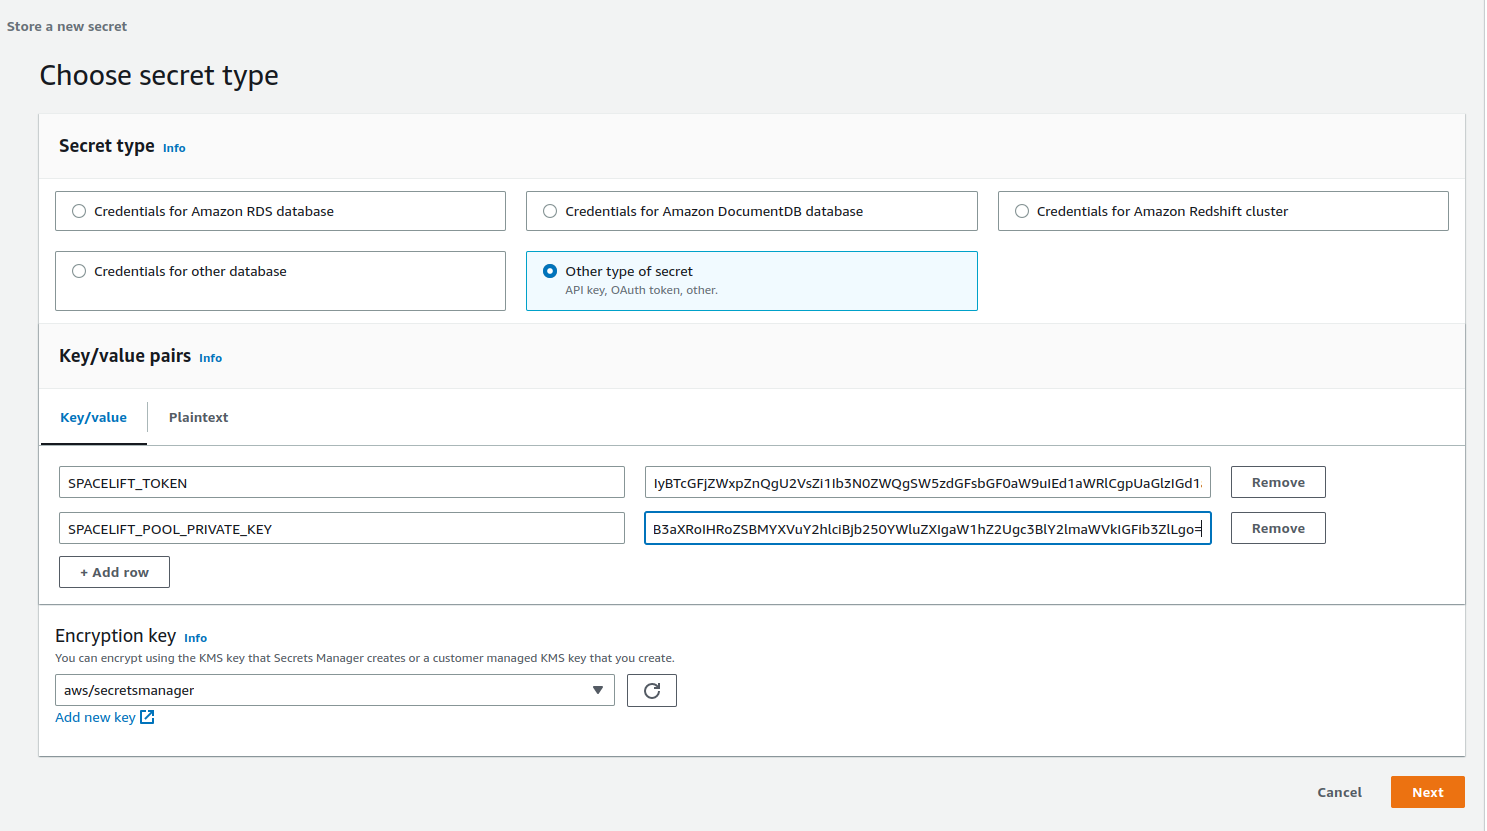
Give your secret a name and create it. It doesn't matter what this name is, but you'll need it when deploying the CloudFormation stack.
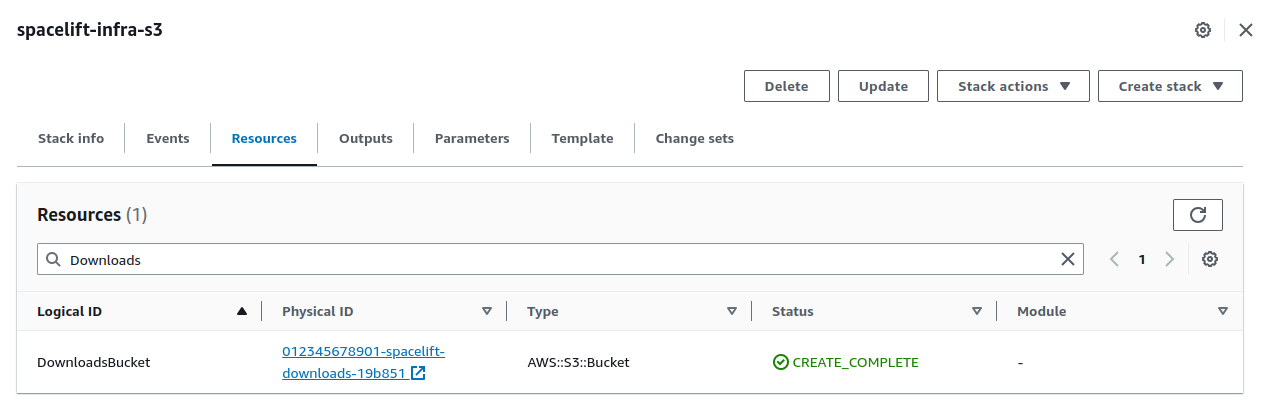
Get the downloads bucket name»
The downloads bucket name is output at the end of the installation process. If you don't have it saved somewhere, you can find the downloads bucket name from the resources of the spacelift-infra-s3 stack in CloudFormation:
AMI»
You can use your own custom-built AMI for your workers, or you can use one of the pre-built images we provide. For a list of the correct AMI to use for the region you want to deploy your worker to, see the spacelift-worker-image releases page.
Choose the x86_64 version of the AMI.
Subnets and security group»
You will need to have an existing virtual private cloud (VPC) to deploy your pool into, and will need to provide a list of subnet IDs and security groups to match your requirements.
Using a custom IAM role»
By default, Spacelift will create the instance role for the EC2 ASG as part of the worker pool stack. You can also provide your own custom role via the InstanceRoleName parameter to grant permissions to additional AWS resources that your workers need access to. For example, you can allow access to a private ECR in order to use a custom runner image.
At a minimum, your IAM role must have:
- A trust relationship that allows role assumption by EC2.
- The following managed policies attached:
AutoScalingReadOnlyAccess.CloudWatchAgentServerPolicy.AmazonSSMManagedInstanceCore.
Injecting custom commands during instance startup»
You have the option to inject custom commands into the EC2 user data. This can be useful if you want to install additional software on your workers, or if you want to run a custom script during instance startup, or just to add some additional environment variables.
The script must be a valid shell script and should be put into Secrets Manager. Then you can provide the name of the secret as CustomUserDataSecretName when deploying the stack.
Example:
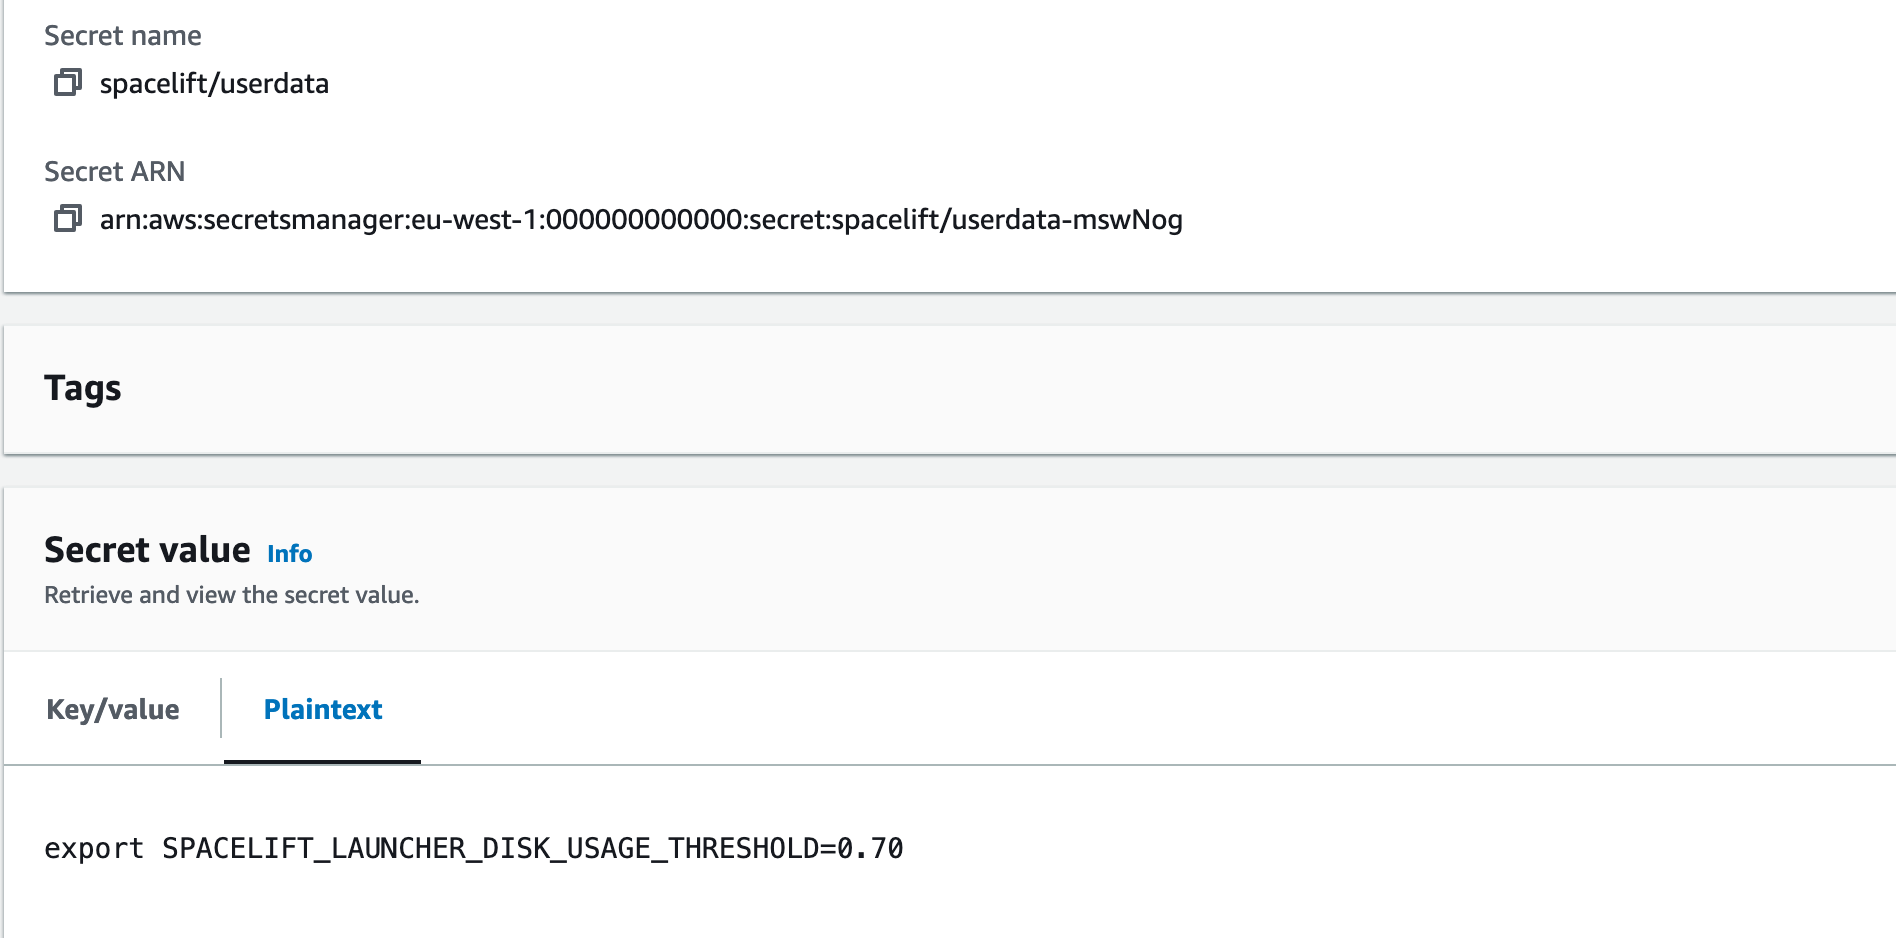
In the example above, we used spacelift/userdata as a secret name so the parameter will look like this:
1 2 3 4 | |
Granting access to a private ECR»
To allow your worker role to access a private ECR, you can attach a policy similar to this to your instance role (replacing <repository-arn> with the ARN of your ECR repository):
1 2 3 4 5 6 7 8 9 10 11 12 13 14 15 16 17 18 19 20 21 | |
Repository ARNs are in the format arn:<partition>:ecr:<region>:<account-id>:repository/<repository-name>.
Proxy configuration»
If you need to use an HTTP proxy for internet access, you can provide the proxy configuration using the following CloudFormation parameters:
HttpProxyConfig.HttpsProxyConfig.NoProxyConfig.
For example, you could use the following command to deploy a worker with a proxy configuration:
1 2 3 4 5 6 7 8 9 10 11 12 13 14 15 | |
Using custom CA certificates»
If you use a custom certificate authority to issue TLS certificates for components that Spacelift will communicate with (for example, your VCS system) you need to provide your custom CA certificates to the worker. You do this by creating a secret in Secrets Manager containing a base64-encoded JSON string.
The format of the JSON object is as follows:
1 | |
For example, if you had a file called ca-certs.json containing the following content:
1 2 3 4 5 | |
You could then encode it to base64 using base64 -w0 < ca-certs.json (or base64 -b 0 < ca-certs.json on a Mac), resulting in the following string:
1 | |
You would then create a secret in Secrets Manager, and deploy the worker pool using the following command (replacing <ca-cert-secret-name> with the name of your secret):
1 2 3 4 5 6 7 8 9 10 11 12 13 | |
Add certificates to the OpenTofu/Terraform process»
The existing custom CA certificate mechanisms (AdditionalRootCAsSecretName for CloudFormation, or selfhosted_configuration.ca_certificates for the Terraform module) only add certificates to the Spacelift launcher and worker binary's trust store. OpenTofu and Terraform run as separate processes inside a Docker container and read certificates from the system certificate store (/etc/ssl/certs/ca-certificates.crt). If your OpenTofu/Terraform configuration needs to communicate with services that use a custom certificate authority (for example, a private provider registry, a custom state backend, or a private module source), you need to supply those certificates to the system store inside the runner container.
The approach is to create an extended CA bundle on the worker host, and then use SPACELIFT_WORKER_EXTRA_MOUNTS to mount it into the runner container.
First, Prepare your custom CA certificate.
Place your CA certificate file on your local machine (e.g., custom-ca.pem).
Second, Create an extended CA bundle.
Download the existing CA certificate bundle from the runner image and append your custom certificate:
1 2 | |
Tip
If you are using a custom runner image, replace public.ecr.aws/spacelift/runner-terraform:latest with your image. The certificate bundle path may differ depending on the base image (e.g., /etc/pki/tls/certs/ca-bundle.crt on Red Hat-based images).
Ensure the resulting custom-ca-bundle.crt ends with a newline.
Finally, Place the bundle on the worker host and configure the mount.
The bundle needs to be available on the EC2 instance at a known path, and then mounted into the runner container using SPACELIFT_WORKER_EXTRA_MOUNTS.
Use the configuration variable to write the bundle to disk during instance startup, and set the mount:
1 2 3 4 5 6 7 8 9 10 11 12 13 14 15 16 17 18 19 20 21 22 23 24 | |
Copy the custom-ca-bundle.crt file to the worker host (for example, to /etc/spacelift/custom-ca-bundle.crt), and export the mount before starting the launcher:
1 2 | |
Info
This mounts the custom bundle as a bind mount into every runner container. The mount overrides the container's built-in /etc/ssl/certs/ca-certificates.crt, so all TLS clients inside the container (including OpenTofu, Terraform, and any providers) will trust your custom CA.
Warning
If you update your runner image, the built-in CA certificates in the image may change. You should regenerate your extended CA bundle whenever you update your runner image to ensure it includes the latest upstream CA certificates alongside your custom ones.
Running the launcher as root»
By default, when the EC2 instance starts up, it creates a user called spacelift with a UID of 1983. This user is then used to run the launcher process.
If for some reason this causes problems, you can run the launcher as root by setting the RunLauncherAsSpaceliftUser CloudFormation parameter to false.
Tip
Versions v0.0.7 or older of Self-Hosted always ran the launcher as root. In newer versions this behavior has changed to default to the spacelift user.
PowerOffOnError»
By default, the startup script for the EC2 instances automatically terminates the instance if the launcher exits. This is to allow the instance to be automatically removed from the autoscale group and a new one added in the case of errors.
Sometimes it can be useful to disable this behavior, for example if instances are repeatedly crashing on startup, preventing you from being able to connect to investigate any issues before they terminate.
To do this, set PowerOffOnError to false when deploying your CloudFormation stack.
Info
If you update this setting on an existing CloudFormation stack, you will need to restart all the workers in the pool before the updated setting takes effect.
Deploying the template»
To deploy your worker pool stack, use the following command:
1 2 3 4 5 6 7 8 9 10 11 12 | |
For example, to deploy to eu-west-1 you might use something like this:
1 2 3 4 5 6 7 8 9 10 11 12 | |
To use a custom instance role, you might use something like this:
1 2 3 4 5 6 7 8 9 10 11 12 13 | |
Manual setup»
Prerequisites»
The launcher expects to be able to write to the local Docker socket. Make sure that Docker is installed and running.
Downloading the launcher»
The Self-Hosted release archive contains a copy of the Spacelift launcher binary built specifically for your version of Self-Hosted. You can find this at bin/spacelift-launcher. This binary is also uploaded to the downloads S3 bucket during the Spacelift installation process. For more information on how to find your bucket name see here.
Running the launcher»
Run the launcher binary using the following commands, replacing <worker-pool-id> with the ID of your pool:
1 2 3 | |
These commands set the following environment variables and then execute the launcher binary:
SPACELIFT_TOKEN: The token you received from Spacelift on worker pool creation.SPACELIFT_POOL_PRIVATE_KEY: The contents of the private key file you generated, in base64.
Info
You need to encode the entire private key using base64, making it a single line of text. The simplest approach is to run cat spacelift.key | base64 -w 0 in your command line. For Mac users, the command is cat spacelift.key | base64 -b 0.
Your launcher should now connect to the Spacelift backend and start handling runs.
AMI updates & deprecation policy»
If you run your workers in AWS and use the Spacelift AMIs, update your worker pool routinely as they receive weekly updates to ensure all system components are up-to-date.
Currently, the AWS AMIs are set to be deprecated in 364 days after its release and removed after 420 days. You won't be able to start new instances using a deprecated AMI, but existing instances will continue to run.
EC2 Spot Instances»
The AWS Terraform module supports EC2 Spot Instances for up to 90% cost savings.
Not recommended for production/critical workloads
Spot instances are NOT recommended for critical or production workloads as they can be interrupted with only 2 minutes notice, potentially causing:
- Incomplete or corrupted Terraform state.
- Failed deployments leaving infrastructure in inconsistent state.
- Loss of work-in-progress for long-running operations.
- Use Spot instances only for development, testing, or fault-tolerant workloads where interruption is acceptable: for example, ephemeral environments, Terraform modules, or operations with guaranteed runtimes under one minute.
1 2 3 4 5 6 7 8 9 10 | |
The Spacelift worker includes graceful interruption handling: it monitors for spot interruption notices and allows running jobs to complete when possible. However, if a run doesn't complete within the 2-minute interruption grace period, it will be abruptly terminated and crash.
Use the AWS EC2 Spot Instance Advisor to select cost-effective instance types with lower interruption rates. See the spot instances example for more configuration options.
Download EC2 module from registry»
Our EC2 worker pool module can be downloaded from our registry, instead of directly from GitHub:
1 2 3 4 5 6 7 8 9 10 11 | |