Context»
Context is a bundle of configuration elements (environment variables, mounted files and hooks) independent of any stack that can be managed separately and attached to as many or as few projects as necessary. Contexts are only directly accessible to administrators from the Share code & config > Contexts tab:
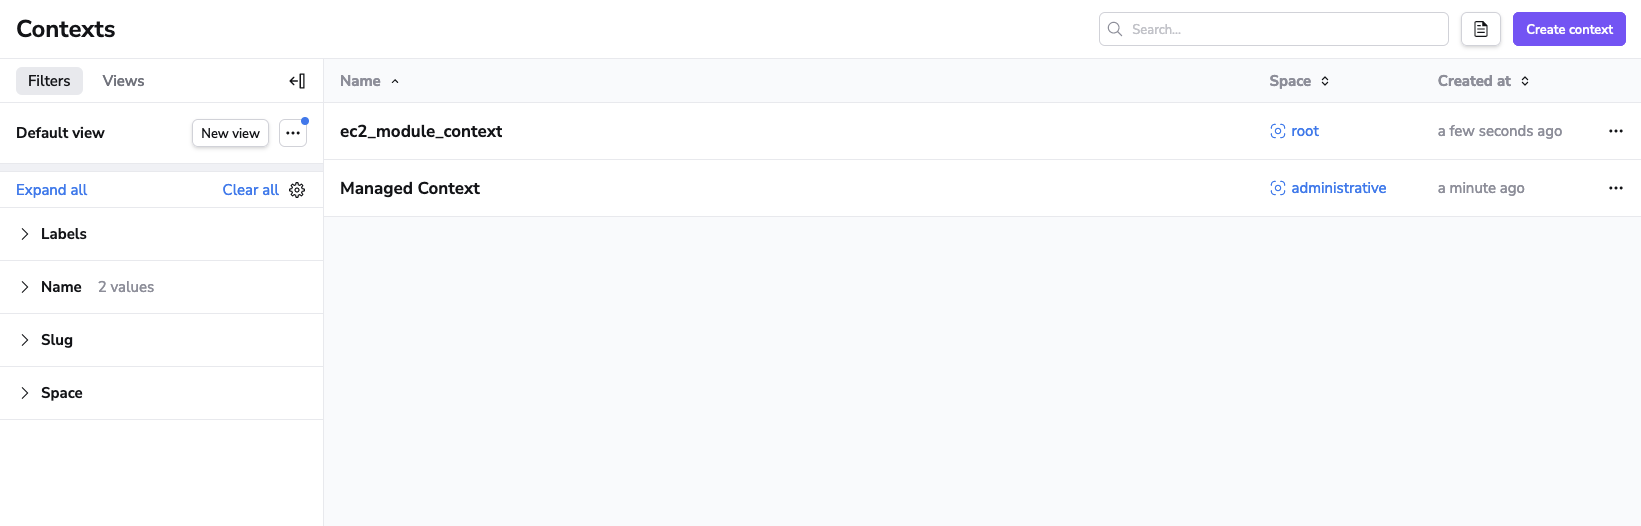
The list of contexts displays names, descriptions, and labels of the contexts. You can edit a context from the list by clicking the three dots in a context's row, clicking Edit, entering the new name, then clicking Save. You can also delete a context from the same menu.
Context management»
You can create, edit, attach, detach and delete contexts. We will show you how to do so through the Spacelift UI, but you can also manage contexts programmatically using our Terraform provider.
Creating a context»
As an account administrator you can create a new context by navigating to Share code & config > Contexts and clicking Create context.
- Fill in context details, then click Continue.
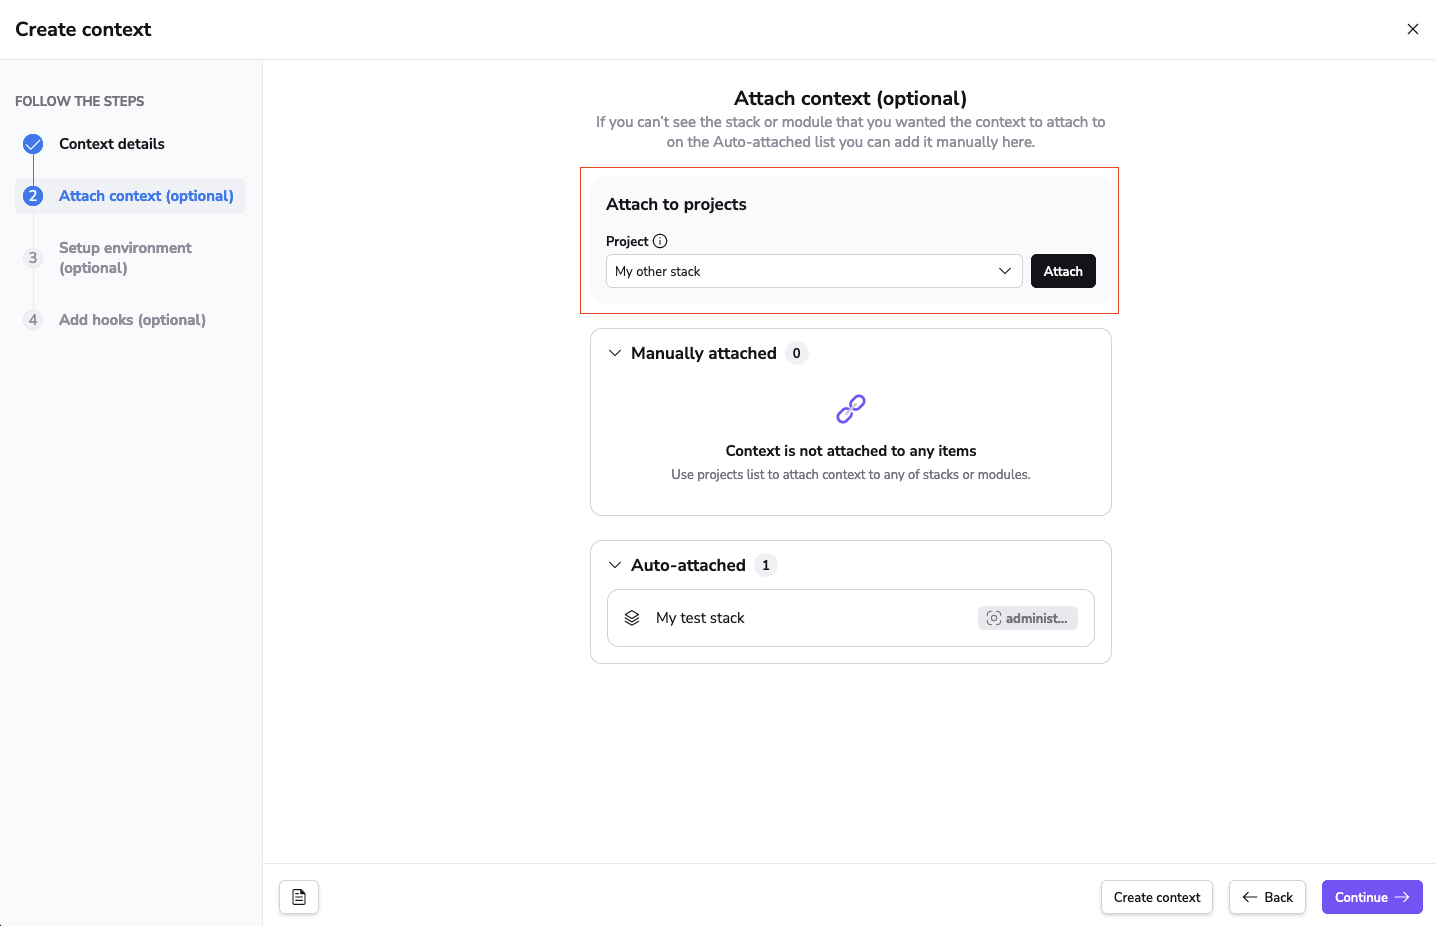
- Attach the context to project(s) using the dropdown, then click Continue.
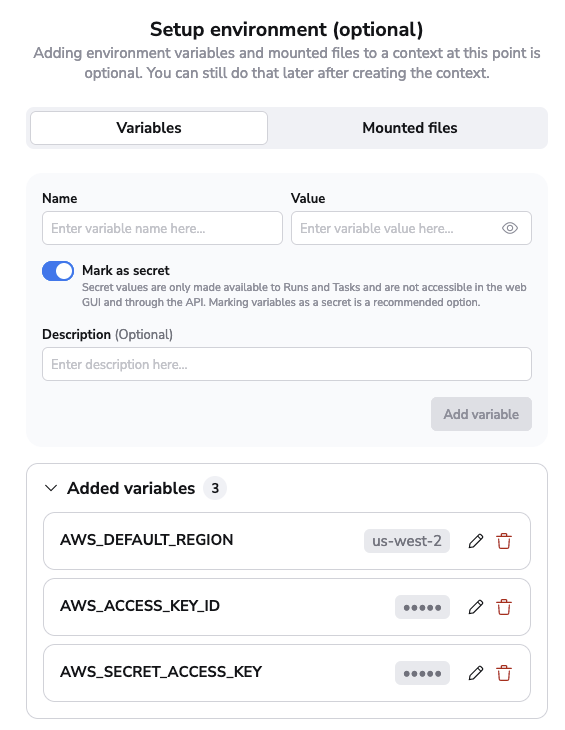
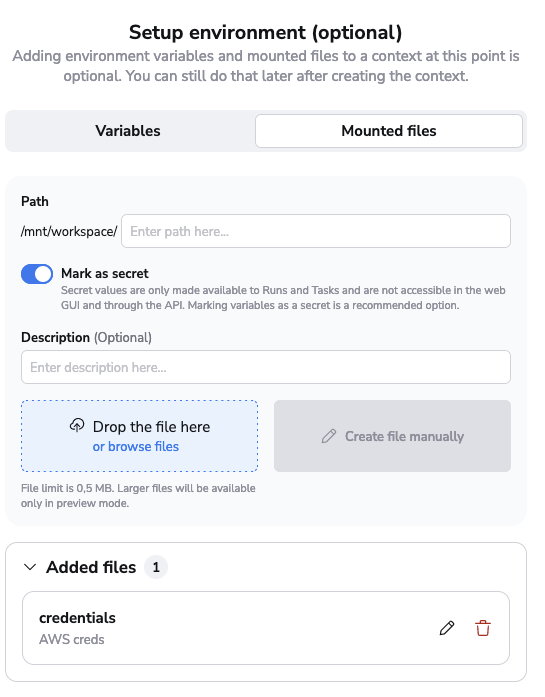
- Add variables and mounted files, then click Continue:
- Variables: Enter a name for the variable, its value, choose whether it's secret or not, and optionally enter a description, then click Add variable.
- Mounted files: Enter the path to the mounted file, choose whether it's secret or not, optionally enter a description, attach the file, then click Add file.
- Add hooks to the various project phases, then click Continue.
- Review the summary, then click Create context.
Step 1. Context details»
This is the only mandatory step in the context creation process; the remaining steps are optional.
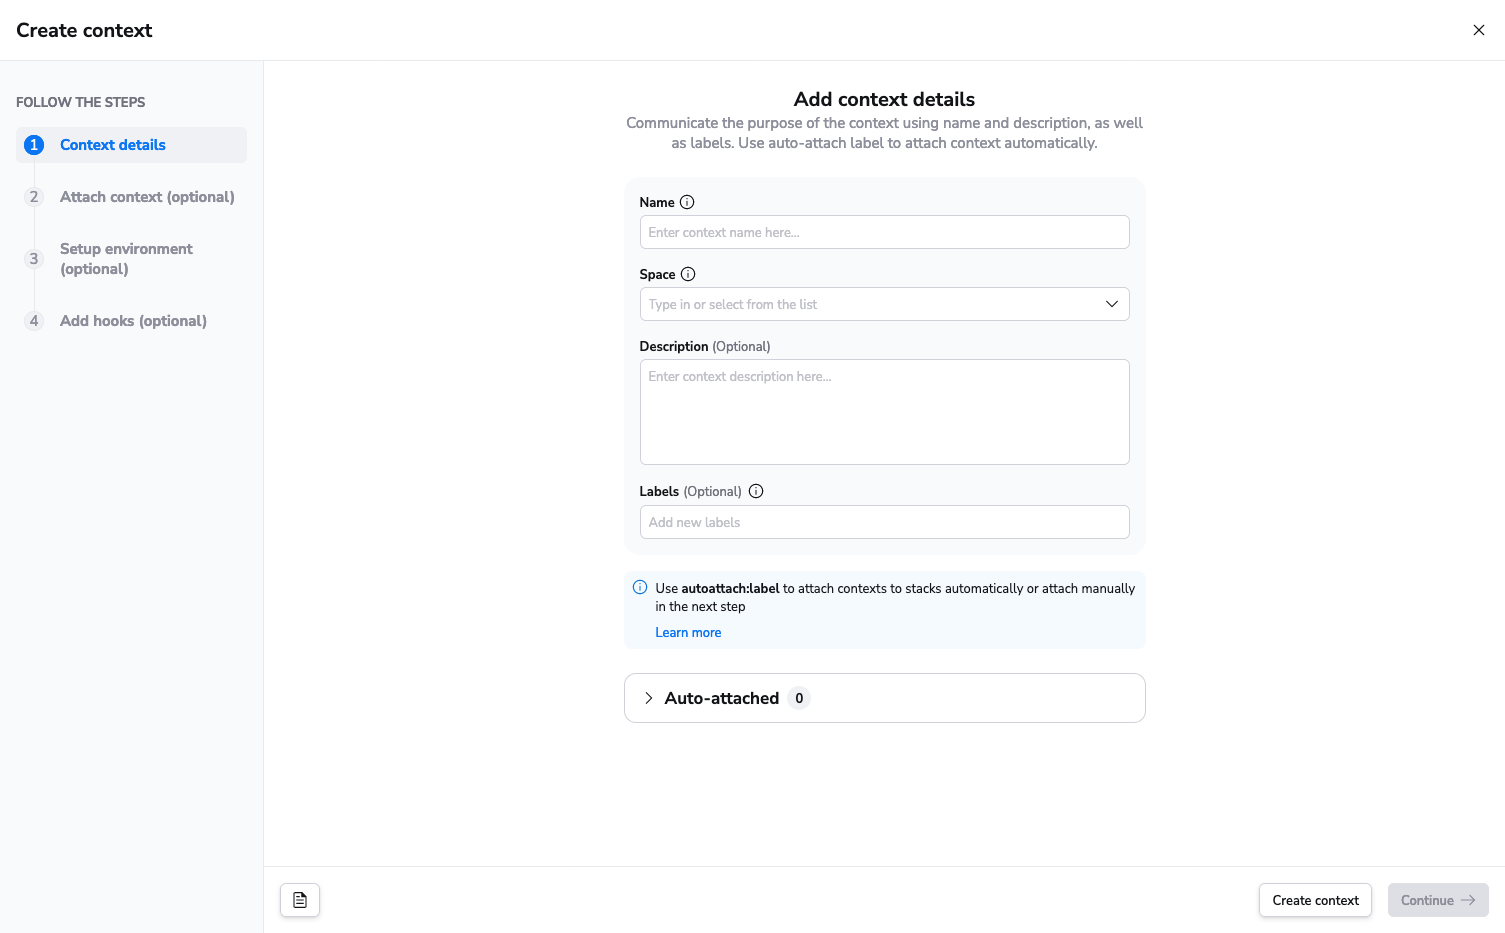
- Name: Enter a unique, descriptive name for your context.
- Space: Select the space to create the context in.
- Description (optional): Enter a (markdown-supported) description of the context. This will display on the Contexts tab and in the list of attached contexts in a stack's details.
- Label (optional): Add labels to help sort and filter your contexts. You can also use the
autoattachlabel to automatically attach the context to a specified stack or stacks.
Warning
Based on the original context name, Spacelift generates an immutable slug that serves as a unique identifier of the context. If the name and the slug diverge significantly, things may become confusing.
Although you can change the context name at any point, we strongly discourage all non-trivial changes.
Step 2. Attach context (optional)»
Attach the context to projects by selecting the project from the dropdown and clicking Attach. You can attach it to multiple contexts. When you're done, click Continue.
Step 3. Setup environment (optional)»
Configure environment variables and mounted files if you already have them ready during the creation of the context.
| Environment variables | Mounted files |
|---|---|
 |
 |
Step 4. Add hooks (optional)»
Hooks are optional scripts that can be set up to run before and/or after different project phases, automating tasks at specific points in the project lifecycle.
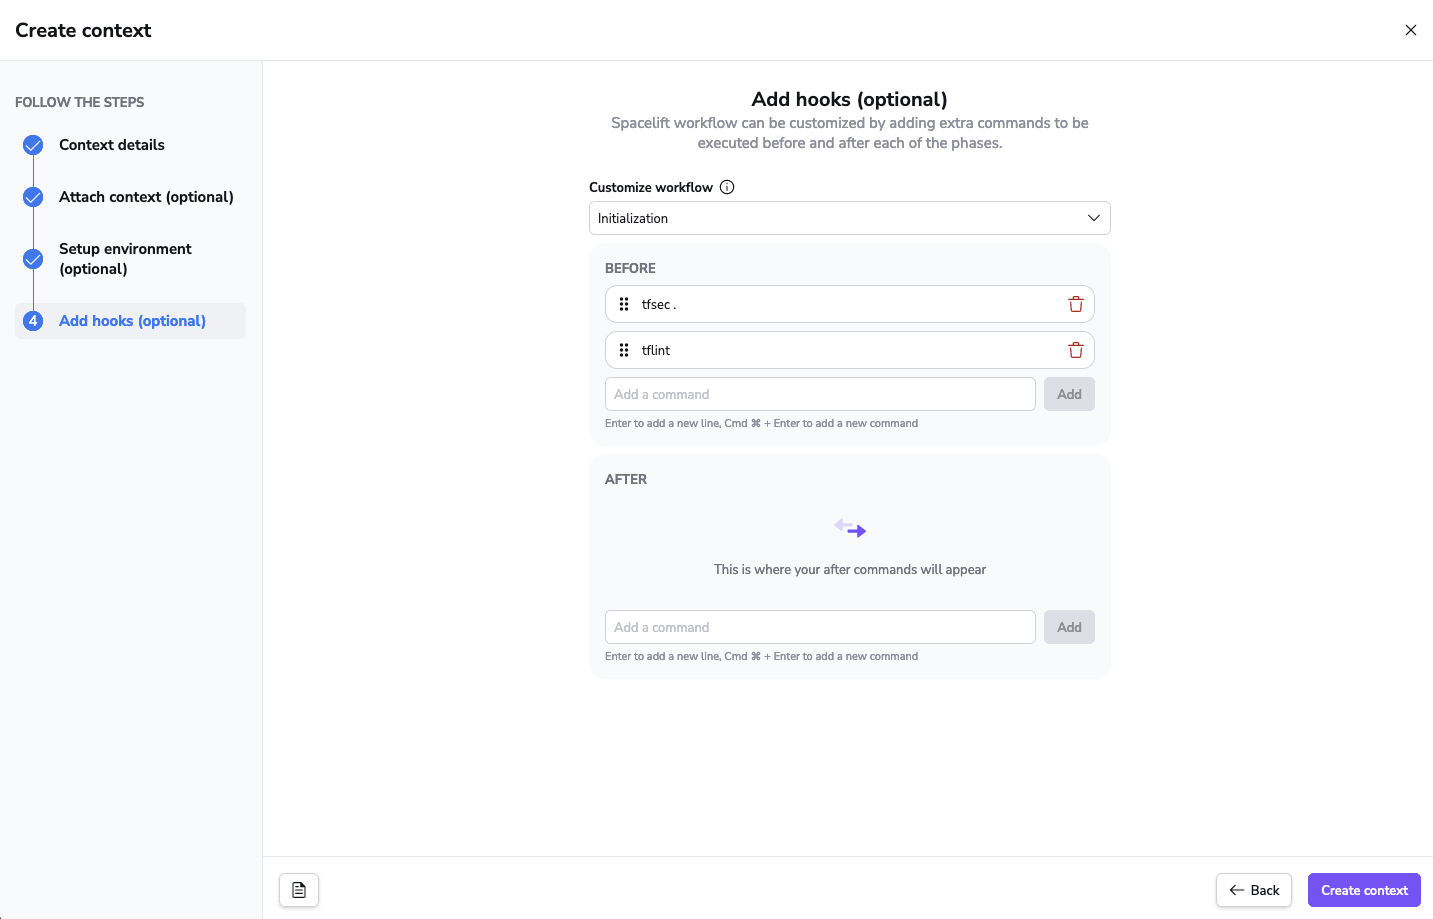
To add a hook, select the phase in which it should be run, enter the command in the text box (either Before or After), then click Add. You can add as many hooks as you like, and they will run in the order they appear.
After adding a hook, you can rearrange it within a section or move it to the other section by dragging and dropping:
When you're done, click Continue.
Step 5. Review summary»
Review the full summary of the new context and the information you filled out in each of the steps. If it's all correct, click Create context.
Editing a context»
You can edit everything about a context (details, attached projects, environment variables, mounted files, and hooks) except for its slug.
Note
Any context details (such as environment variables or mounted files) that have been set as secret will not be visible in the Spacelift UI or via the API.
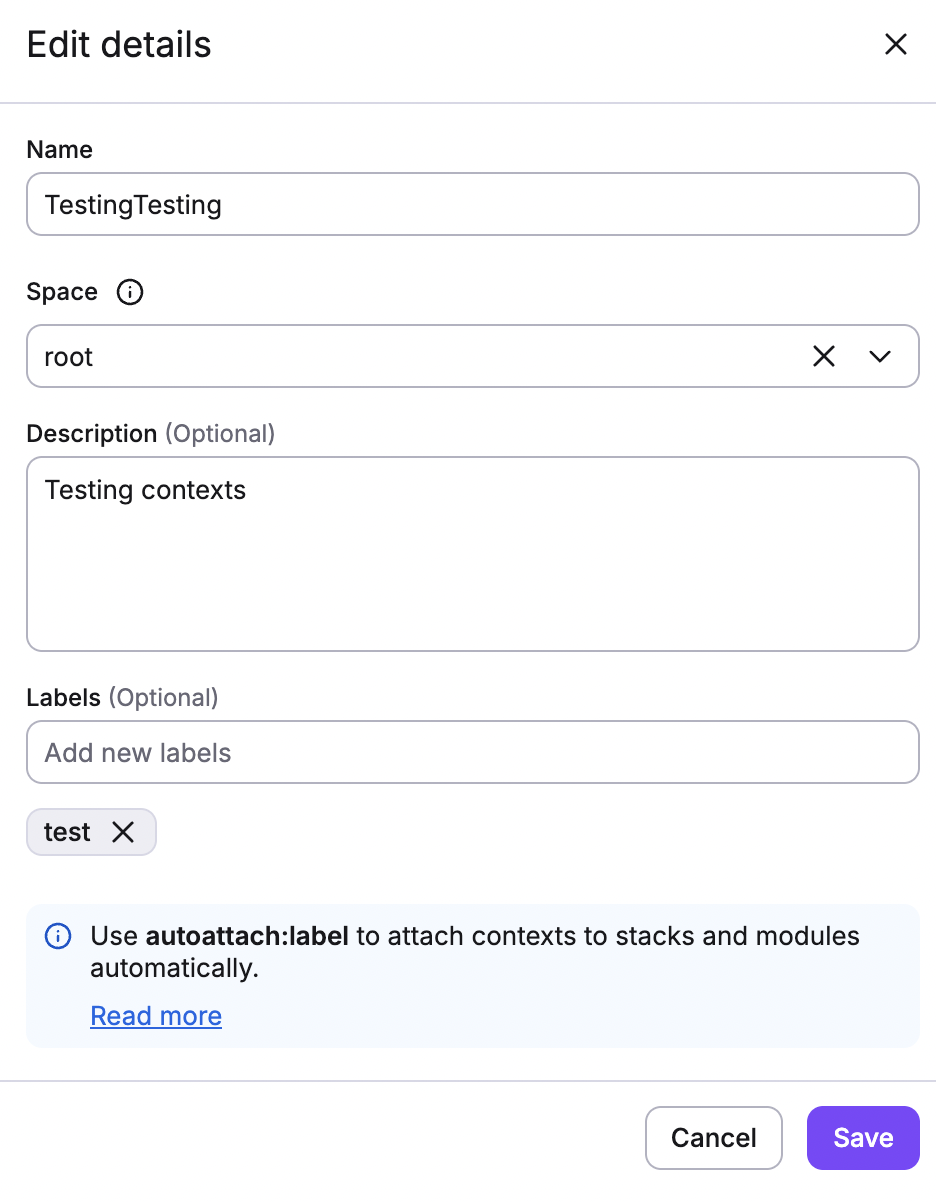
Editing context details»
To edit the details of a context, navigate to the Share code & config > Contexts tab. Click the three dots in a context's row, then click Edit.
Editing environment variables»
Click on a context in the list on the Share code & config > Contexts tab to view its details. On the Variables tab, you'll find a list of all the environment variables associated with the context.
Click the three dots in a variable's row, then click Edit. This will open a drawer where you can edit the variable's properties such as value, description, and sensitivity. Make your changes, then click Save.
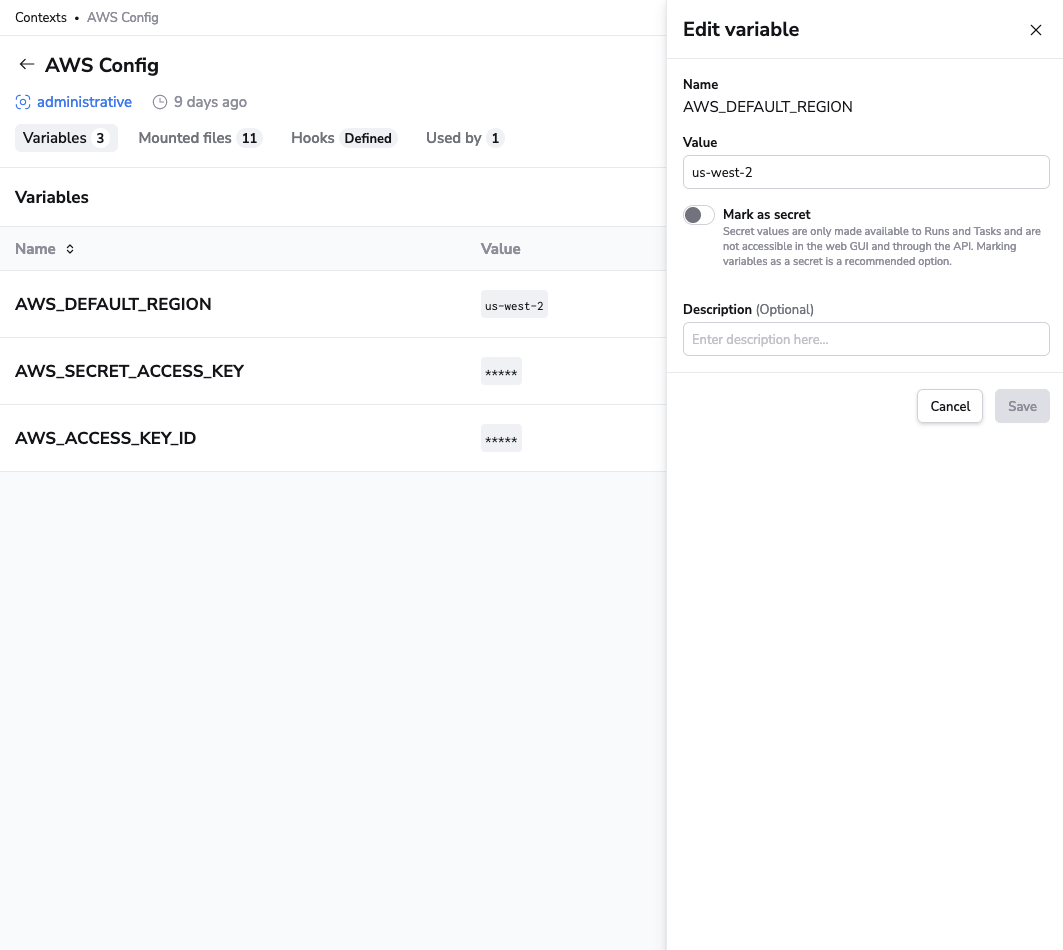
Changes to environment variables will affect all projects using the context. Be cautious when making changes to avoid unintended side effects.
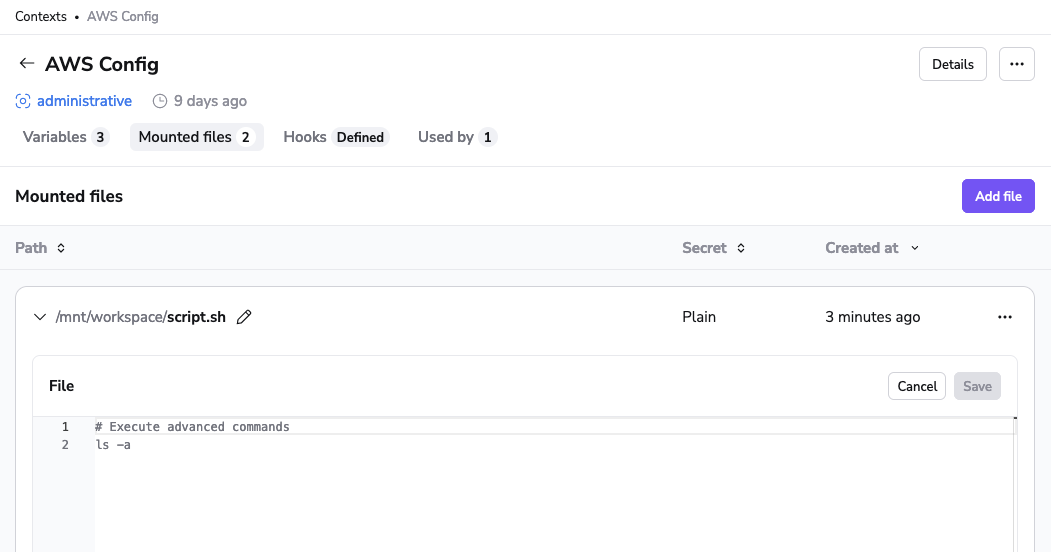
Editing mounted files»
Navigate to the Share code & config > Contexts tab. On the Mounted files tab, you'll find a list of all the mounted files associated with the context.
You can preview the contents of a non-secret mounted file by clicking Expand by the file name. To edit it, click the three dots in the file's row, then click Edit file. Make your changes, then click Save.
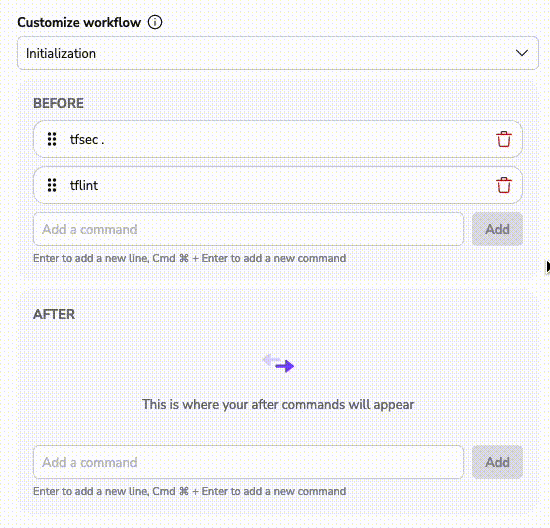
Editing hooks»
Navigate to the Share code & config > Contexts tab. On the Hooks tab, you'll find a list of all the hooks associated with the context grouped by the different project phases.
To modify hooks, click Expand by the phase name. Click Edit (pencil) to edit a hook, or Delete (trash can) to delete it.
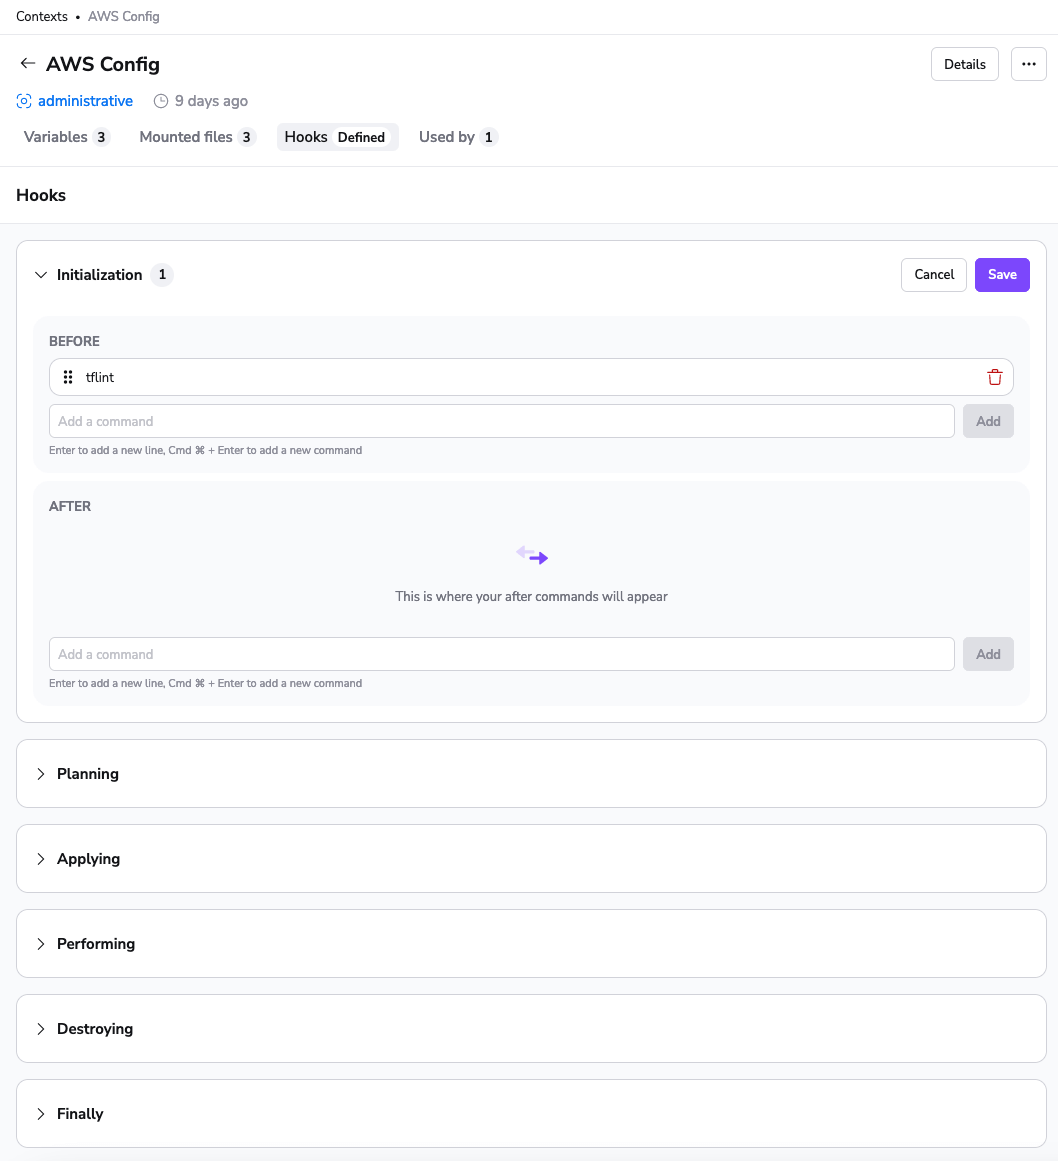
You can add a new command, adjust its position within the same section, or even move it to the other section using a simple drag-and-drop mechanism. Once you've made the necessary adjustments, click Save
Hooks run in the sequence they appear in the list, so the order matters.
Attaching and detaching contexts»
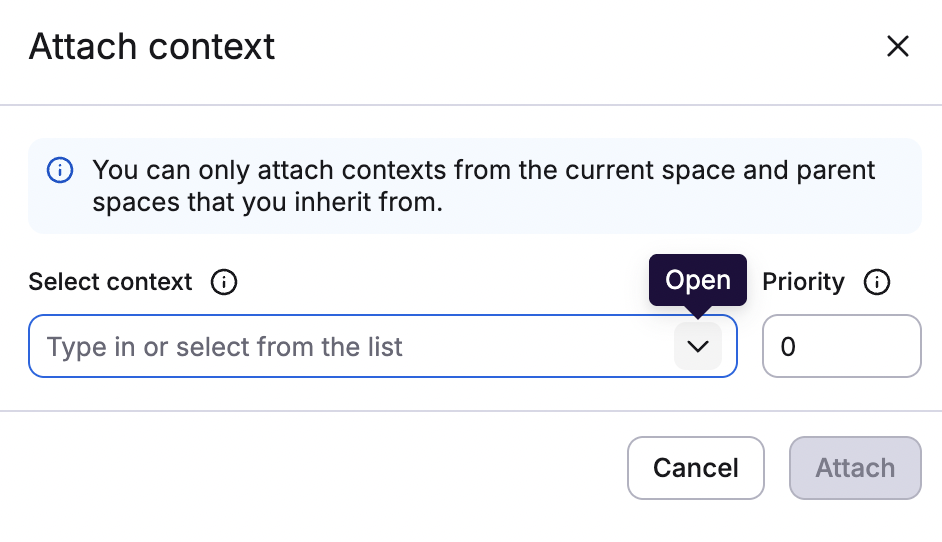
Navigate to Ship Infra > Stacks and click the name of the stack where you want to add or remove a context. Then navigate to the Contexts tab and click Attach context.
You'll see a dropdown with all the contexts available for attaching. Select the context, then enter its priority (lowest values go first).
Info
A context can only be attached once to a given stack, so if it's already attached, it will not be visible in the dropdown menu.
Attached contexts contribute to the stack environment.
You can edit a context's priority by clicking the three dots in the context's row, then click Edit priority. To detach a context, click Detach.

Auto-attachments»
The autoattach label automatically attaches contexts, policies and integrations to projects based on shared labels. This comes in handy, especially when multiple projects require the same context.
Instead of manually attaching a context to every stack or module, simply define an autoattach label on the context. For example, adding the label autoattach:XYZ to a context will automatically attach that context to all projects with the matching XYZ label.
Note
You only need the autoattach: prefix for the context label; the projects only need the specific label (XYZ) to activate the automatic attachment.
- Navigate to the context view and open the context details drawer.
- Define an
autoattachlabel to the context. For instance,autoattach:XYZ.
- Ensure that your projects have the matching label. In this case, it should be
XYZ.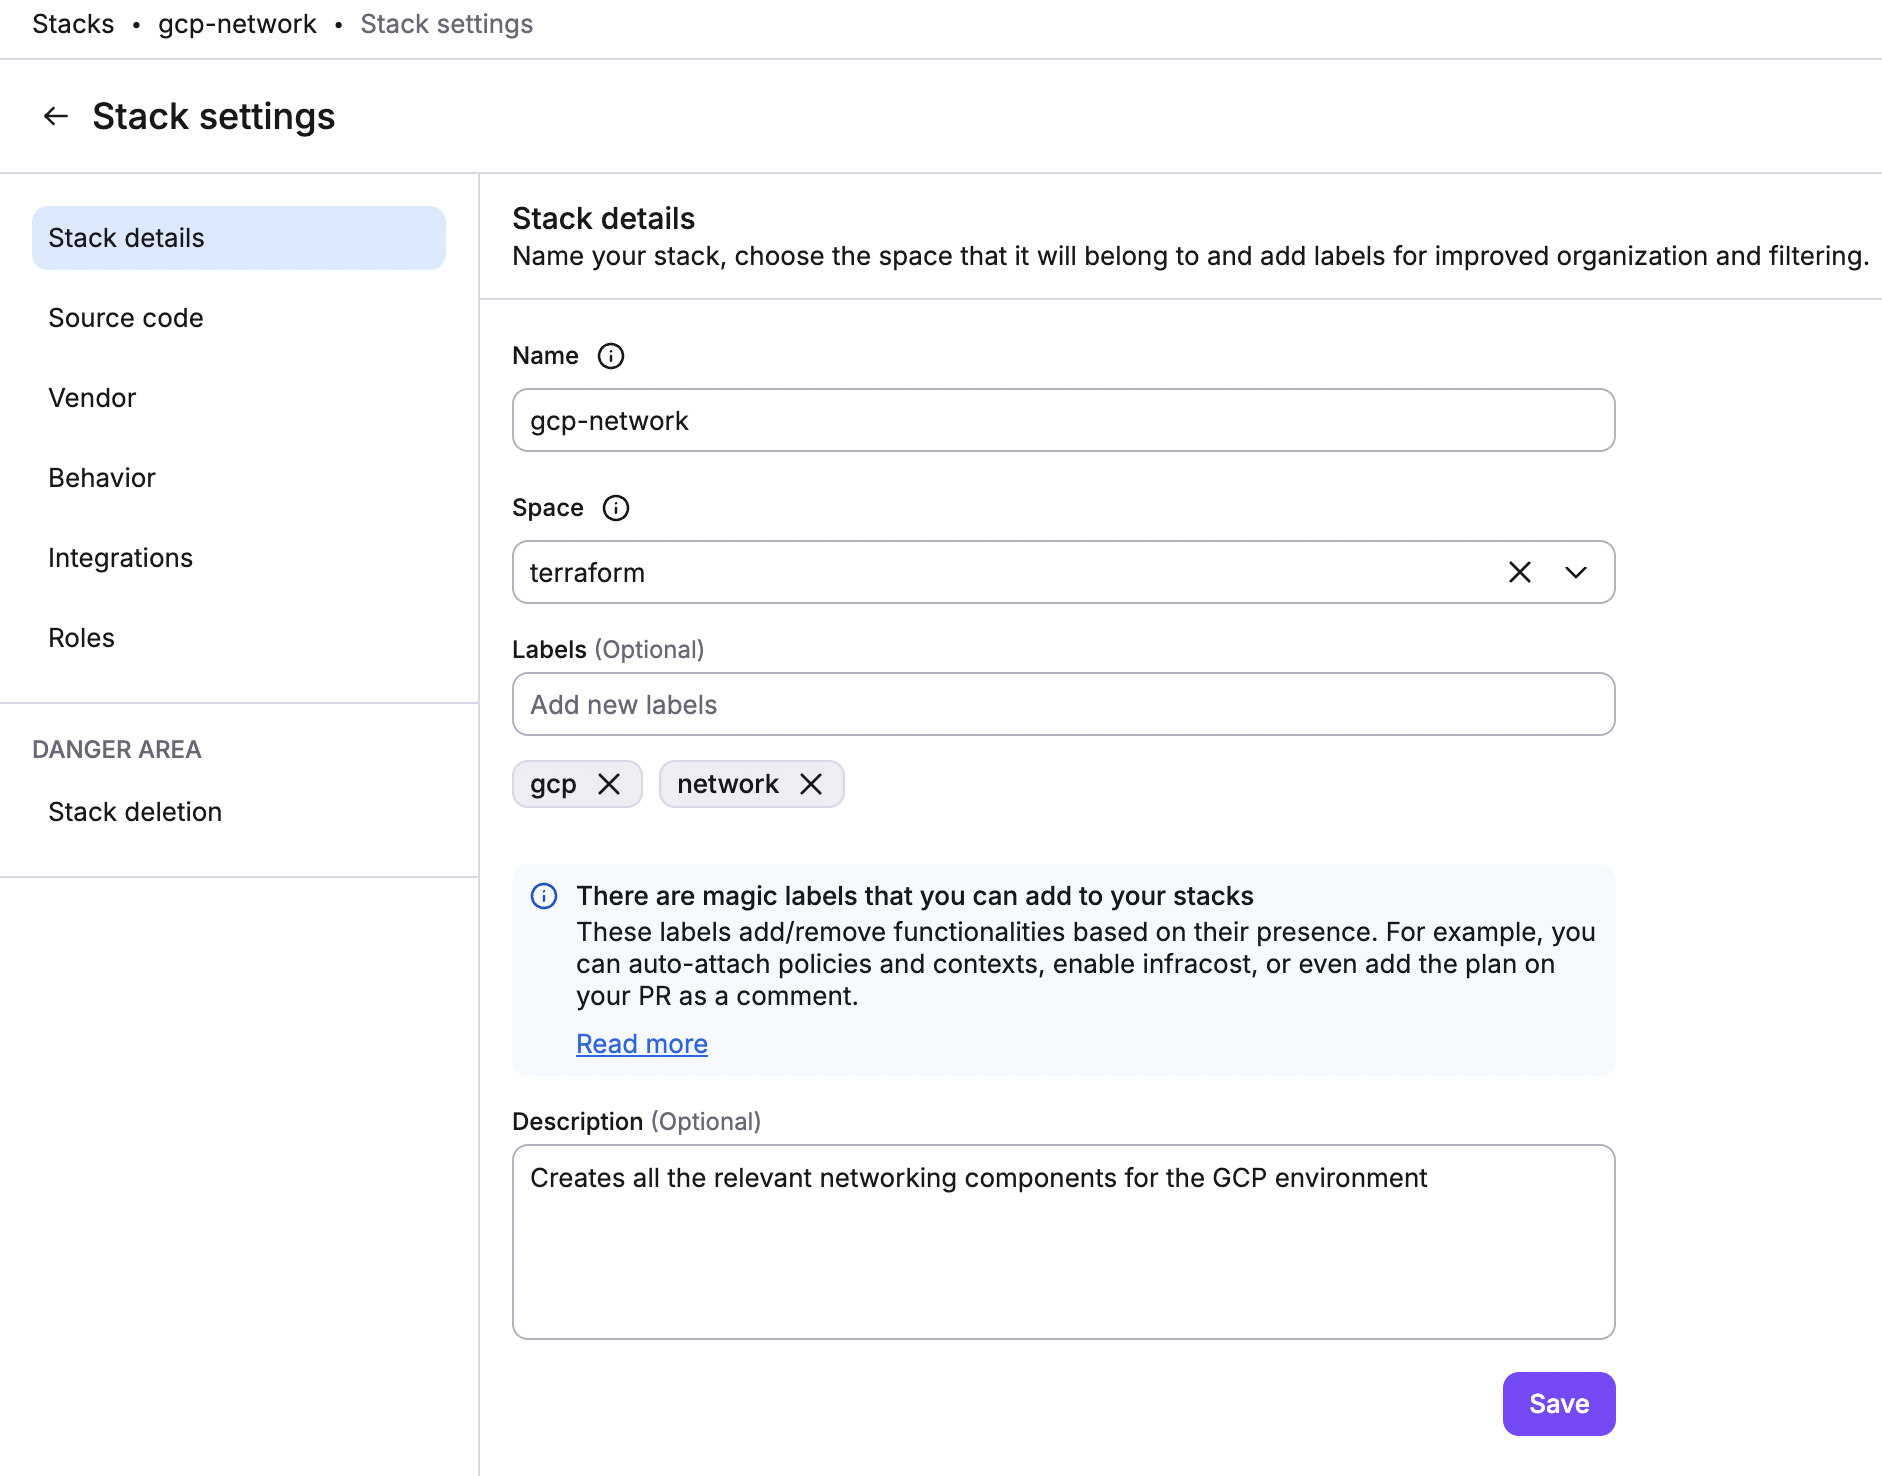
Once complete, Spacelift will automatically link the context to all projects sharing the XYZ label.
Tip
If you want to attach a context to all projects, you can use the autoattach:* label on the context. This will attach the context to all projects, regardless of their labels.
If the context is in a specific space, the autoattach:* label will only attach the context to stacks in that space and its child spaces.
On priority»
Priority is a property of the context-stack relationship. All the contexts attached to a stack are sorted by priority (lowest first), though values don't need to be unique. This ordering establishes precedence rules between contexts should there be a conflict and multiple contexts define the same value.
You might notice that there is no priority picker for auto-attached contexts. The highest priority for all configuration elements (environment variables, mounted files, and hooks) are:
- At the stack level.
- Explicitly attached contexts (based on set priorities).
- Auto-attached alphabetically for environment variables, mounted files, and after phase hooks (before phase hooks are attached reverse alphabetically).
Read and write permission for AWS and Azure integrations»
AWS and Azure integrations attached using the autoattach: label will have read-write permissions.
To restrict the permissions to only read or write, the autoattach_read: and autoattach_write: labels can be used instead. This only applies to AWS and Azure integrations.
Info
If autoattach_read: or autoattach_write: is combined with autattach:, then both read and write permissions will be granted.
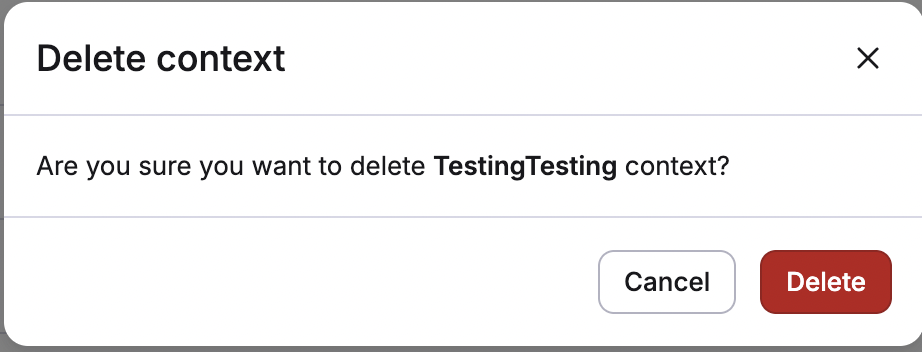
Deleting a context»
To delete a context, navigate to the Share code & config > Contexts tab. Click the three dots in a context's row, then click Delete.

As a safety measure, you'll be asked to confirm the deletion:
Warning
Deleting a context will also automatically detach it from all the projects it was attached to. Make sure you only delete contexts that are no longer useful. For security purposes we do not store historical data and remove the deleted data from all of our data storage systems.
Use cases»
We can see two main use cases for contexts, depending on whether the context data is supplied externally or produced by Spacelift.
Shared configuration elements»
You can use contexts to group configuration elements (external to Spacelift) that are meant to be shared between multiple stacks. For example, you could use contexts for cloud provider configuration, either for OpenTofu/Terraform or Pulumi. Instead of attaching the same values (some of which could be secret) to individual stacks, contexts allow you to define those once and then attach them to the stacks that need them.
A variation of this use case is collections of OpenTofu/Terraform input variables (for example, variables related to a particular system environment such as staging or production) that may be shared by multiple stacks. The collection of variables can specify:
- Environment name.
- DNS domain name or a reference to it (e.g. zone ID).
- Tags.
- References to provider accounts.
Instead of setting these on individual stacks, you can group them into a context and attach the context to eligible stacks.
Remote state alternative (Terraform-specific)»
You can use contexts to group data that are produced by one or more Spacelift stacks, as an alternative to the Terraform remote state. In this use case, contexts can serve as outputs for stacks that can be consumed by (attached to) other stacks. So, instead of exposing the entire state, a stack can use the Spacelift Terraform provider to define values on a context, either managed by the same stack or externally. Managing a context externally can be particularly useful when multiple stacks contribute to a particular context.
Info
To use the Terraform provider to define contexts or its configuration elements, the stack needs the right role attachments.
As an example of this use case, imagine an organization where shared infrastructure (VPC, DNS, compute cluster, etc.) is centrally managed by a DevOps team, which exposes it as a service to be used by individual product development teams. To be able to use the shared infrastructure, each team needs to address multiple entities generated by the central infra repo. In vanilla Terraform you would likely use the remote state provider, but that could expose secrets and settings the DevOps team would rather keep it to themselves. Using a context, however, allows the team to decide (and document) what constitutes their "external API".
The proposed setup for this use case would involve two stacks with roles: one to manage all the stacks, and the other for the DevOps team.
- The management stack would programmatically define the DevOps one, and possibly also its context.
- The DevOps team would receive the context ID as an input variable, and use it to expose outputs as
spacelift_environment_variableand/orspacelift_mounted_fileresources. - The management stack could then attach the context populated by the DevOps stack to other stacks it defines and manages.
Extending Terraform CLI Configuration (Terraform-specific)»
For some of our Terraform users, a convenient way to configure the Terraform CLI behavior is through customizing the ~/.terraformrc file.
Spacelift allows you to extend terraform CLI configuration through the use of mounted files.