OpenID Connect (OIDC)»
Hint
This feature is only available to paid Spacelift accounts. Please check out our pricing page for more information.
OpenID Connect is a federated identity technology that allows you to exchange short-lived Spacelift credentials for temporary credentials valid for external service providers like AWS, GCP, Azure, HashiCorp Vault etc. With OIDC, Spacelift can manage your infrastructure on these cloud providers without static credentials.
OIDC is also an attractive alternative to our native AWS, Azure and GCP integrations in that it implements a common protocol, requires no additional configuration on the Spacelift side, supports a wider range of external service providers and empowers the user to construct more sophisticated access policies based on JWT claims.
It is not the purpose of this document to explain the details of the OpenID Connect protocol. If you are not familiar with it, we recommend you read the OpenID Connect specification or GitHub's excellent introduction to security hardening with OpenID Connect.
About the Spacelift OIDC token»
The Spacelift OIDC token is a JSON Web Token that is signed by Spacelift and contains a set of claims that can be used to construct a set of temporary credentials for the external service provider. The token is valid for an hour and is available to every run in any paid Spacelift account. The token is available in the SPACELIFT_OIDC_TOKEN environment variable and in the /mnt/workspace/spacelift.oidc file.
Standard claims»
The token contains the following standard claims:
iss: The issuer of the token. This is the URL of your Spacelift account, for examplehttps://demo.app.spacelift.io, and is unique for each Spacelift account.sub: The subject of the token, which includes some information about the Spacelift run that generated this token.- By default, the subject claim is constructed as follows:
space:<space_id>:(stack|module):<stack_id|module_id>:run_type:<run_type>:scope:<read|write>. For example,space:legacy-01KJMM56VS4W3AL9YZWVCXBX8D:stack:infra:run_type:TRACKED:scope:write. Individual values are also available as separate custom claims. - You can customize the subject claim format to include additional information like the full space path. See Customizing the OIDC Subject Claim for details.
- By default, the subject claim is constructed as follows:
aud: The audience of the token. This is the hostname of your Spacelift account, for exampledemo.app.spacelift.io, and is unique for each Spacelift account.exp: The expiration time of the token, in seconds since the Unix epoch. The token is valid for one hour.iat: The time at which the token was issued, in seconds since the Unix epoch.jti: The unique identifier of the token.nbf: The time before which the token is not valid, in seconds since the Unix epoch. This is always set to the same value asiat.
Custom claims»
The token also contains the following custom claims:
spaceId: The ID of the space in which the run that owns the token was executed.callerType: The type of the caller, i.e. the entity that owns the run, eitherstackormodule.callerId: The ID of the caller, i.e. the stack or module that generated the run.runType: The type of the run, such asPROPOSED,TRACKED,TASK,TESTINGorDESTROY.runId: The ID of the run that owns the token.scope: The scope of the token, eitherreadorwrite.
Wildcards»
You can use wildcards like "*" in your OIDC token, as long as the wildcard matches the exact format of the sub claim: space:<space_id>:(stack|module):<stack_id|module_id>:run_type:<run_type>:scope:<read|write>.
For example, you could create a policy like this, which would cover most internal spaces, stacks, run types, and scopes:
1 2 3 4 5 | |
space:production-*: Covers any internal Space ID that begins with "production-".stack:*: Matches any stack inside that production space.run_type:*: Covers all types of runs (e.g., PROPOSED, TRACKED).scope:*: Covers both read and write scopes for that run.
Wherever you need tighter control of access or which spaces and stacks are affected, replace the wildcard with the exact value for that portion of the claim.
About scopes»
Whether the token is given read or write scope depends on the type of the run that generated the token:
The only exceptions are tracked runs whose stack is not set to autodeploy. In that case, the token will have a read scope during the planning phase, and a write scope during the apply phase. This is because a tracked run requiring a manual approval should not perform write operations before human confirmation.
The scope claim, as well as other claims presented by the Spacelift token, are merely advisory. It depends on you whether you want to control access to your external service provider based on the scope of the token or on some other claim like space, caller, or run type. In other words, Spacelift gives you the data and it's up to you to decide how to use it.
Custom Claims Mapping for Groups»
Some identity providers use non-standard claim names for user group membership. For example:
- AWS Cognito uses
cognito:groupsinstead of the standardgroupsclaim - Google Workspace does not include group membership in OIDC tokens by default
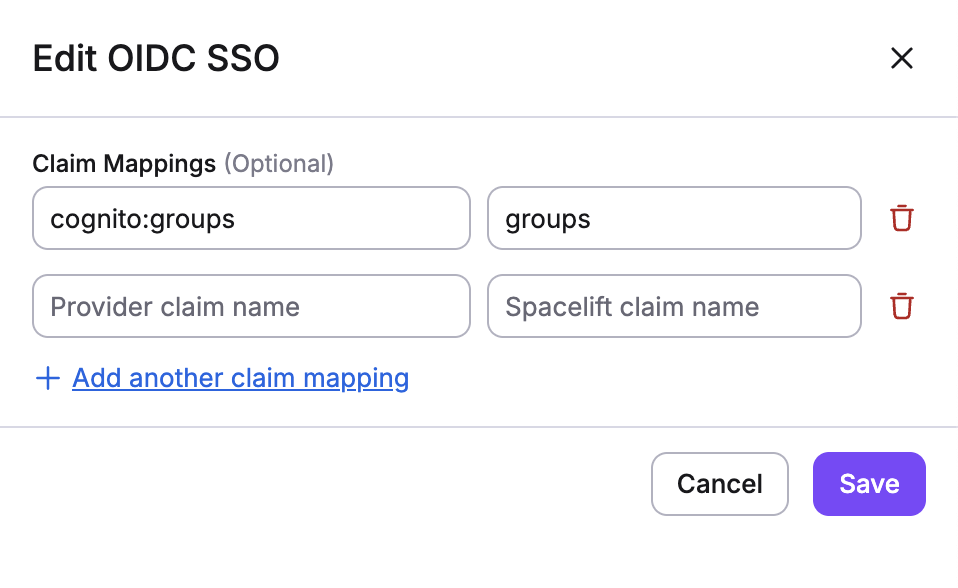
Spacelift allows you to map custom claims from your identity provider to the standard groups claim that Spacelift expects. This enables group-based access control even when your IdP doesn't follow the standard OIDC groups claim convention.
Configuring Custom Claims Mapping»
To configure custom claims mapping:
- Navigate to Organization settings → Single Sign-On
- In your OIDC configuration, look for the Custom claims mapping section
- Add a mapping for the
groupsclaim: - Claim name in IdP: Enter the custom claim name from your identity provider (e.g.,
cognito:groups) - Claim name in Spacelift: Enter
groups

Use the Spacelift OIDC token»
You can follow our guidelines to see how to use the Spacelift OIDC token to authenticate with:
- Customizing the subject claim - Learn how to customize the OIDC token subject format for hierarchical space authorization
- AWS
- GCP
- Azure
- HashiCorp Vault
In particular, we will focus on setting up the integration and using it from these services' respective Terraform providers.