Environment»
The Environment screen of a stack displays all configured environment variables, mounted files, and attached contexts. The main part of the view represents the synthetic outcome showing what your run will "see" when executed.
Environment variables»
Environment variables are key-value mappings available to all processes running in a given environment. With both Pulumi and OpenTofu/Terraform, environment variables are frequently used to configure providers. Additionally, when prefixed with TF_VAR_, environment variables are used as OpenTofu/Terraform input variables.
Info
Spacelift does not provide a dedicated mechanism for defining OpenTofu/Terraform input variables because the combination of TF_VAR_ environment variables and mounted files should cover all use cases.
Adding environment variables»
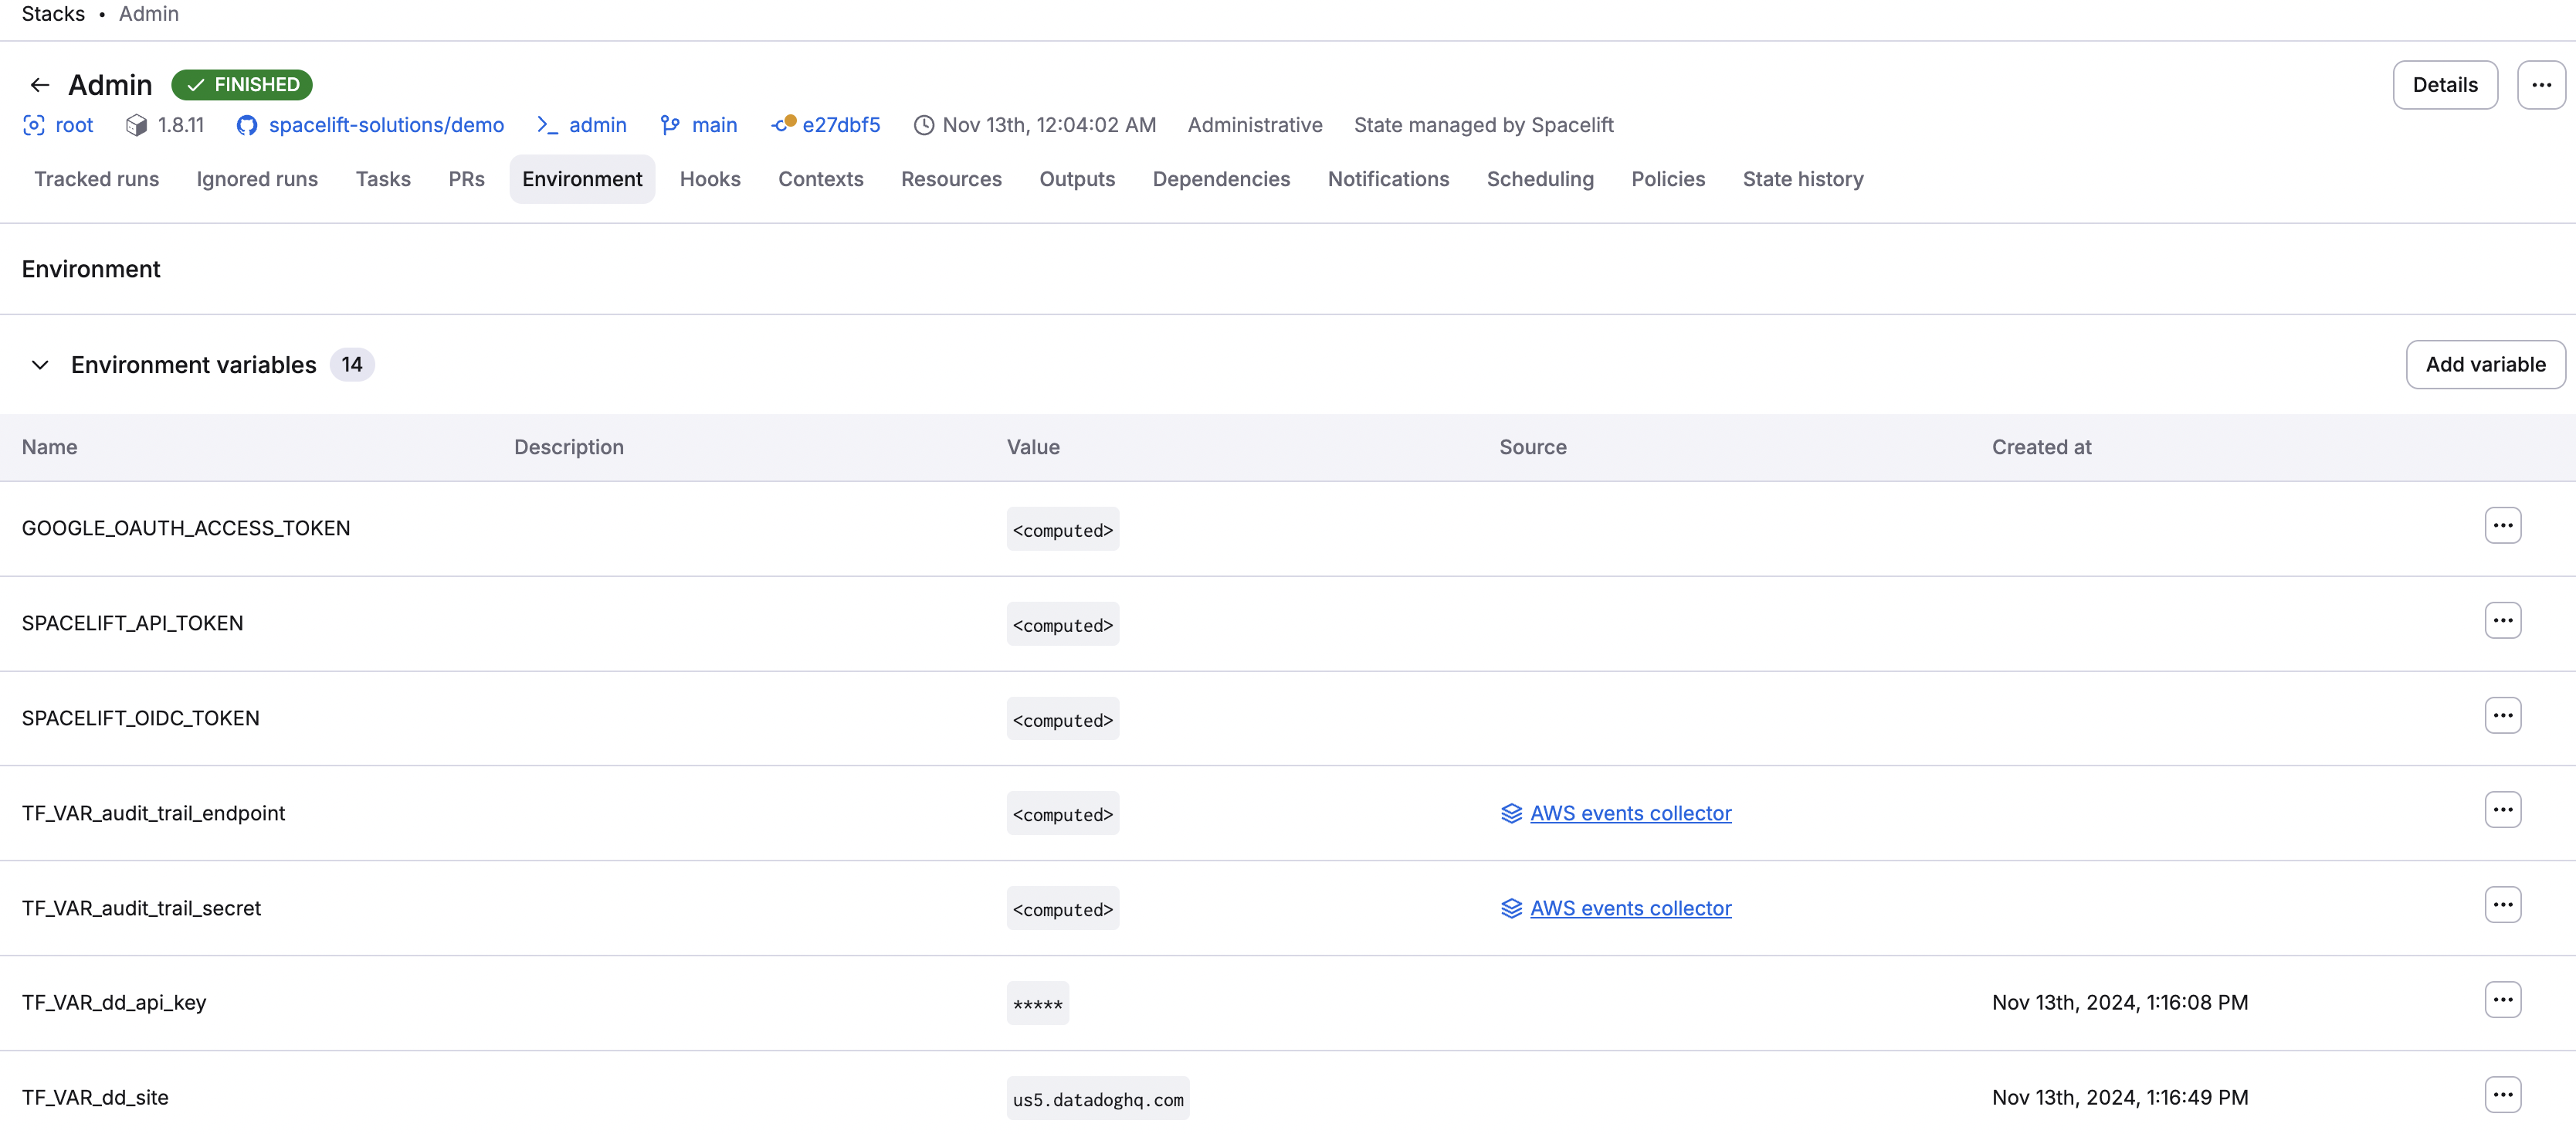
Adding an environment variable is straightforward:
- In the Ship Infra > Stacks tab, choose the stack to add a variable to.
- Navigate to the Environment tab.
- In the Environment variables section, click Add variable.
- Fill in variable details:
- Name: Enter a name for the variable.
- Value: Enter the variable's value.
- Mark as secret: Enable to mark the value as a secret, which will hide it in the Spacelift UI and via API.
- Description (optional): Enter a short (markdown-supported) description of the variable.
- Click Create.
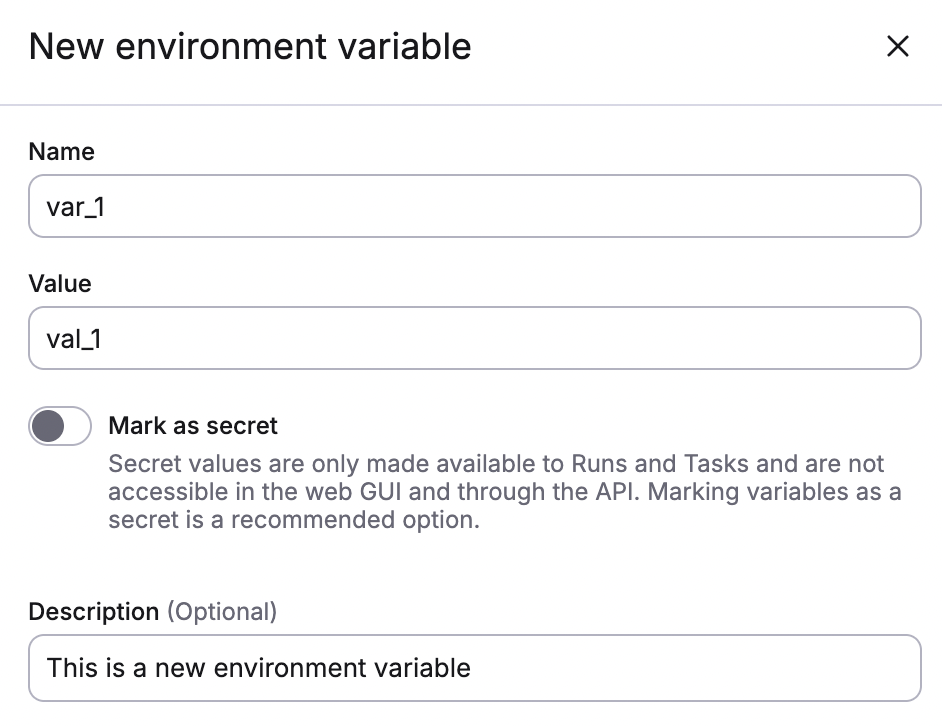
If you mark the variable as secret, you will see this:
You can edit or delete the variable by clicking the three dots next to it. You cannot change the name of a variable, just the value.

User-configurable variables»
Spacelift users can configure environment variables to alter their stack behaviors. For example, if you have a large number of resources (statefiles, modules, etc.) in a stack causing operation timeouts, you can configure:
SPACELIFT_STATE_ANALYTICS_UPLOAD_TIMEOUTSPACELIFT_STATE_OUTPUTS_UPLOAD_TIMEOUTSPACELIFT_MODULE_METADATA_UPLOAD_TIMEOUT
The value for these should be a duration string: one or more decimal numbers (which can include fractions) and a unit suffix, for example "300ms". Spacelift accepts these time units:
- ns
- us (or µs)
- ms
- s
- m
You can set the timeout values to a maximum of 10 minutes.
Environment variable interpolation»
Environment variables can refer to other environment variables using simple interpolation. For example, if you have an environment variable FOO with a value of bar you can use it to define another environment variable BAZ as ${FOO}-baz which will result in bar-baz being set as the value of BAZ. This interpolation is dynamically evaluated on the worker, and will work between environment variables defined in different ways, including contexts.
Computed values»
You may notice some environment variables marked as <computed>, which means that their value is only computed at runtime. These are not directly set on the stack but come from various integrations. For example, AWS credentials (AWS_ACCESS_KEY_ID and friends) are set by the AWS integration, and the SPACELIFT_API_TOKEN is injected into each run to serve a number of purposes.
You cannot set a computed value, but you can override it, which explicitly sets an environment variable on a stack that has the same name as the variable that comes from an integration. This is due to precedence rules.
You can override the computed value by clicking the three dots next to it.

When you click Override, you can replace the value computed at runtime with a static one.
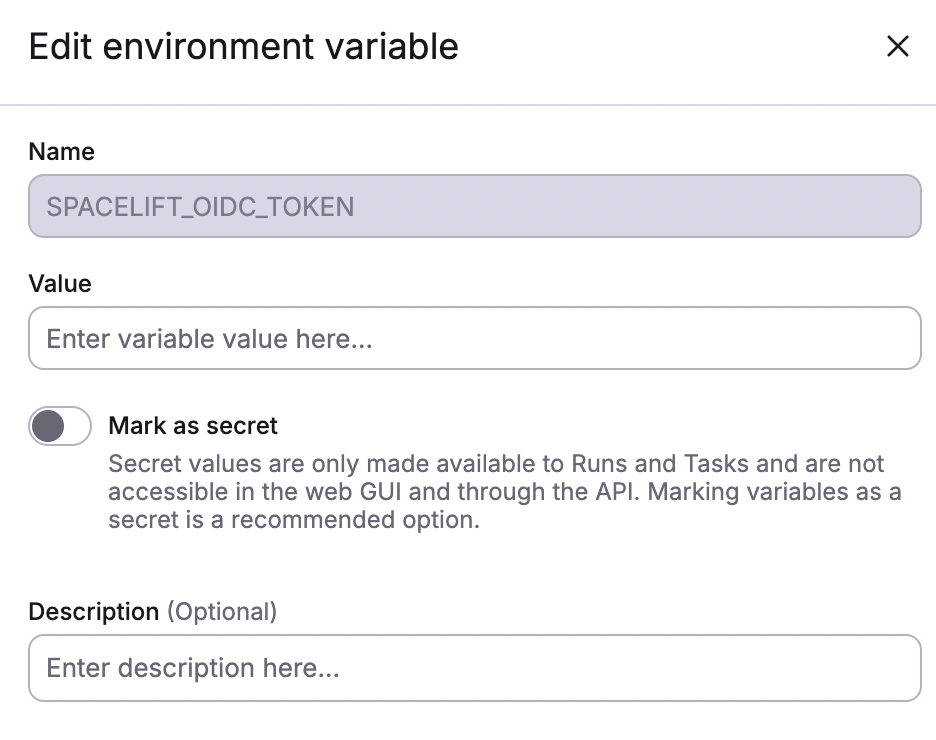
When you do so, the variable will become a normal, editable one. If you delete the variable, it will be replaced by the computed one. To remove a computed variable entirely, you will need to disable the integration that originally led to its inclusion in the list.
Spacelift environment»
The Spacelift environment section lists a special subset of computed values that are injected into each run and that provide some Spacelift-specific metadata about the context of the job being executed. These are prefixed so that they can be used directly as input variables to OpenTofu/Terraform configuration, and their names always clearly suggest the content:
| Environment Variable | Type | Description | Possible Values / Format |
|---|---|---|---|
| TF_VAR_spacelift_account_name | string | Spacelift account name. | <ACCOUNT_NAME>.app.spacelift.io |
| TF_VAR_spacelift_commit_branch | string | The commit branch in the Version Control System (VCS). | e.g., main, develop, feature/branch-name |
| TF_VAR_spacelift_commit_sha | string | The SHA of the commit in the Version Control System (VCS). | Git commit SHA (40-character hash, e.g., 0123456789abcdef0123456789abcdef01234567) |
| TF_VAR_spacelift_local_preview | boolean | Indicates if the local-preview feature is enabled for the stack. | true or false |
| TF_VAR_spacelift_project_root | string | The project root defined in the stack for the Version Control System. | Relative path (e.g., src/app) |
| TF_VAR_spacelift_repository | string | The name of the repository in the Version Control System (VCS). | Format: owner/repo |
| TF_VAR_spacelift_run_id | string | The unique Run ID for the current run. | UUID-like format (e.g., 01JKZAHVAQHFM8CC3EA5HWRMP1) |
| TF_VAR_spacelift_run_state | enum | The state of the current run. | QUEUED, CANCELED, INITIALIZING, PLANNING, FAILED, FINISHED, UNCONFIRMED, DISCARDED, CONFIRMED, APPLYING, PERFORMING, STOPPED, DESTROYING, PREPARING, PREPARING_APPLY, SKIPPED, REPLAN_REQUESTED, PENDING (DEPRECATED), READY, PREPARING_REPLAN, PENDING_REVIEW |
| TF_VAR_spacelift_run_trigger | string | The trigger information of the run. | e.g., Username, git commit, trigger policy, schedule identifier, API keys, reconciliation runs, modules |
| TF_VAR_spacelift_run_type | enum | The type of the current run. | PROPOSED, TRACKED, TASK, TESTING, DESTROY, PARSE |
| TF_VAR_spacelift_space_id | string | The ID of the Space that the stack belongs to. | e.g., root (for the default space) |
| TF_VAR_spacelift_stack_branch | string | The tracked branch for the stack. | e.g., main, production |
| TF_VAR_spacelift_stack_id | string | The ID of the stack. | e.g., myfirststack |
| TF_VAR_spacelift_stack_labels | string | The labels attached to the stack. | Comma-separated list (e.g., feature:add_plan_pr_comment,newlabel) |
| TF_VAR_spacelift_stack_labels_list | string | The labels attached to the stack expressed as list. | HCL list (e.g., ["feature:add_plan_pr_comment","newlabel"]) |
| TF_VAR_spacelift_workspace_root | string | The workspace root information. | Absolute path (e.g., /mnt/workspace) |
Info
Unless you know exactly what you're doing, we generally discourage overriding these dynamic variables.
Per-stage environment variables»
The Spacelift flow can be broken down into a number of stages, most importantly:
- Initializing: Prepare the workspace.
- Planning: Calculate the changes.
- Applying: Make the actual changes.
In this model, only the Applying phase makes any actual changes to your resources and your state and needs the credentials that support it. However, we often see users passing the same credentials to all stages. Depending on your flow, this can be a security issue because even if you manually review every job before it reaches the applying stage, the planning phase can do a lot of damage.
Environment variable prefixes»
Spacelift supports a more security-conscious approach by allowing users to define variables that are passed to read (in practice, everything except for applying) and write stages. By default, we pass an environment variable to all stages, but prefixes can be used to change the default behavior. For example:
ro_: An environment variable whose name starts with thero_(read only) prefix is only passed to read stages but not to the write (applying) stage.wo_: An environment variable whose name starts with thewo_(write only) prefix is only passed to the write (applying) stage but not to the read ones.
Combining the two prefixes makes it easy to create flows that limit the exposure of admin credentials to the code that has been thoroughly reviewed. The example below uses a GITHUB_TOKEN environment variable used by the GitHub Terraform provider variable split into two separate environment variables:

The first token will potentially be exposed to less-trusted code, so it makes sense to create it with read-only permissions. The second token will only be exposed to the reviewed code and can be given write (or admin) permissions.
A similar approach can be used for AWS, GCP, Azure, or any other cloud provider credentials.
Info
Newlines are not supported in environment variables. Alternatively, you can use mounted files, base64 encoding/decoding, or removing newlines where possible.
-backend-config prefixes»
The ro_/wo_TF_CLI_ARGS_init variable prefixes do not work for -backend-config.
OpenTofu and Terraform bake -backend-config values into plan files. When a customer sets ro_TF_CLI_ARGS_init with a role dedicated to the plan phase and wo_TF_CLI_ARGS_init with a role dedicated to the apply phase, the apply phase still uses the planner's backend config because tofu apply spacelift.plan reads it from the plan file, not the environment.
Manually re-running tofu init -reconfigure in a before_apply hook will not fix the issue because tofu apply <planfile> still reads backend config from the plan file, ignoring the current .terraform/ state.
As a workaround, use ro_/wo_AWS_ROLE_ARN + AWS_WEB_IDENTITY_TOKEN_FILE instead. The AWS SDK resolves environmennt variables at runtime, so they aren't captured in the plan file.
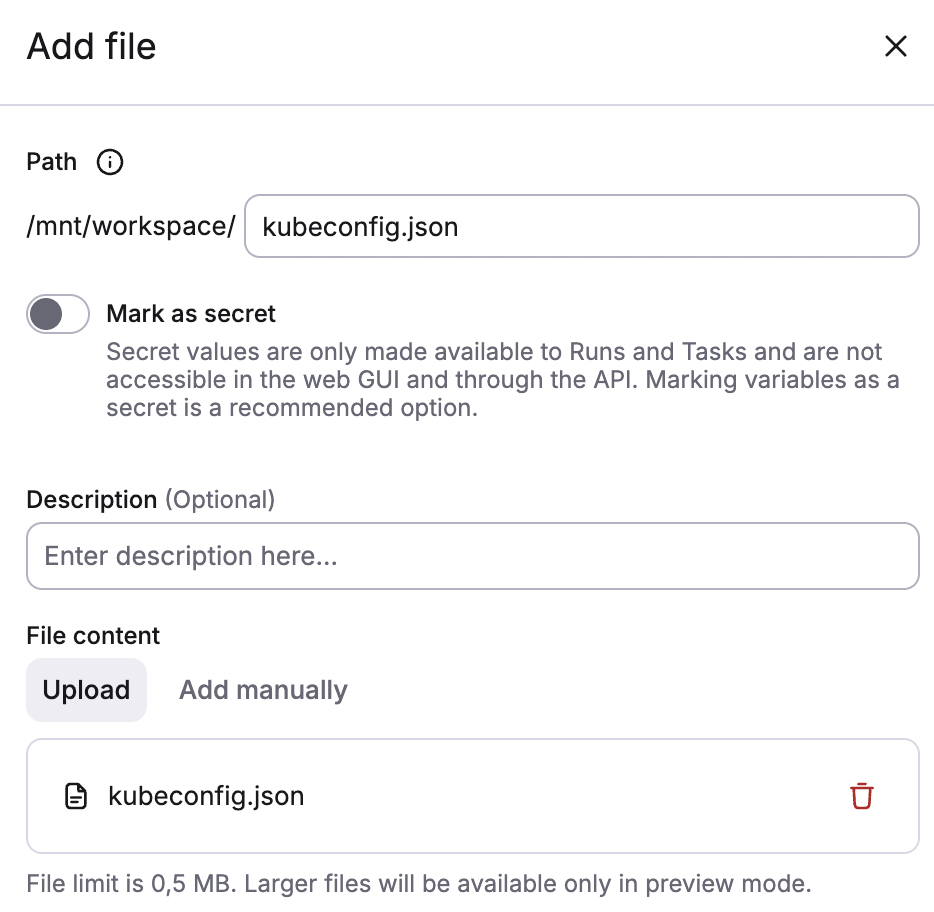
Mounted files»
Every now and then an environment variable is not what you need; you need a file instead. Terraform's Kubernetes provider is a great example, as one of the common ways of configuring it involves setting a KUBECONFIG variable pointing to the actual config file which needs to be present in your workspace as well.
Adding mounted files»
- In the Ship Infra > Stacks tab, choose the stack to add a mounted file to.
- Navigate to the Environment tab.
- In the Mounted files section, click Add file.
- Fill in file details:
- Path: Enter the path for the mounted file, which will begin with
/mnt/workspace/. - Mark as secret: Enable to mark the value as a secret, which will hide it in the Spacelift UI and via API.
- Description (optional): Enter a short (markdown-supported) description of the variable.
- File content: Click Upload to add a file from your device, or Add manually to manually enter the details of the mounted file.
- Path: Enter the path for the mounted file, which will begin with
- Click Create.
You can give your mounted file a different name than the uploaded file. You can also use / characters in the file path to nest it deeper in directory tree. For example, a/b/c/d/e.json is a perfectly valid file path.
Similar to environment variables, mounted files can have different visibility settings. Plaintext (non-secret) files can be downloaded from the UI or API, while secret files will only be visible to the run executed for the stack.
Info
Mounted files are limited to 2 MB in size. If you need to inject larger files into your workspace, make them part of the Docker runner image, or retrieve them dynamically using something like wget or curl.
Project structure»
When using mounted files, it's important to understand the structure of the Spacelift workspace. Every Spacelift workload gets a dedicated directory /mnt/workspace/, which also serves as a root for all the mounted files.
Your Git repository is cloned into /mnt/workspace/source/, which also serves as the working directory for your project, unless explicitly overridden by the project root configuration setting (either on the stack level or on in the runtime configuration).
Warning
Mounted files may be put into /mnt/workspace/source/ as well. It's a legitimate use case to dynamically inject backend settings or even add extra infra definitions. Just beware of path clashes, as mounted files will override your project source code in case of conflict.
Attached contexts»
We cover contexts in more depth in this article, but it's also crucial to understand how they interact with environment variables, mounted files set directly on the stack, and computed values.
Adding attached contexts»
- In the Ship Infra > Stacks tab, choose the stack to add a variable to.
- Navigate to the Contexts tab.
- Click Attach context.
- Fill in details:
- Select context: Enter the name of the context to attach.
- Priority: Enter a number value for the priority of the context. If multiple contexts are attached to a stack, they will be evaluated starting with the lowest priority.
- Click Attach.
Attached contexts that supply a variable's value are displayed as blue labels in the environment variable list.

Similar to computed values, you can override the attached value by clicking the three dots next to it, clicking Override, entering the new value, then clicking Save.
When you do so, the variable will become a normal, editable one. If you delete the variable, it will be replaced by the value defined by the context. To remove the context-provided variable entirely, you will need to detach the context.
Contexts can both provide environment variables as well as mounted files, and both can be overridden directly on the stack.
Variable visibility»
Environment variables and mounted files can be plain and secret. Here they are in the form for the new environment variable:
Functionally, the difference between the two is simple:
- Plain values are accessible in the web GUI and through the API.
- Secret values are only accessible to runs and tasks.
Additionally, plain mounted files can be downloaded from the web GUI or through the API, and secret can't.
Check a secret variable value»
While the content of secret (write-only) environment variables and mounted files is hidden in the GUI or API, the checksums are always available. If you have the value and want to check if it's the same value as the one set in Spacelift, you can compare its checksum with the one reported by Spacelift via the GraphQL API.
Info
Though all of our data is encrypted both at rest and in transit, secret (write-only) values have two extra layers of protection.